C2C Crochet Rectangle Tutorial

This guide provides comprehensive instructions on crafting a corner-to-corner (c2c) crochet rectangle in both "portrait" and "landscape" styles.
You might be wondering, "Why bother with a landscape rectangle?" While it's easy to turn a portrait blanket into a landscape view, this approach suits projects with single colors, striped bands, or self-striping yarn. However, for intricate color work using a c2c color graph, knowing how to create both landscape and portrait rectangles becomes essential, depending on your design.
Instuctions
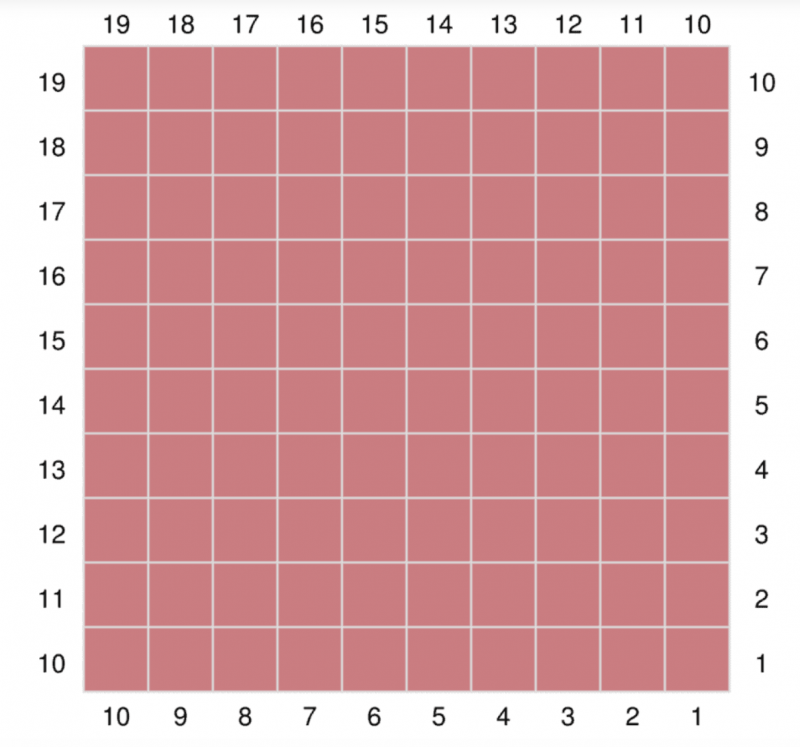
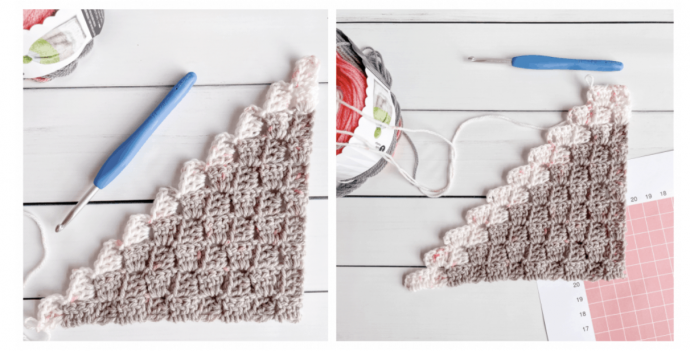
You can see by the above graph that once you complete row 10 you will begin decreasing on both sides of your pattern. This creates a square shape and you are now decreasing on both sides through the remainder of your graph.
The written instructions for a square shape in c2c crochet would look like the following:
← Row 1 [RS]: Pink 1 (1 square)
→ Row 2 [WS]: Pink 2 (2 squares)
← Row 3 [RS]: Pink 3 (3 squares)
→ Row 4 [WS]: Pink 4 (4 squares)
← Row 5 [RS]: Pink 5 (5 squares)
→ Row 6 [WS]: Pink 6 (6 squares)
← Row 7 [RS]: Pink 7 (7 squares)
→ Row 8 [WS]: Pink 8 (8 squares)
← Row 9 [RS]: Pink 9 (9 squares)
→ Row 10 [WS]: Pink 10 (10 squares)
Corner (begin decreasing)
← Row 11 [RS]: Pink 9 (9 squares)
→ Row 12 [WS]: Pink 8 (8 squares)
← Row 13 [RS]: Pink 7 (7 squares)
→ Row 14 [WS]: Pink 6 (6 squares)
← Row 15 [RS]: Pink 5 (5 squares)
→ Row 16 [WS]: Pink 4 (4 squares)
← Row 17 [RS]: Pink 3 (3 squares)
→ Row 18 [WS]: Pink 2 (2 squares)
← Row 19 [RS]: Pink 1 (1 square)
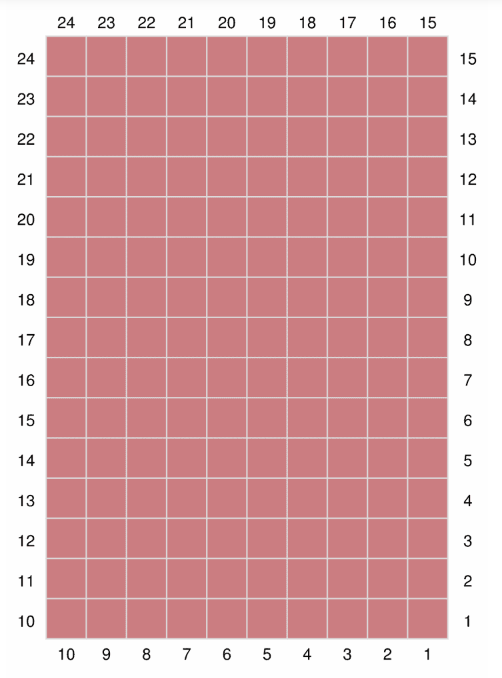
C2C Crochet Portrait Rectangle
The graph below will create a rectangle “portrait” shape. You can see that I will begin decreasing after row 10 on the left edge of my work, while continuing to increase on the top edge until I reach row 15.
In a written pattern the above rectangle graph will look like the following:
← Row 1 [RS]: Pink 1 (1 square)
→ Row 2 [WS]: Pink 2 (2 squares)
← Row 3 [RS]: Pink 3 (3 squares)
→ Row 4 [WS]: Pink 4 (4 squares)
← Row 5 [RS]: Pink 5 (5 squares)
→ Row 6 [WS]: Pink 6 (6 squares)
← Row 7 [RS]: Pink 7 (7 squares)
→ Row 8 [WS]: Pink 8 (8 squares)
← Row 9 [RS]: Pink 9 (9 squares)
→ Row 10 [WS]: Pink 10 (10 squares)
Corner (begin decreasing)
← Row 11 [RS]: Pink 10 (10 squares)
→ Row 12 [WS]: Pink 10 (10 squares)
← Row 13 [RS]: Pink 10 (10 squares)
→ Row 14 [WS]: Pink 10 (10 squares)
← Row 15 [RS]: Pink 10 (10 squares)
Corner (begin decreasing)
→ Row 16 [WS]: Pink 9 (9 squares)
← Row 17 [RS]: Pink 8 (8 squares)
→ Row 18 [WS]: Pink 7 (7 squares)
← Row 19 [RS]: Pink 6 (6 squares)
→ Row 20 [WS]: Pink 5 (5 squares)
← Row 21 [RS]: Pink 4 (4 squares)
→ Row 22 [WS]: Pink 3 (3 squares)
← Row 23 [RS]: Pink 2 (2 squares)
→ Row 24 [WS]: Pink 1 (1 square)
You will notice that you see corner instructions in two different places in your pattern – after row 10 and after row 15. You will increase on both sides through row 10 and after row 10 will increase on one side only through row 15.
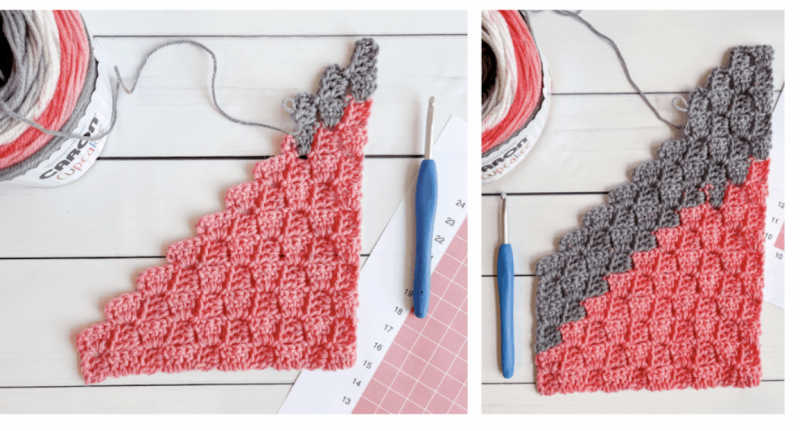
C2C Crochet Landscape Rectangle
The graph below will create a rectangle “landscape” shape. You can see that I will begin decreasing after row 10 on the top edge of my work, while continuing to increase on the left edge until I reach row 15.
The landscape c2c rectangle written instructions will look like the following:
← Row 1 [RS]: Pink 1 (1 square)
→ Row 2 [WS]: Pink 2 (2 squares)
← Row 3 [RS]: Pink 3 (3 squares)
→ Row 4 [WS]: Pink 4 (4 squares)
← Row 5 [RS]: Pink 5 (5 squares)
→ Row 6 [WS]: Pink 6 (6 squares)
← Row 7 [RS]: Pink 7 (7 squares)
→ Row 8 [WS]: Pink 8 (8 squares)
← Row 9 [RS]: Pink 9 (9 squares)
→ Row 10 [WS]: Pink 10 (10 squares)
Corner (begin decreasing)
← Row 11 [RS]: Pink 10 (10 squares)
→ Row 12 [WS]: Pink 10 (10 squares)
← Row 13 [RS]: Pink 10 (10 squares)
→ Row 14 [WS]: Pink 10 (10 squares)
← Row 15 [RS]: Pink 10 (10 squares)
Corner (begin decreasing)
→ Row 16 [WS]: Pink 9 (9 squares)
← Row 17 [RS]: Pink 8 (8 squares)
→ Row 18 [WS]: Pink 7 (7 squares)
← Row 19 [RS]: Pink 6 (6 squares)
→ Row 20 [WS]: Pink 5 (5 squares)
← Row 21 [RS]: Pink 4 (4 squares)
→ Row 22 [WS]: Pink 3 (3 squares)
← Row 23 [RS]: Pink 2 (2 squares)
→ Row 24 [WS]: Pink 1 (1 square)

You will notice that you see corner instructions in two different places in your pattern – after row 10 and after row 15. You will increase on both sides through row 10 and after row 10 will increase on one side only through row 15. This is the same as the portrait shaped rectangle. However, the decreases are on the opposite sides of the graph from the “portrait” style.
I hope you now feel comfortable making c2c crochet rectangles!