How to Corner-to-Corner Crochet (C2C) for Beginners


Do you want to learn how to corner-to-corner crochet (C2C)? This popular technique is a great way to make blankets, scarves, and other colorful crochet patterns. This crochet tutorial will show you how to get started with C2C crochet.
What is corner-to-corner crochet (C2C)?
If you’re new to crochet, you might be wondering what C2C crochet is. C2C stands for corner-to-corner crochet, a type of crochet pattern that’s worked diagonally from one corner to the opposite corner. This crochet technique is often used for making blankets and afghans, but it can also be used to make other items like scarves, shawls, and dishcloths.
Now that you know a little bit about C2C crochet, let’s learn how to do it!
The Basic Technique
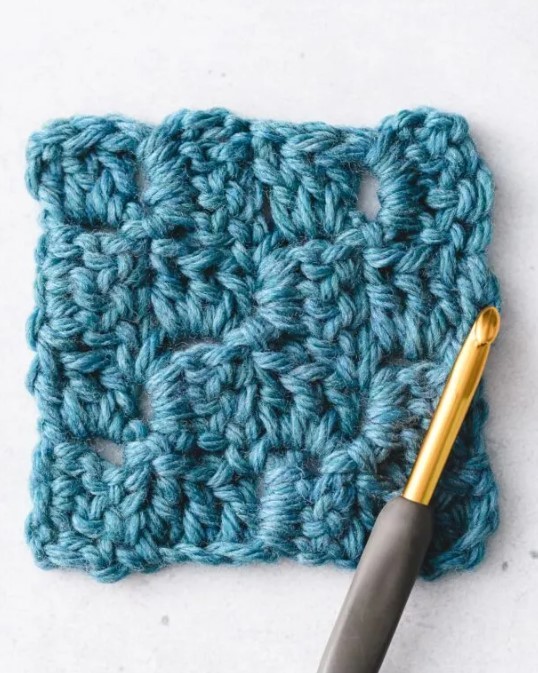
The C2C technique works a little differently than standard crochet: as the name implies, you start at one corner and work back and forth in diagonal rows until you reach the opposite corner.
Each diagonal row is made from several “tiles,” also called “squares” or “blocks.” And each tile is made from 3 double crochet stitches, plus their corresponding 3-ch turning chain.
You’ll start by making the first tile, which will become the bottom-right corner of your project. Then, you’ll work back and forth in diagonal rows, increasing on each side until you reach the widest part of the project.
Then, you’ll start decreasing the number of tiles per row as you make your way to the top-left corner of the project.
Don’t worry if this seems a little confusing at first. The hardest part is figuring out the first two rows – after that, you’ll be flying.
Getting Started with C2C crochet
Make your first swatch along with me, and you’ll get a good grasp of the basic concept. You’ll be ready for your first real C2C project with just a little practice.
Basic Skills to Know First
The C2C technique uses the same basic crochet stitches you might already know.
- ch – chain. Chain stitches are used in a turning chain to start each row.
- dc – double crochet. This is the main stitch used in C2C crochet.
- sl st – slip stitch. This stitch is used to join one tile to the next.
- ch-3-sp – chain 3 space. In C2C patterns, the ch-3-sp refers to the space between the turning ch-3 and 1st dc of the tile. I’ll point this out when we get to the step-by-step instructions below.
Other stitches
Less commonly, C2C is done with half double crochet stitches (hdc) instead of double crochet stitches (dc). This is known as mini C2C and is used to create smaller-scale designs. (But for this tutorial, we’ll stick with the more popular C2C technique done with double crochet.)
Supplies You’ll Need
Yarn. For this practice swatch, you don’t need anything special. Feel free to use scrap yarn from your stash. As always, I recommend that beginners practice with a smooth, light-colored yarn in a DK or worsted weight.
Crochet hook. Choose a hook that is the appropriate size for your yarn. For example, try a size H-8 (5.0 mm) hook if you’ve chosen a worsted weight yarn.
Stitch Marker. Stitch markers are handy for marking the first tile’s right side (front side). That way, you can quickly and easily identify the bottom right corner of your project
How to C2C Crochet
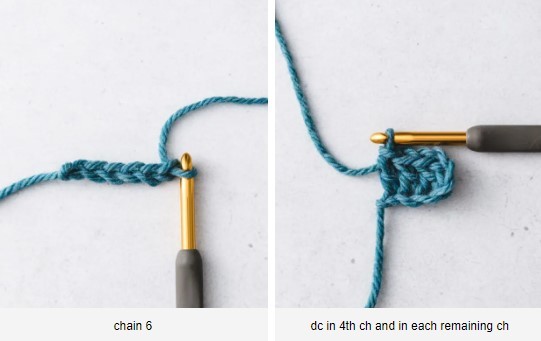
Step 1: Make the First Tile
Chain 6. Dc in the 4th chain from the hook. Dc in each of the two remaining chains. At this point, you’ll have a small block comprised of the ch-3 turning chain and 3 dc stitches.
This completes the first tile.
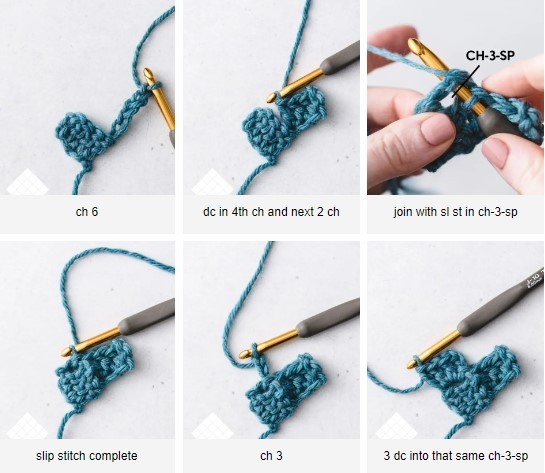
Step 2: Work Row 2
Turn your work. Row 2 is a WS (wrong side) row, and has two tiles. We’ll start Row 2 by increasing one tile.
Chain 6. Dc in the 4th chain from the hook. Dc in each of the two remaining chains. This completes the first tile of the second row.
Now, we’ll need to join this tile to the first tile we made. Find the ch-3-space created by the turning-ch-3 on the first tile. Slip stitch into the ch-3-sp from the previous row.
Then, make the next tile. Chain 3. Make 3 dc into that same ch-3-sp.
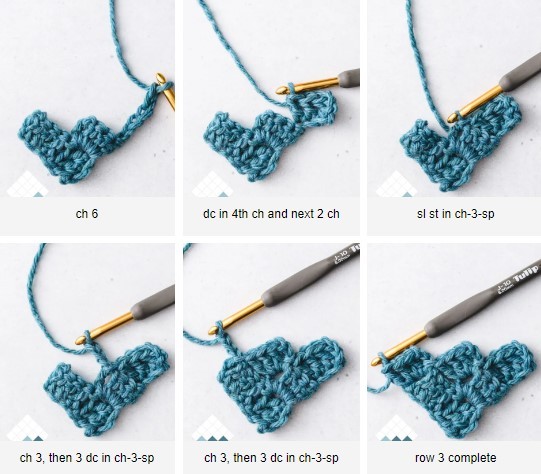
Step 3: Work Row 3
Turn your work. Work Row 3 in the same way that you worked Row 2. Row 3 is a RS (right side) row, and has 3 tiles. You’ll start by making a C2C increase.
Ch 6. DC in the 4th chain from the hook, and in each of the 2 remaining chains. (1 tile complete.)
Sl st into the ch-3-sp from the previous row. Ch 3, 3 dc into the same ch-3-sp. (2nd tile complete.)
Sl st into the ch-3 sp from the previous row. Ch 3, 3 dc into the same ch-3-sp. (3rd tile complete.)
Step 4: Continue Increasing
Continue following the same pattern. Turn your work at the beginning of each new row. You’ll increase one tile at the beginning of each row until you reach the widest part of your project. For reference:
C2C increase: Chain 6, dc in the 4th ch from the hook, and dc in each remaining chain.
Step 5: Start Decreasing
Once your project is as wide as you’d like, you’ll start each new Row with a C2C Decrease.
First Decrease Row: Instead of chaining 6 to make a new tile, we’ll slip stitch across the last tile in the previous row. The slip stitches will move our yarn across the tile without adding height. Then, we’ll chain 3 and work the next tile.
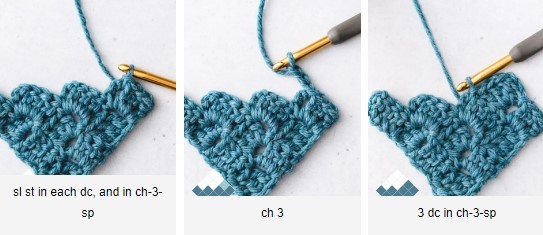
Slip stitch in each dc across, and slip stitch into the ch-3-space.
Chain 3, and work 3 dc into the ch-3-sp of the previous row. (This completes the first tile of this row.)
Repeat this pattern across the row.
Last tile of the row: Work the last tile of the row, and slip stitch into the next ch-3-space. Don’t chain 3 to start a new tile – instead, turn your work to start the next decrease row.
Step 6: Continue working decrease rows.
Continue working row by row, until you come to the last row.
C2C Decrease:
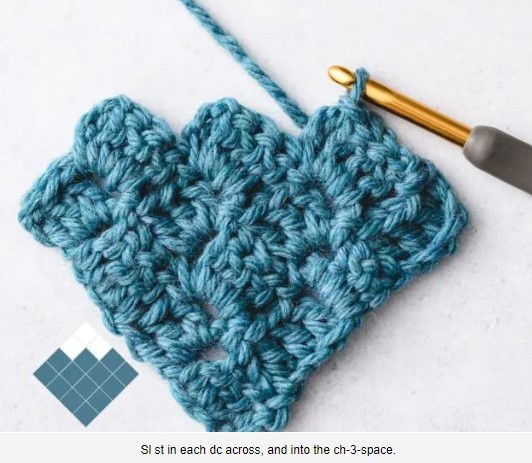
Slip stitch in each dc across, and slip stitch into the ch-3-space.
Chain 3, and work 3 dc into the ch-3-sp of the previous row. (This completes the first tile of this row.)
Repeat this pattern across the row.
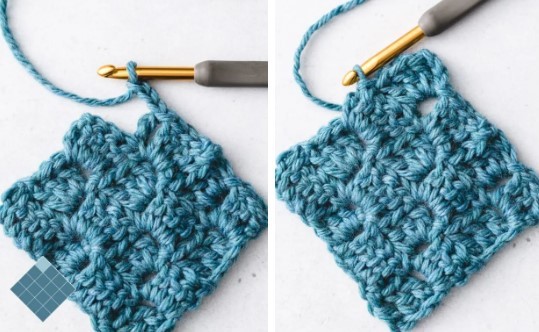
Step 6: Work the Last Tile
When you come to the last tile, work:
Slip stitch in each dc across, and slip stitch into the ch-3-space.
Ch 3, and work 3 dc into the ch-3-sp of the previous row. (This completes the first tile of this row.)
Now that you’ve finished your C2Cs, it’s time to weave in the ends.
How to Weave in Ends for C2C Crochet
Weaving in the end for a C2C project is similar to weaving in the ends for any other crochet project. The goal is to weave the ends in a way that secures the yarn tails without creating too much bulk.
To weave in the ends:
- Cut the yarn, leaving a six-inch-long tail.
- Thread tail onto a tapestry needle.
- Weave the needle in and out of the stitches on the back side of the work, being careful not to pull too tight.
- When you get to the end, cut the yarn close to the work.
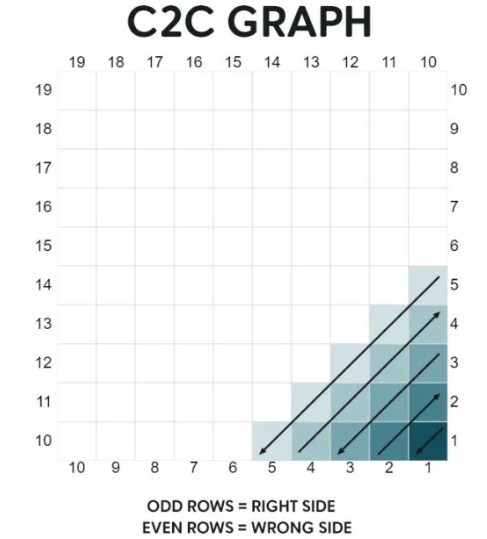
Reading C2C Graphs
Some C2C crochet patterns are given as a written pattern with fully spelled out instructions, but sometimes the pattern is given as a c2c graph.
C2C graphs (sometimes called C2C charts) are grids that show you which yarn colors to work in each tile. Each square in the chart represents one C2C tile.
C2C graphs are most commonly worked from the bottom-right corner to the top-left corner. That means you’ll start your design with the bottom-right tile, and work your way across the chart in diagonal rows, until you reach the top-left tile.
The graph will have numbers along all four sides to help you keep track of what row you’re on. I like to draw diagonal lines through the chart as I finish each row to help me keep track of what I’ve already crocheted. Crossing off the rows helps me stay a little more organized so I don’t lose my place.
Changing Colors in C2C Crochet
One of the things that makes C2C crochet so fun is that you can easily change colors to create graphic designs.
There are a few different ways that you can change colors on C2C crochet. But for the most part, you’ll change colors just like you would in any other crochet project.
To change colors in crochet:
- Work the last stitch in the old color, but stop crocheting right before you pull through the last two loops of the stitch. Drop the old color of yarn.
- Pull the new color of yarn through the last two loops on the hook. Then continue crocheting with the new color.
In C2C, you’ll most often switch colors right before you complete the third double crochet stitch of the tile. Then you’d slip stitch to the ch-3-sp with the new color, and continue with the pattern.