Crochet Circle Insertion Tutorial

Are you looking to add a touch of whimsy and intricacy to your crochet projects? Look no further than the enchanting world of crochet circle insertion. This technique allows you to incorporate circular motifs into your designs, creating eye-catching patterns and adding depth and dimension to your work.
Crochet circle insertion involves seamlessly attaching circular motifs into a base fabric, such as a garment or accessory, to create a stunning visual effect. The circles can be of varying sizes, colors, and textures, allowing you to unleash your creativity and personalize your projects to your heart's content.
In this tutorial, we will delve into the art of crochet circle insertion, guiding you step by step through the process. We'll show you how to create the circular motifs, prepare the base fabric, and neatly attach the circles to achieve a seamless integration. Along the way, you'll learn valuable tips and tricks to ensure clean edges, maintain consistent tension, and bring your circle insertion projects to life.
So, grab your crochet hook, choose your favorite yarn, and let your imagination soar as we explore the captivating world of crochet circle insertion. Get ready to infuse your projects with a touch of magic and transform them into true works of art.
Instructions
Chain stitch – ch
Slip stitch – sl.st
Double crochet / Single crochet – dc / sc
Treble / Double crochet – tr / dc
Cluster of 5 tr/dc – cl. : work in the same space 5 incomplete tr/dc, yarn over hook and pull it through all loops on hook.
Picot of 3ch - picot
Stitch - st
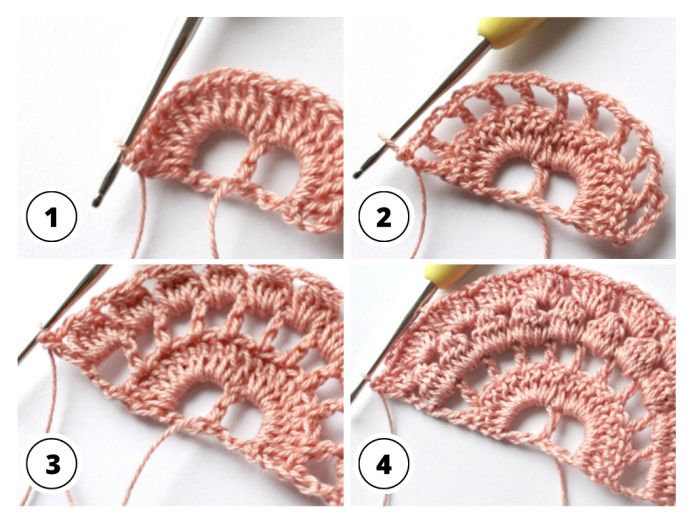
Make 9 foundation chains.
Row 1: 1tr/dc + 5ch + 1tr/dc in last ch, turn.
Row 2: 3ch, 9 tr/dc in space of 5ch, 1 tr/dc in tr/dc below, 9 tr/dc in net space of 8ch, 1 tr/dc in 4th ch, turn.
Row 3: 5ch, *skip 1st, 1tr/dc in next, 2ch; rep from* 8 times, 1tr/d cin 3rd ch, turn.
Row 4: 4ch, * 1cl. in space of 2ch, 3ch; rep from* 8 times, 1cl. in space of 2ch, 1ch, 1tr/dc in 3rd ch, turn.
Row 5: 3ch, 2tr/dc in space of 1ch, *1ch, 5tr/dc in space of 3ch; rep from* 8 times, 1ch, 2 tr/dc in space of 4ch, 1 tr/dc in 3rd ch, turn.
Row 6: 5ch, * 1tr/dc in space of 1ch, 5ch; rep from * 8times, 1 tr/dc in space of 1ch, 2ch, 1 tr/dc in 3rd ch.
Row 7: 2ch, 3dc/sc in space of 2ch, 4dc/sc + 1 picot + 3dc/sc in space of 5ch, * 7 dc/sc in next space of 5ch; rep from* 6 times, 4dc/sc + 1 picot + 3dc/sc in next space of 5ch, 3dc/sc in space of 5ch, 1dc/sc in 3rd ch. Fasten off.
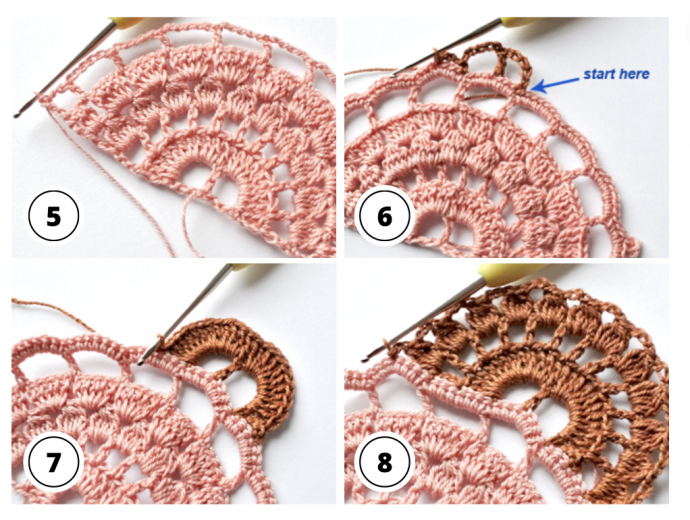
Row 8:
For next wheel connect the thread between 31st and 32nd dc/sc and work 6ch, 1 tr/dc in 4th st, 6ch, work 1dc/sc between 38th and 39th, 3ch, skip 2st, sl.st in next, turn.
Row 9: 11 tr/dc in space of 6ch, 1 tr/dc in tr/dc below, 11 tr/dc in next space of 6ch, skip 3dc/sc of first wheel and work sl.st in next st, 3ch, skip 2st, sl.st in next, turn.
Row 10: *2ch, skip 1st, 1tr/dc in next; rep from* 10 times, 2ch, skip 3dc/sc of first wheel and work sl.st in next st, 3ch, skip 2st, sl.st in next, turn.
Row 11: 1ch, * 1cl. in space of 2ch, 3ch; rep from* 10 times, 1cl. in space of 2ch, 1ch, skip 3dc/sc of first wheel and work sl.st in next st, 3ch, skip 2st, sl.st in next, turn.
Row 12: 2 tr/dc in space of 1ch, *1ch, 5tr/dc in space of 3ch; rep from* 10 times, 1ch, 2 tr/dc in space of 1ch, skip 3dc/sc of first wheel and work sl.st in next st, 3ch, skip 2st, sl.st in next, turn.
Row 13: 2ch, * 1tr/dc in space of 1ch, 5ch; rep from *10 times, 1 tr/dc in space of 1ch, 2ch, skip 3dc/sc of first wheel and work sl.st in next st, turn.
Row 14: work 2 dc/sc + 1picot + 3dc/sc in space of 2ch, 4dc/sc + 1 picot + 3dc/sc in space of 5ch, 4dc/sc + 1 picot + 3dc/sc in next space of 5ch, * 7 dc/sc in next space of 5ch; rep from* 6 times, rep 2 times: 4dc/sc + 1 picot + 3dc/sc in next space of 5ch; 4dc/sc + 1 picot + 1dc/sc in space of 2ch. Fasten off.
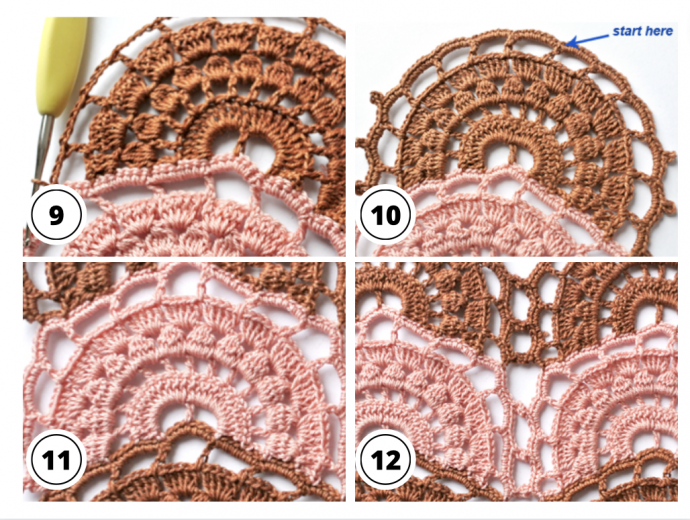
Repeat rows 8 - 14 until you have reached your desired length.
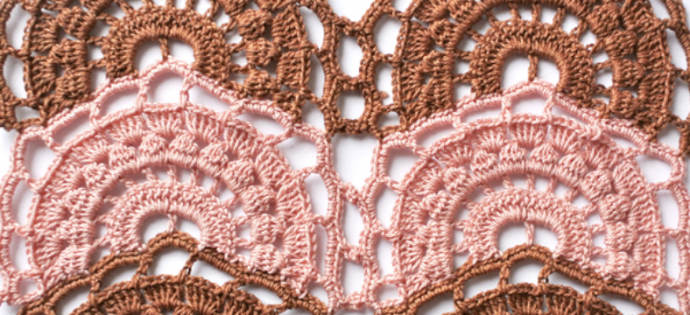
If you'd like to get wide openwork pattern just make the another one edging. Join it to first edging through picot.
This color combination has simple wave effect: change the color of yarn for each of the next wheel.