Guide to Crochet & Knitting Gauge

Here we go: the importance of gauge! Today I’d like to talk about gauge: what it is, how to do it, and why we should not skip the step of making a gauge swatch.
I know, it’s extra work. And I know, you'd rather skip it, right? I spent a few years crocheting before I even knew what crochet gauge was. Now, I understand taking an extra 15 minutes before I start my project can save me hours of frustration, crying, or worse, quitting. If you’re like me of the past, you find yourself just kind of skipping over that part so that you can start your project. But gauge is actually very important for many projects, believe me, it’s your best insurance to avoid finishing an ill-fitting sweater. So let’s get to how to do this important step and never miss it in future!
What is gauge?
Gauge simply describes the number of stitches per inch on the horizontal and the number of rows per inch on the vertical of any project you work on with your yarn and hook.
The longest journey begins with the first step, and knowing the meaning and importance of gauge is your first step to crocheting a new project that comes out the correct size. While gauge may not be critical for practice swatches or basic pattern formulas where finished size isn’t important (for projects like blankets, towels and coasters where size isn’t a deal breaker for you, a gauge swatch isn’t mandatory in my opinion), it is essential when making any garment or accessory that must fit properly. To ignore the gauge given in the pattern directions may result in your making a sweater that would fit an ogre or a hat that is too small for a newborn.
Most patterns will list the gauge in the instructions of the pattern and generally use 4 inches as a good square. If you’re not using a written pattern, sample gauge can often be found on the label for the yarn you are using.
Making a gauge swatch
Most gauge instructions in a pattern are listed near hook size and yarn weight. It’s best to begin with the yarn and hook recommended in your pattern. Similarly, on a ball or skein of yarn, it is often listed near the bottom of the label next to the hook. If the yarn is no longer available, try to find one with a similar weight and fiber content as the original yarn. Remember that the pattern is only a starting point. Your tension may differ from that of the designer’s, and you may therefore need to change your hook size to achieve the correct gauge.
It can look something like this:
15 stitches and 19 rows = 4 inch (this refers to a 4″ x 4″ square) using an 8 mm hook
# stitches and # rows = 4 inches in single crochet
Gauge: # stitches and # rows = 4 inches (10.16 centimeters)
Many patterns tell you to make a 4" × 4" swatch to measure gauge. If you knew how many stitches to chain to get 4 inches, why would you need to swatch?! Start a chain and when it measures just longer than 4 inches you can start working your first row of stitches.
The 4" × 4" measurement is an approximation meant to encourage you to swatch bigger, not smaller. The larger the swatch, the more accurate a measurement of your gauge you will get.
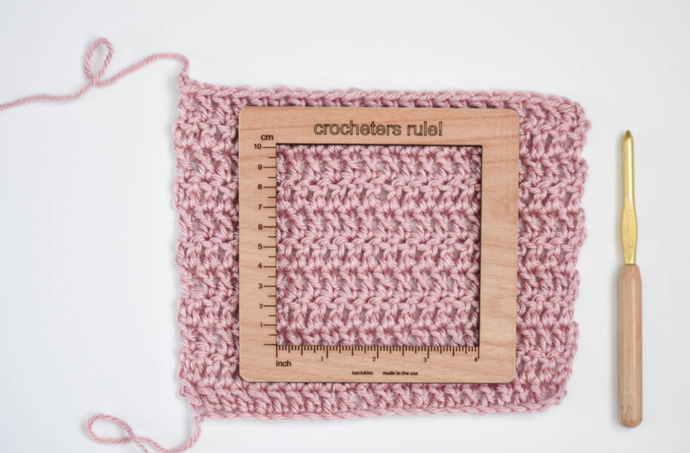
Measuring Gauge
Instructions
1. Crochet a swatch that measures 4" × 4". You don’t need the swatch to be exactly this size, but the larger, the better.
2. Count the number of stitches over 3" and divide by 3. This gives you the number of stitches per inch.
3. Now lay the ruler over the swatch vertically and count the number of rows over 3"; again divide by 3 to get the number of rows per inch.
4. Soak, wash, and block your swatch in the same way you will be finishing your actual item, then again measure the stitches and rows per inch. This is an essential step, because the prewashed swatch does not provide your finished gauge. Compare the two measurements to see how much, or how little, the yarn changes after blocking.
Knit Gauge
Check the pattern requirements first. Does the pattern give the gauge in stockinette stitch or in the pattern stitch? Whatever the pattern designer used, you need to do the same thing. If the gauge is in stockinette, cast on at least 4 inches worth of stitches (for instance, four times the number of stitches recommended as the gauge for that yarn) plus 6 more stitches; then when you knit the swatch, you can knit the first and last 3 stitches on each row. This gives you a border of garter stitch (knitting every row), and your swatch will lie flat. For this same reason, I always start and end each swatch with 6 to 8 rows of garter stitch.
If the gauge measurements are in a pattern stitch, it will usually say “X number of stitches over 4 inches in pattern,” and you can use that number to cast on. If it gives pattern gauge in stitches per 1 inch, multiply that number by 4. For both methods, I add extra stitches and rows to create a garter-stitch border. A flat swatch is much easier to measure than one that curls.
Crochet Gauge
Gather the same yarn and crochet hook size that is called for in the directions. Crochet enough chain stitches for a 5" wide swatch, then work in the pattern stitch specified in the directions for 5". Do not fasten off. Place the swatch on a hard, flat surface. For stitches across, place a ruler, tape measure or stitch gauge horizontally on the swatch. Position the 1" mark even with a whole stitch, then working toward, the right count 4" worth of stitches. If you have more stitches to the inch/centimeter than is recommended, remake the swatch using a hook that’s one size larger. If you have fewer stitches than is stated, try again with a smaller hook.
Tips for Getting Accurate Gauge
1) When you measure, lay your swatch on a flat, hard surface, such as a tabletop. Non-flat surfaces can give you a false reading.
2) Don’t ever stretch your swatch. Don’t pull or push your swatch to get it close to the gauge you want. This, too, will give you a false reading and result in your finished item having the wrong measurements.
3) Measure only along the center stitches and rows of your swatch, as edge stitches can be distorted.
In the end of the day, swatches are also great records of projects you’ve completed, especially if you gift most of your work! Feel free to share any of your thoughts about gauge in the comments section! Do you skip the gauge step?