Crochet Pumpkin Headband Pattern


As the leaves turn golden and the air gets crisp, there’s nothing quite like adding a touch of autumn magic to your wardrobe.
I’m thrilled to share with you my latest crochet pattern: an adorable crochet pumpkin headband in 3 sizes! This adorable accessory features plump, puffy pumpkins dotted across a soft, creamy base, all brought together with a modern twisted front for that extra stylish flair.
This crochet pumpkin headband pattern is quick, fun, and perfect for embracing the harvest season. Inspired by pumpkin patches and cozy fall vibes, the Pumpkin Patch Twist Headband uses simple stitches to create those irresistible 3D pumpkins that pop right off the fabric.
In just a couple of hours, you’ll have a handmade headband that’s sure to earn compliments wherever you go! What are you waiting for? Grab your hook, some yarn, and let’s bring the pumpkin patch to life!
Materials
- Caron Simply Soft Tweeds, Weight 4 / Medium (97% acrylic / 3% viscose)
- Color Off White (MC)
- Adult 1.5 oz / 72 yards
- Caron Simply Soft, Weight 4 / Medium (100% acrylic)
- Color Pumpkin
- Adult 0.5 oz / 27 yards
- Color Dark Sage
- Adult 0.2 oz / 11 yards
- Crochet hook size H (5 mm)
- Stitch Marker
- Scissors
- Tapestry Needle
Approximate finished size
- Toddler: Approximately 17” circumference x 3” height
- Child: Approximately 19” circumference x 4” height
- Adult: Approximately 21” circumference x 4” height
Gauge
- 14 dc sts x 13 rows = 4” x 4”
Abbreviations
- MC = main color
- ch(s) = chain(s)
- RS = right side
- dc = double crochet
- sl st = slip stitch
- sc = single crochet
- bob = bobble
- hdc = half double crochet
- sk = skip
- CL = cluster
Special Stitches
Bobble: (Yo, insert hook into stitch, yo, pull up a loop, yo and pull through 2 loops on hook) three times (4 loops on hook), yo and pull through all 4 loops on hook.
CL (cluster): (bob, ch 1, bob) all worked in the same st.
Notes
- Resize by working foundation chain in multiples of 6 + 7.
- Instructions are written for sizes toddler, child and adult in parentheses as toddler (child, adult).
- Chain 3 at beginning of row counts as first st.
Instructions
With MC, ch 61 (67, 73)
Row 1: (RS) Working in back bump of ch, dc in fourth ch from hook (skipped chs count as first st) and in each ch to end. Do not fasten off, place stitch marker in loop to hold stitch. Turn. 59 (65, 71)
Row 2: Join orange to first st with sl st, ch 6, sk next 4 sts, CL in next st, *ch 6, sk next 5 sts, CL in next st,* repeat from * to * to last 5 sts, ch 6, sk next 4 sts, sl st in last st. Fasten off orange. Do not turn. 9 (10, 11) clusters
Row 3: Insert hook into loop of MC, ch 3, working behind chs and into skipped sts from previous row, dc in next 4 sts, *ch 1, sk over CL, dc in next 5 sts,* repeat from * to * to end. Do not fasten off, place stitch marker in loop to hold stitch. Turn. 50 (55, 60) + 9 (10, 11) ch-1 sps.
Push pumpkin clusters through to RS of head band.
Row 4: Join green to first st with sl st, ch 6, sk next 4 sts, *sc into ch-1 sp from cluster of row 2 and over ch-1 sp from previous row, ch 6, sk next 5 sts,* repeat from * to * to last st, sl st in last st. Fasten off green. Do not turn.
Row 5: Insert hook into loop of MC, ch 3, working in front of chs and into skipped sts from previous row, dc in next 4 sts, *hdc in sc st from previous row, dc in next 5 sts,* repeat from * to * to end. Do not fasten off, place stitch marker in loop to hold stitch. Turn. 59 (65, 71)
Row 6: Join orange to first st with sl st, ch 2, sk next st, CL in next st, *ch 6, sk next 5 sts, CL in next st,* repeat from * to * to last 2 sts, ch 2, sk next st, sl st in last st. Fasten off orange. Do not turn. 10 (11, 12) clusters
Row 7: Insert hook into loop of MC, ch 3, working behind chs and into skipped sts from previous row, dc in next st, *ch 1, sk over CL, dc in next 5 sts,* repeat from * to * to last CL, ch 1, sk CL, dc in last 2 sts. Do not fasten off, place stitch marker in loop to hold stitch. Turn. 49 (54, 59) +
10 (11, 12) ch-1 sps.
Push pumpkin clusters through to RS of head band.
Row 8: Join green to first st with sl st, ch 2, sk next st, *sc into ch-1 sp from cluster of row 6 and over ch-1 sp from previous row, ch 6, sk next 5 sts,* repeat from * to * to last CL, sc in ch-1 sp from cluster, ch 2, sk next st, sl st in last st. Fasten off green. Do not turn.
Row 9: Insert hook into loop of MC, ch 3, working in front of chs and into skipped sts from previous row, dc in next st, *hdc in sc st from previous row, dc in next 5 sts,* repeat from * to * to last 3 sts, hdc in next st, dc in last 2 sts. Turn. 59 (65, 71)
Stop here for Toddler size – fasten off, leaving a long tail for sewing. Weave in remaining ends. Proceed to finishing instructions.
Rows 10 – 13: Repeat rows 2 – 5.
Fasten off, leaving a long tail for sewing. Weave in remaining ends.
Finishing
Lay the headband flat with the right side (RS) facing up.
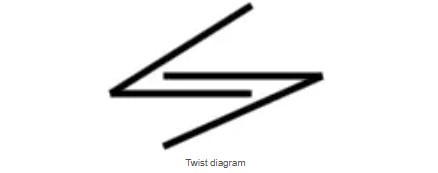
Fold each end of the headband in half lengthwise, bringing the outer edges toward the center.
Bring the two folded ends together, with the wrong side (WS) facing outward. Slide the folded ends into each other, ensuring all four raw edges align neatly (refer to the diagram below for guidance).
Using the long tail left for sewing, thread a yarn needle. Sew through all four layers along the aligned edges for a secure and invisible seam.
Fasten off. Weave in ends.
Turn the headband right side out to reveal the twisted front design.