Pillow-Slip Crochet Edging Tutorial

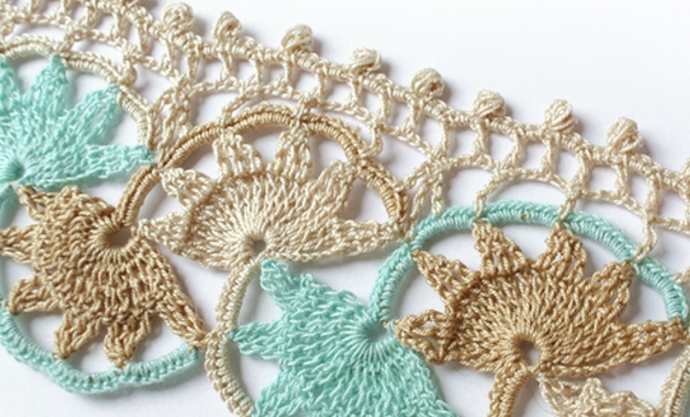
The Pillow-Slip Crochet Edging is a combination of thoughtfully placed stitches that create a lacy and airy texture. It's perfect for adding a graceful finish to a variety of items, such as blankets, shawls, tablecloths, and of course, pillowcases. This edging brings a touch of elegance to your projects, making them stand out with a touch of sophistication.
In this comprehensive tutorial, we will walk you through the step-by-step process of crocheting the Pillow-Slip Crochet Edging. Whether you're a beginner or an experienced crocheter, this tutorial will guide you seamlessly through the stitches and techniques needed to achieve this charming edging. As you work your way through each row, you'll witness the emergence of a captivating lace pattern that elevates the look of your projects.
Techniques used in this stitch(British term / American term:
Chain stitch – ch
Slip stitch – sl.st
Double crochet / Single crochet – dc / sc Treble / Double crochet – tr / dc
Double treble / treble – d.tr / tr
Triple treble / Double treble – t.tr / d.tr: Yarn over the hook 3 times, insert the hook in st, yarn over the hook and pull it through the st. Yarn over the hook and draw yarn through the first 2 loops on the hook. Repeat the preceding step three more times until you have only 1 loop left on the hook.
Picot of puff stitch – picot: work 3ch, 1 puff.st in 1st ch, 1ch, sl.st in the same ch. Stitch - st
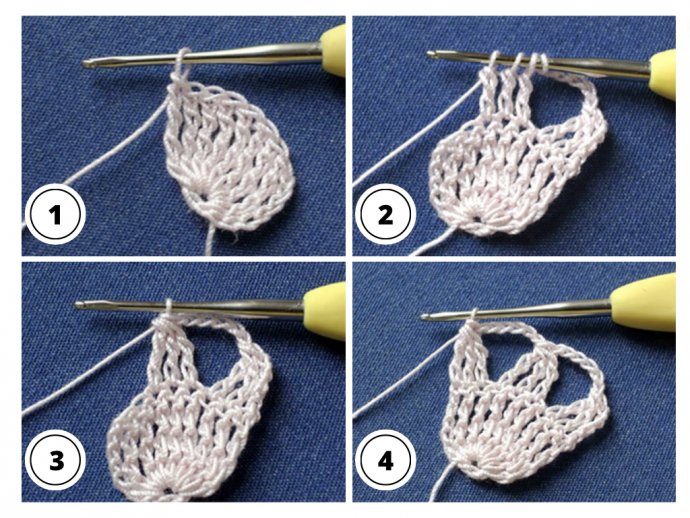
Work 5ch and sl.st in last ch.
Row 1: 7ch, 8 t.tr/d.tr in ring of 5ch, turn.
Row 2: 5 ch, work 2d.tr/tr together (work 2 incomplete d.tr/tr, yarn over the hook and draw yarn
through all loops on the hook), * 6ch, 3d.tr/tr together; rep from * one more time, turn.
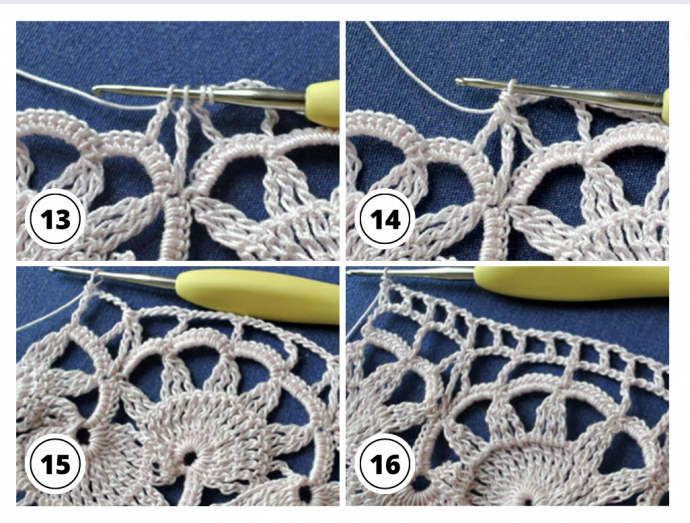
Row 3: 1ch, 9dc/sc in 1st space of 6ch, 9dc/dc + 5ch + 1dc/sc in next space of 6ch, turn.
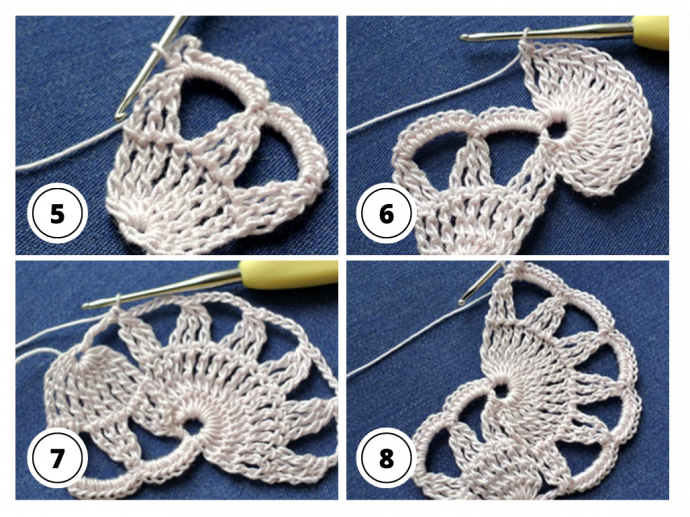
Row 4: 7ch, 17 t.tr/d.tr in space of 5ch, turn.
Row 5: 5 ch, work 2d.tr/tr together, * 6ch, 3d.tr/tr together; rep from * 4 more times, 1d.tr/tr in rig of
5ch, turn.
Row 6: Work 9dc/sc in 1st , 2nd, 3rd and 4th space of 6ch and 9dc/dc + 5ch + 1dc/sc in last space of
6ch, turn.
Row 7: 7ch, 17 t.tr/d.tr in space of 5ch, turn.
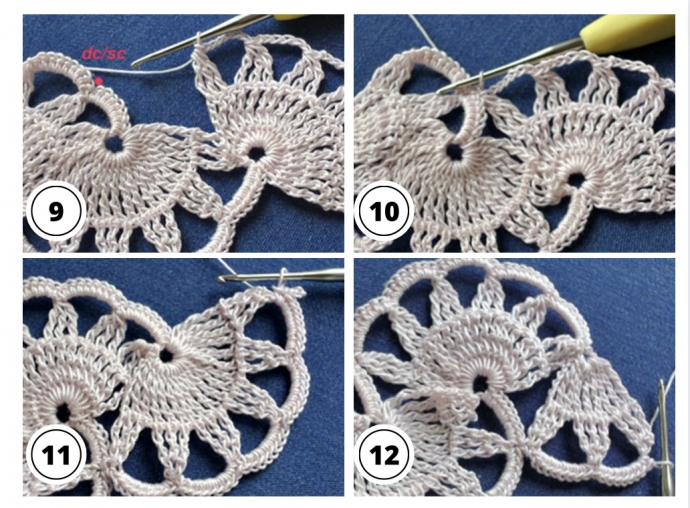
Row 8: 5 ch, work 2d.tr/tr together, * 6ch, 3d.tr/tr together; rep from * 4 more times, 1dc/sc in previous
shell (see pictures), turn.
Row 9: Work 9dc/sc in 1st , 2nd, 3rd and 4th space of 6ch and 9dc/dc + 5ch + 1dc/sc in last space of
6ch, turn.
Repeat rows 7 – 9 until you have reached your desired length.
Finishing:
Round 1: 7ch, 8 t.tr/d.tr in space of 5ch, turn.
Round 3: Work 9dc/sc in 1st and 2nd spaces of 6ch, turn.
Round 2: 5 ch, work 2d.tr/tr together, * 6ch, 3d.tr/tr together; rep from * one more time, 1dc/sc in
previous shell, turn.
Upper edge:
Row 1: 8ch, skip 8st, * 1d.tr/tr in next, 5ch, skip 4st, work 1 incomplete d.tr/tr in next st, 1 incomplete
t.tr/d.tr in the same st where two shells join together, skip 4st, 1 incomplete d.tr/tr in next st, yarn over
the hook and draw yarn through all loops on the hook (3 sts together), 5ch, skip 4st, 1d.tr/tr in next,
5ch, skip 7st, 1tr/dc in next, 5ch, skip 8st; rep from *, 1d.tr/tr in next, 5ch, work 3 sts together, 5ch,
1d.tr/tr in last dc/sc, turn.
Row 2: 5ch, * skip 2st, 1tr/dc in next, 2ch; rep from*, 1tr/dc in 3rd ch, turn.
Row 3: 1ch, * 2dc/sc in 1st space of 2ch, 1 picot, 3dc/sc in next space of 2ch; rep from *.
Color combinations with purple & pink:
Colors & rounds: 1 - 2 – 3 - purple, 4 - 5 – pink, * 6 - 7 - 8 - purple, 9 - 10 – 11 - pink * .
Color combinations with beige & cyan:
Colors & rounds: 1 - 2 - beige, * 3 - 4 - 5 – brown, 6 - 7 - 8 - cyan, 9 - 10 – 11 - beige * .


Love this
How is this attached to the pillow case? I've always wonderd if you punch a tiny hole in which to crochet, or use a nail or large needle to makea hole, or what....?