Crochet Tutorial: How to Make a Vintage Flower Motif

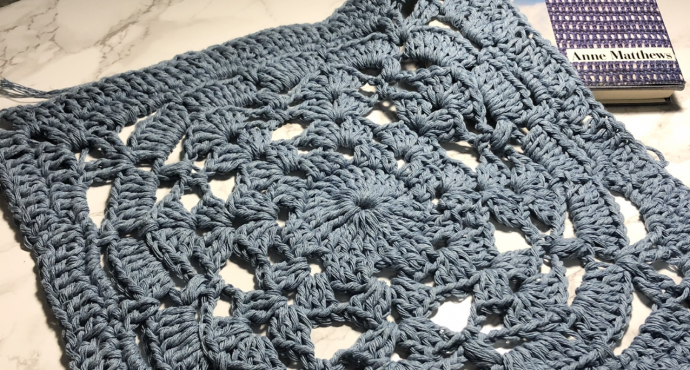
Crochet the Vintage Flower Motif for any project. The crochet vintage flower Motif is an easy square to crochet, in this free pattern we will be using worsted weight yarn and a 5mm hook to produce 13 x 13 crochet square. Scroll down to learn how to crochet the vintage flower motif or chat a bit with me before we move on to the crochet!
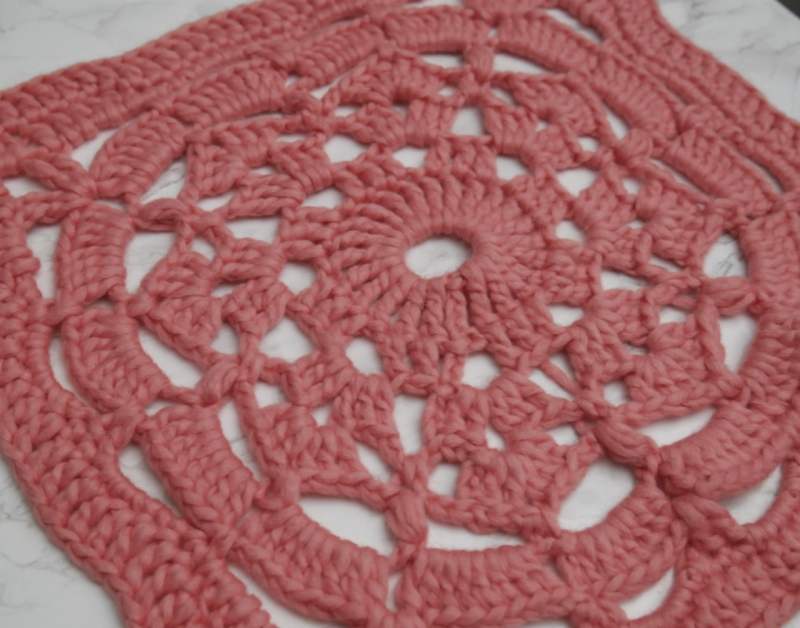
The Vintage Flower Motif starts off in the round and then squared with some cleverly placed stitches and chains. You can make it in a solid color as I have done or let your soul be free and change colors every row, or perhaps change colors when you square the circle. Crochet has endless options, let your creativity soar.
This pattern can be used in just about any project on your to-do list. It will look equally amazing incorporated in a baby blanket or even in a full-size afghan, so keep it in mind for any baby showers or housewarming parties on your calendar. The timeless look of this crochet vintage flower pattern is one that everyone is sure to love, too. The delightfully easy motif uses yarn in various colors, making it the perfect pattern for anyone who wants to make a dent in an ever-growing stash of yarn.
Stitches:
Shell 1 – 3dc, ch3, 3dc
Shell 2 – 3dc,ch1,3dc
Puff Stitch – Yarn over, insert your hook into the stitch , yarn over and pull up a loop, repeat twice more. Yarn over and go through all loops on the hook.
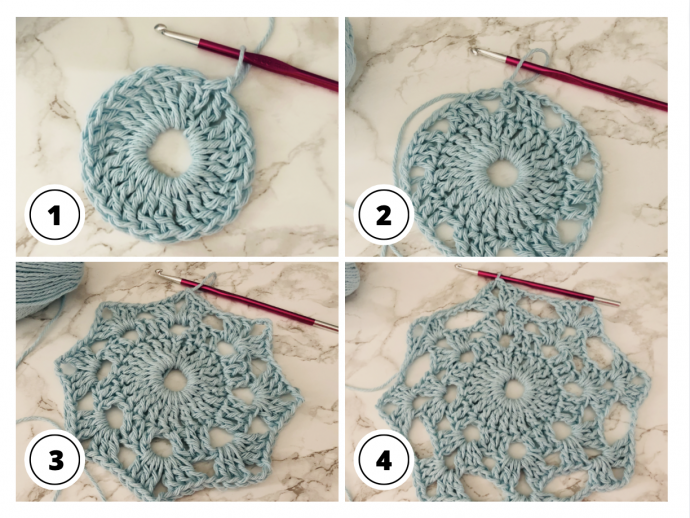
Instructions:
Start with a ch12 and join with a slip stitch to form a ring. Ch4 (counts as the first treble)
Round 1 – 23 trebles into the center of the ring. Slip stitch to the top of the ch4 to close.
Round 2 – Ch6, *1dc in the next 3 stitches, ch3* Repeat from * to * until you have reaches the last 2 stitches. Work 1 dc in the remaining 2 stitches, slip stitch to the third ch to join the round. Slip stitch into the first ch 3 space. 8 groups of 3 dc and 8 ch3 spaces.
Round 3 – Ch 3, 2 dc into the space, ch3, 3dc into the space. *Ch1, Shell 1 into the next ch3 space.* Repeat from * to * to the end of the round. Join with a slip stitch to the top of the ch 3. Slip stitch over next 2 dc. and into the ch space.
Round 4 – Ch3, 2 dc , Ch 3, 3 dc into the space. *Ch3, Shell 1 into the center ch of the previous shell.* *Repeat from *to* until you have finished your round. Join with a slip stitch to the top of the ch3. Slip stitch over the next 2 dc and into the ch space.
Round 5- Ch3, 2dc, ch1 3 dc into the space. *Ch2, work sc into the ch 3 space, ch 2 work Shell 2 into the center ch of the previous shell* Repeat from * to * around. Slip stitch to the top of the ch 3, and until you reach the ch 1 space from the shell.
Round 6 – Ch1, sc in the same space. *ch 5, puff stitch in the sc, ch 5, sc in the ch 1 space from the previous shell.* Repeat from * to * Slip stitch into the beg sc to join, slip stitch into the ch 5 space.
Round 7 – Ch 3, 7 dc into the ch space. *8 dc into the ch 5 space* Repeat from * to * around. Slip stitch to the top of the ch3 to join.
Round 8 – Ch1, *sc in the sc. Ch5, skip 8 dc, work 2 dc between the 8dc groups , ch5 skip 8 dc, work 1sc between the next 8 dc group, ch 5 work 2trb ch3 2trb between the next 8 dc group (on top of the puff stitch), ch 5*. Repeat from * to * all the way around. Slip stitch to the beg sc to join.
Round 9 – Ch1, *sc in the sc. sc in each of the next fifteen ch (the stitches also count as part of these 15) once you have completed 15 sc work 4 dc into the last 5ch, and 1 dc on top of the treble. Corner – 3dc,ch3,3dc. 1 dc on top of the trb, 4dc and 1 sc into the ch5 space. * Repeat from *to *. Slip stitch to the top of the sc to join. Your circle should now begin to look like a square.
Round 10 – Ch3, (counts as the first dc) *1 dc in each stitch until you reach the corner ch space. 2dc, ch3, 2 dc into the corner space.* Repeat from * to * all the way around. Slip stitch to the top of the ch3 to join. Fasten off.
Square measures 13 X 13 without blocking.
I have always enjoyed your pattern and stitch tutorials--and this one iis something very special. I can see it as a dressy bib or a multi-color baby afghan. Manythanks for all the beautiful ideas you share.
Jessica