Crochet Basics: Trellis Honeycomb Stitch


Crocheting remains a great way to make clothes and other types of things that you may want to have around the house, like blankets and scarves or baby blankets. It’s a time-consuming process, but the results are always rewarding. Many crocheters call crochet an art form, a passion, a therapy, whatever you want to call it, to me it is the most fun you can have with yarn. This is a calming activity and the fact that you also get to have something to show off at the end with, is pretty awesome. So, let’s continue to create yarn magic, one stitch at a time! Today’s stitch is the Trellis Honeycomb Stitch.
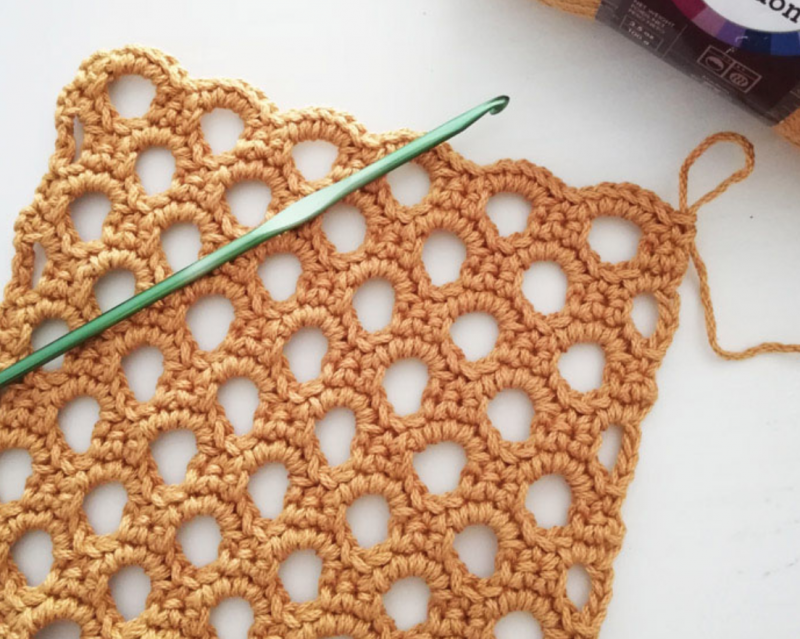
This honeycomb trellis stitch is perfect for cotton yarns or bulky yarns. The stiffer or larger yarns help it hold its shape and keep that open feel with more structure than a lace look.
This stitch works great in a variety of projects and I will post some examples below. It works up quickly with the basic repeat of the pattern, and it just uses a few basic stitches, so an advanced beginner crocheter who has a few projects under their belt can certainly manage this one. This stitch is so quick and easy to make, it’s perfect for beginners. You definitely won’t have a hard time understanding how to make this stitch since it uses the basic stitches only. Learning a new crochet stitch is like a turning new page of the book of your crochet life. In this chapter, we are going to learn how to crochet a honeycomb trellis stitch.
Crochet honeycomb trellis stitch great for market bags, shawls, cover-ups and more summer projects. This pretty stitch has an open work and lace texture.
Instructions
Abbreviations
ch = chain
st = stitch
sk = skip
sc = single crochet
tr = treble crochet
ch-() sp = chain (number of chains) – space
* to ; = repeat * to the instructions.
Crochet multiple of 5 +2.
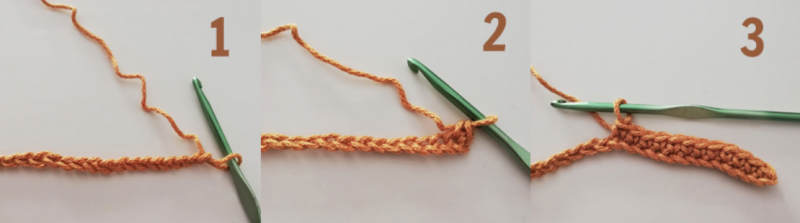
Crochet 32 chains (image 1)
Row 1: sc in 2nd ch from the hook (image 2), sc in each st across (image 3), turn.
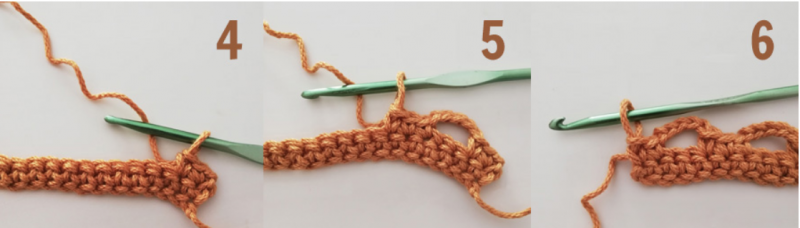
Row 2: ch 1, sc in first st and next st (image 4), *ch 5, sk next 2 st, sc in each of next 3 st (image 5); repeat until last 4 sts remain, ch 5, sk next 2 st, sc in last 2 st (image 6), turn.
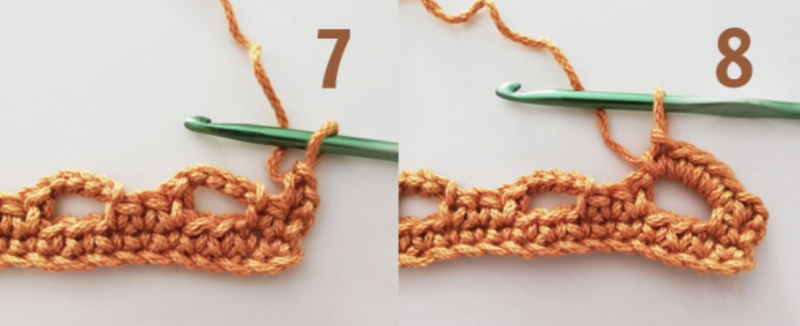
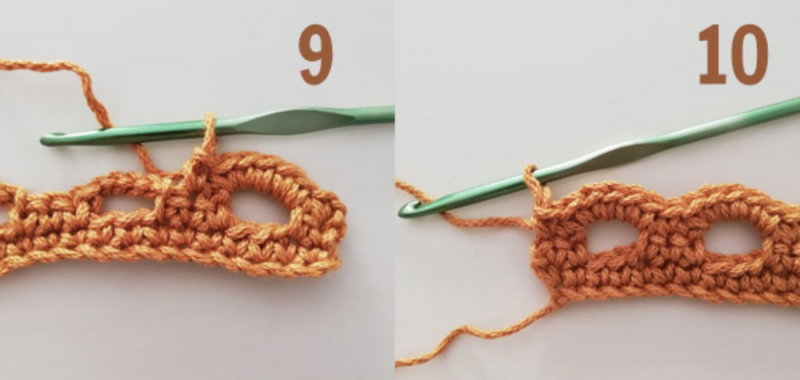
Row 3: ch 1, sc in first sc (image 7), sk next sc, *5 sc in next ch-5 sp (image 8), sk next sc, sc in next sc (image 9), sk next sc; repeat until last 2 sts remain, sk next sc, sc in last sc (image 10), turn.
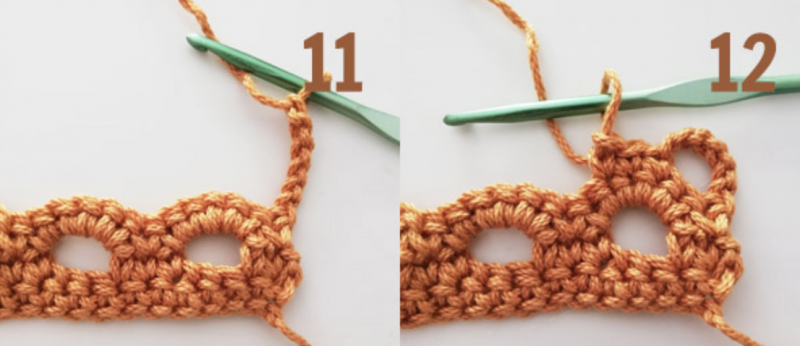
Row 4: ch 6 (count as tr and chain 2) (image 11), sk first 2 sc, *sc in each of next 3 sc (image 12), ch 5, sk next 3 sc (image 13); repeat until last 2 sts remain, ch 2, sk next sc, tr in last sc (image 14).
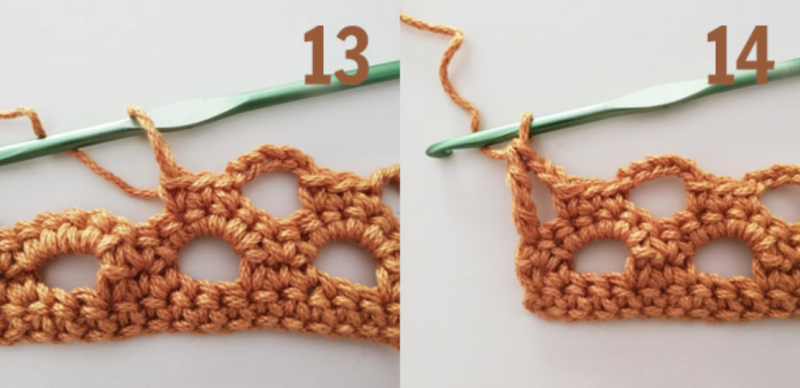
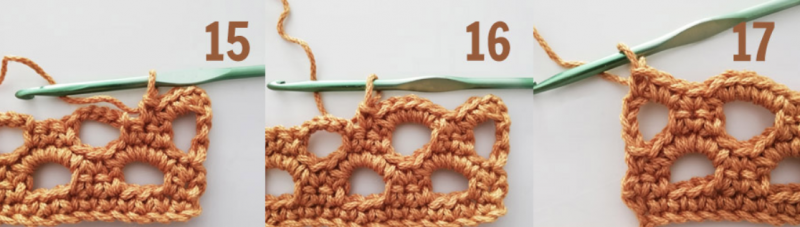
Row 5: ch 1, sc in first sc, 2 sc in ch-2 sp, *sk next sc, sc in next sc (image 15), sk next sc, 5 sc in ch-5 sp; repeat until last ch-5 sp, sk next sc, sc in next sc (image 16), sk next sc, 2 sc in ch-6 sp, sc in 4th beg ch top (image 17).
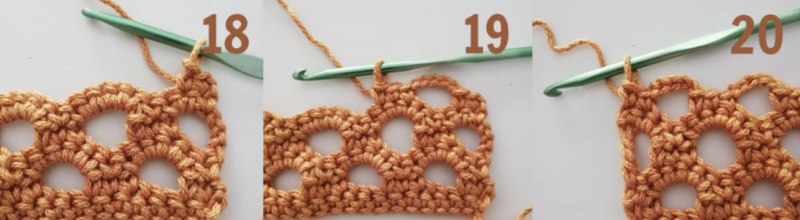
Row 6: ch 1, sc in first sc and next sc (image 18), *ch 5, sk next 3 sc, sc in each of next 3 sc (image 19); repeat until last 5 sts remain, ch 5, sk next 3 sc, sc in last 2 sc (image 20).
Repeat rows 3 to 6 until your desired length.