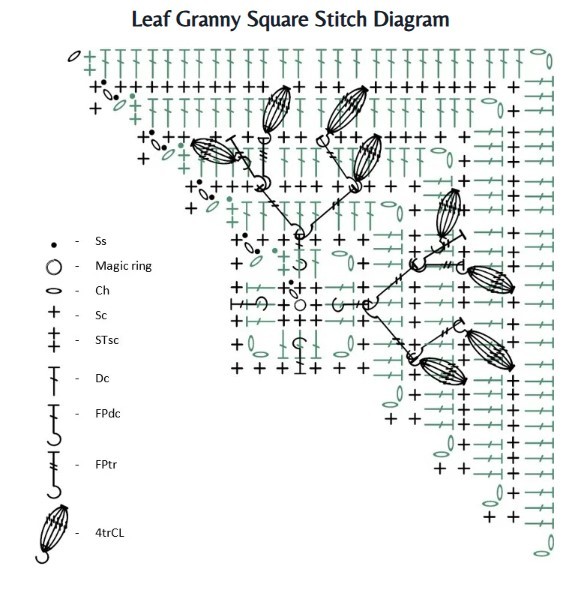
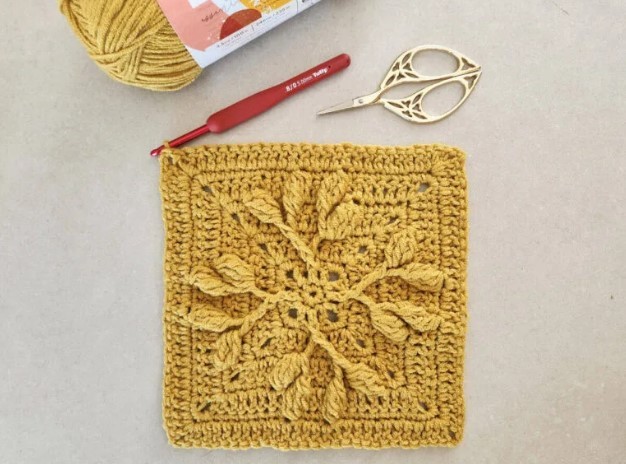
Autumn Bloom Square – Leaf Granny Square Pattern


The Autumn Bloom square is a beautiful leaf Granny Square Pattern. The lovely cable stitches create a crochet vine leaf pattern worked over a solid granny square.
This beautiful leaf granny square pattern features a crochet vine pattern that is worked over a solid granny square.
The crochet leaves are made using front post Cable stitches and Cluster treble stitches. That’s why the square is considered to be an intermediate level. But I promise you it’s not that complicated, and much easier when you follow the photo tutorial!
Materials
- Crochet hook 5.0 mm / H
- Worsted (#4) weight yarn – I used Lion Brand – Color Theory yarn (Bee Pollen color)
Gauge
- In pattern: working rounds 1-5 will result in a 10 cm by 10 cm / 4” by 4” square.
Finished Size
- 8x8 in (20.3×20.3 cm)
Abbreviations
- ch – chain
- dc – double crochet
- flo – work into the front loop only
- FPdc – front post double crochet: Yo, insert hook from the front to the back and then to the front of the indicated stitch, yo and pull up a loop all the way back, yo and pull through 2 loops (2 loops remain on the hook), yo again and pull through 2 remaining loops.
- FPtr – front post treble crochet: Yo twice, insert hook from the front to the back and then to the front of the indicated stitch (working around the post), yo and pull up a loop, (yo and pull through 2 loops) x 3.
- sc – single crochet
- sk – skip
- sp – space
- ss – slip stitch
- st – stitch
- STsc – stacked single crochet: work 1 single crochet in the first st, then work another single crochet into the left leg of the single crochet you just worked.
- tr – treble crochet: Yo twice, insert hook into indicated st, yo and pull up a loop, (yo and pull through 2 loops) x 3 times.
- 4trCL – 4-treble Cluster: (Yo twice, insert your hook from the front to the back and then to the front of the indicated stitch – working around the post, yo and pull up a loop, yo and pull through 2 loops, yo and pull through 2 loops) x 4 times on same st. With 5 loops on the hook, yo and pull through all 5 loops.
- PM – place marker
- RS – right side
- WS – wrong side
- […] – crochet the instructions within brackets as many times as directed.
- (…) – crochet the instructions within parentheses into the same indicated st.
- * Repeats are shown via asterisks. Repeat begins at *
Special Stitches
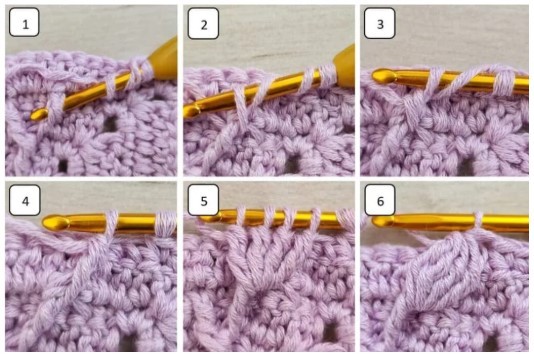
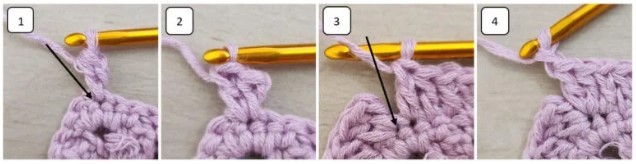
How to crochet the Stacked Single Crochet (STsc)
This stitch is an alternative to double crochet, its intention in this pattern is to replace the ch3, or ch2 + dc at the beginning of the pattern and get a straighter edge.
At the beginning of the row, do not chain, keep your yarn behind your hook and work 1 single crochet in the first stitch, then work another single crochet into the left leg of the single crochet you just worked.
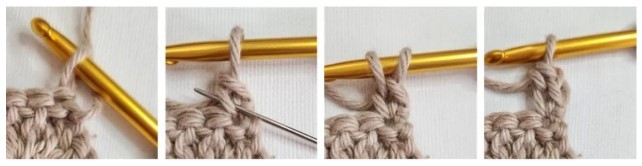
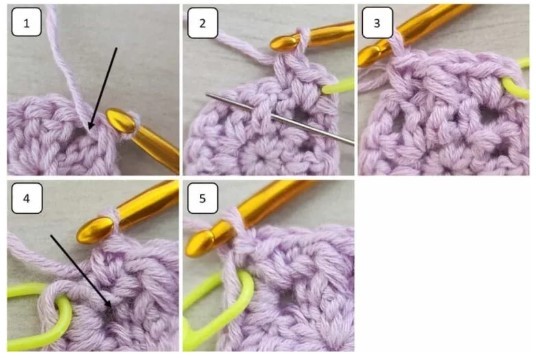
How to crochet the Front Post Double Crochet (FPdc)
Yo, insert hook from the front to the back and then to the front of the indicated stitch (pics 1-2), yo and pull up a loop all the way back (pic 3), yo and pull through 2 loops (2 loops remain on the hook), yo again and pull through 2 remaining loops (pic 4).
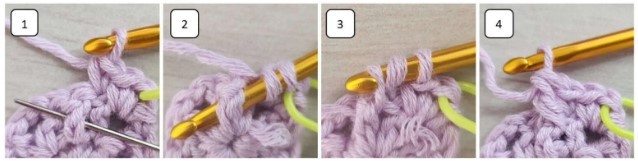
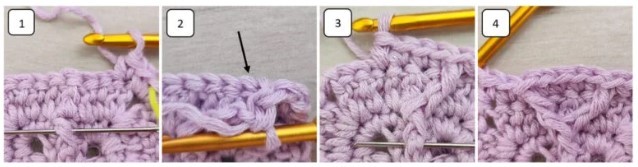
How to crochet the Front Post Treble Crochet (FPtr)
Yo twice, insert your hook from the front to the back and then to the front of the indicated stitch (working around the post – pic 2), yo and pull up a loop (pic 3), yo and pull through 2 loops (3 loops remain on the hook), yo and pull through 2 loops (pull the yarn to the height of your row – 2 loops remain on the hook), yo again and pull through 2 remaining loops (pic 4).
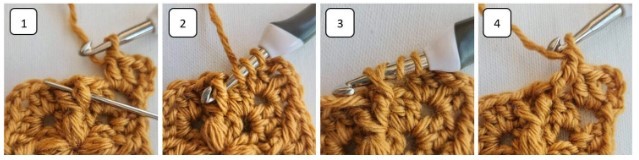
How to crochet the 4-treble Cluster (4trCL) around FP stitch
* Yo twice, insert your hook from the front to the back and then to the front of the indicated stitch – working around the post (pic 1), yo and pull up a loop (pic 2), yo and pull through 2 loops (pic 3), yo and pull through 2 loops – pull the yarn to the height of your row pic 4); repeat from * 3 more times (pic 5). With 5 loops on the hook, yo and pull through all 5 loops (pic 6).
Notes
- The square is turned at the end of each round.
- STsc is an alternative to the 1st double crochet, its intention in this pattern is to get a straighter edge. If you prefer, you can replace it with ch3, or ch2 + dc at the beginning of each row.
- Stitch markers are used in single crochet rounds to help you find the corner-single crochet.
- Don’t worry if your square doesn’t lay flat, make sure to block it when you finish, before you continue to work the transition rows.
Autumn Bloom Crochet Square Pattern
Make a magic ring.
Round 1 (RS): Ch 1 (doesn’t count as a st), work 8 sc into the magic ring, ss to 1st sc. Pull the ring tight, turn. (8 sc)
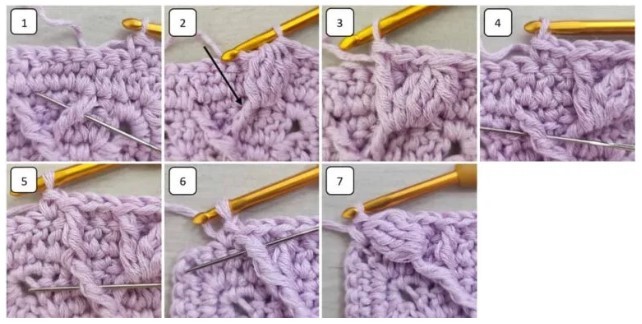
Round 2 (WS): STsc in same st you ss into in the previous round (pics 1-2) (counts as 1 dc here and throughout – see notes on STsc).
* 1 dc in next sc, (1 dc, ch 2, 1 dc) in next sc (pic 3); Repeat from * 2 more times, 1 dc in next sc, 1 dc in the 1st sc you worked the STsc into (pic 4), ch 1, ss to STsc (pic 5), turn. (12 dc, 3 ch-2 sp, 1 ch-1 sp)
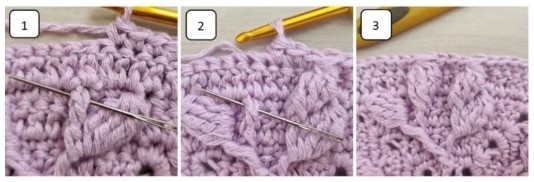
Round 3 (RS): Ss into the next ch-1 sp (pic 1), ch 1 (doesn’t count as a st), [1 sc-PM, 1 sc] in same ch-1 sp, 1 sc in next dc, FPdc around next dc (pic 2), sk the top of dc you just worked around, 1 sc in next dc (pic 3).
* 3 sc in next ch-2 sp (PM in 2nd sc), 1 sc in next dc, FPdc around next dc, sk the top of dc you just worked around, 1 sc in next dc; Repeat from * 2 more times (in last repetition you will work the last sc into top of STsc). 1 sc into first ch-1 sp (pic 4), ss to 1st sc (pic 5), turn. (20 sc, 4 FPdc)
Round 4 (WS): Remove marker and work STsc in same st you ss into in the previous round (pic 1), 1 dc in the same st (pic 2), 1 dc in next 5 sts until marker.
* (2 dc, ch 2, 2 dc) in next corner-sc, 1 dc in next 5 sts until marker; Repeat from * 2 more times. 2 dc in first st of the round you worked into (completing the corner- pic 3), ch 1(pic 4), ss to STsc, turn. (36 dc, 3 ch-2 sp, 1 ch-1 sp)
Round 5 (RS): Ss into the next ch-1 sp, ch 1 (doesn’t count as a st), (1 sc-PM, 1 sc) in same
ch-1 sp, 1 sc in next dc, 1 FPtr around FPdc 2 rows below (pic 1), sk next dc (pic 2), 1 sc in next 4 dc, 1 FPtr around FPdc 2 rows below you just worked around (pics 3-4), sk next dc, 1 sc in next 2 dc.
* 3 sc in next ch-2 sp (PM in 2nd sc), 1 sc in next dc, 1 FPtr around FPdc 2 rows below, sk next dc, 1 sc in next 4 dc, 1 FPtr around FPdc 2 rows below you just worked around, sk next dc,
1 sc in next 2 dc; Repeat from * 2 more times. 1 sc into first ch-1 sp, ss to 1st sc, turn.
(40 sc, 8 FPtr)
Round 6 (WS): Remove marker and STsc in same st you ss into in the previous round, 1 dc in the same st, 1 dc in next 11 sts until marker.
* (2 dc, ch 2, 2 dc) in next corner-sc, 1 dc in next 11 sts until marker; Repeat from * 2 more times. 2 dc in first st of the round you worked into (completing the corner), ch 1, ss to STsc, turn. (60 dc, 3 ch-2 sp, 1 ch-1 sp)
Round 7 (RS): Ss into the next ch-1 sp, ch 1 (doesn’t count as a st), (1 sc-PM, 1 sc) in same ch-1 sp, 1 sc in next 3 dc, 4trCL around next FPtr 2 rows below (pics 1-2), sk next dc, 1 sc in next 2 dc, 1 FPtr around FPtr 2 rows below you just worked around (pics 2-3), sk next dc, 1 sc in next 2 dc.
1 FPtr around the 2nd FPtr 2 rows below (pic 4), sk next dc, 1 sc in next dc, 1 FPtr around FPtr 2 rows below you just worked around (pic 5), sk next dc, 1 sc in next dc, 4trCL around the last FPtr you made (pic 6), sk next dc, 1 sc in next dc (pic 7).
* 3 sc in next ch-2 sp (PM in 2nd sc), 1 sc in next 3 dc, 4trCL around next FPtr 2 rows below, sk next dc, 1 sc in next 2 dc, 1 FPtr around FPtr 2 rows below you just worked around, sk next dc, 1 sc in next 2 dc.
1 FPtr around the 2nd FPtr 2 rows below, sk next dc, 1 sc in next dc, 1 FPtr around FPtr 2 rows below you just worked around, sk next dc, 1 sc in next dc, 4trCL around the last FPtr you made, sk next dc, 1 sc in next dc (pic 7); Repeat from * 2 more times. 1 sc into first ch-1 sp, ss to 1st sc, turn. (52 sc, 12 FPtr, 8 4trCL)
Round 8 (WS): Remove marker and STsc in same st you ss into in the previous round, 1 dc in the same st, 1 dc in next 17 sts until marker.
* (2 dc, ch 2, 2 dc) in next corner-sc, 1 dc in next 17 sts until marker; Repeat from * 2 more times. 2 dc in first st of the round you worked into (completing the corner), ch 1, ss to STsc, turn. (84 dc, 3 ch-2 sp, 1 ch-1 sp)
Round 9 (RS): Ss into the next ch-1 sp, ch 1 (doesn’t count as a st), (1 sc-PM, 1 sc) in same
ch-1 sp, 1 sc in next 7 dc, 4trCL around next FPtr 2 rows below (pic 1), sk next dc, 1 sc in next 3 dc, 4trCL around the 2nd FPtr 2 rows below (pics 2-3), sk next dc, 1 sc in next 9 dc.
* 3 sc in next ch-2 sp (PM in 2nd sc), 1 sc in next 7 dc, 4trCL around next FPtr 2 rows below, sk next dc, 1 sc in next 3 dc, 4trCL around the 2nd FPtr 2 rows below, sk next dc, 1 sc in next 9 dc; Repeat from * 2 more times. 1 sc into first ch-1 sp, ss to 1st sc, turn. (88 sc, 8 4trCL)
Round 10 (WS): Remove marker and STsc in same st you ss into in the previous round, 1 dc in the same st, 1 dc in next 23 sts until marker.
* (2 dc, ch 2, 2 dc) in next corner-sc, 1 dc in next 23 sts until marker; Repeat from * 2 more times. 2 dc in first st of the round you worked into (completing the corner), ch 1, ss to STsc, turn. (108 dc, 3 ch-2 sp, 1 ch-1 sp)
Fasten off and block your square.