No Sew Crochet Cats & Dogs Pattern

I’m so excited to share a super cute and, best of all, no sew crochet pattern with you today – No Sew Cats and Dogs!
If you’ve been looking for a quick, satisfying project that’s perfect for gifting, you’re going to absolutely love these little critters.
Create your own adorable family of amigurumi cats and dogs with this easy to follow, beginner friendly pattern.
Materials
- Acrylic Aran Weight Yarn (Medium #4). You’ll need two colors (e.g., brown and beige, or any combination you love!).
- 4.0mm crochet hook.
- Stitch marker
- Scissors
- Toy stuffing
- Darning needle
- Small amount of black yarn for embroidering the face.
Finished Size
- Approximately 8cm tall
Abbreviations
- ch – chain
- sl st – slip stitch
- sc – single crochet
- hdc – half double crochet
- dc – double crochet
- inc – increase (2 sc in the same stitch)
- dec – decrease1 (sc2tog)
- Bo – Bobble Stitch
- st(s) – stitch(es)
Special Stitches
Bo – Bobble Stitch (made with 5 incomplete double crochet stitches) – Yo, insert hook in the stitch below, yo and pull up a loop, yo and pull through the first 2 loops on the hook, leave the incomplete double crochet on the hook x5, you will have 6 loops on the hook, yo and pull through all 6 loops on the hook.
Notes
- The body parts are crocheted in the round, without turning or closing the round, unless specifically stated.
- Use a stitch marker to mark the beginning of each round. Move the marker up as you complete each round.
- The number at the end of each round indicates the total number of stitches for that round.
- Stitches between ( ) are made into the same stitch or chain space.
- Stitches between * * are repeated as instructed.
Instructions
The Body
With brown yarn & a 4mm crochet hook, ch11.
Round 1: sc in 2nd ch from hook, sc in next 9sts, ch1, turn = 10
Rounds 2-7(6): sc in each st, ch1, turn = 10
Round 8: crochet around your piece as follows: sc in next 7 rows down the left side of your piece, sc in next 10sts along the bottom of your piece, sc in next 7 rows up the right side of your piece, sc in next 10sts along the top of your piece = 34
From this point on, we will be working in the round, without turning or closing the rounds, use a piece of yarn or a stitch marker to mark the beginning of the rounds.
Round 9: sc in each st = 34
Round 10: sc in next 7sts, Bo in next, sc in next 8sts, Bo, sc in next 17sts = 34
Round 11: sc in each st = 34
Change to beige yarn.
Rounds 12-14(3): sc in each st = 34
Round 15: *sc in next 6sts, dec in next, sc in next 7sts, dec in next * x 2 = 30
Round 16: *dec, sc in next 3sts* x 6 = 24
Round 17: *dec, sc in next 2sts* x 6 = 18
Round 18: *dec, sc in next st* x 6 = 12
Fasten off, leave a long tail. Stuff your animal with toy stuffing and use the tail to close the hole. Weave in the end
The Cat Ears
You can make the ears in either brown or beige. Each ear is placed diagonally above the bobble arm, with the outer corner between rows 14-15, and the inner corner between rounds 16-17, 5sts apart.
Start with the right cat ear.
With brown or beige yarn, join with a sl st, 6 rounds above the left bobble arm, 1st to the right of it.
ch4, sc in 2nd ch from hook, hdc, dc, fasten off, leave a tail.
Pull the tail through the same rounds 16-17, 5sts apart from the other ear corner.
The left cat ear is made the same, but start from the inner corner. This way, the right side of the ears will face forward for both ears.
The Dog Ears
Just like the cat ears, you can make the dog ears in brown or beige.
The ears are placed between rounds 16-17, 5sts apart. The other corners are placed 2sts to the side of the bobble arm, the inner corners are placed on the same round, 3sts from the other corner.
Start with the right dog ear.
With brown or beige yarn, join with a sl st, between rounds 16-17, 2sts to the side of the bobble below.
ch5, hdc in 2nd ch from hook, hdc, dc, tr, fasten off, leave a tail.
Pull the tail through the same round, 3sts apart from the other ear corner.
The left dog ear is made the same, but start from the inner corner. This way, the right side of the ears will face forward for both ears.
Weave in all the ends.
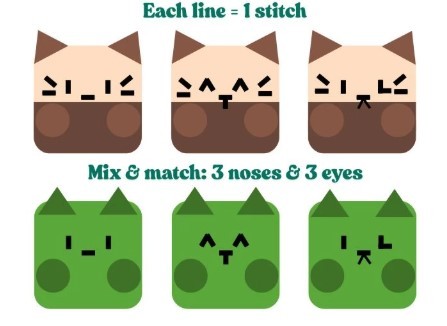
Embroidered Faces
Use the image guide below to embroider the faces.
Each line is as wide as 1 stitch. You have 3 nose designs and 3 eye designs you can mix and match.
Don’t forget to embroider the whiskers on the cats.