Crochet Cat Bee (Cee) Low Sew Pattern Tutorial

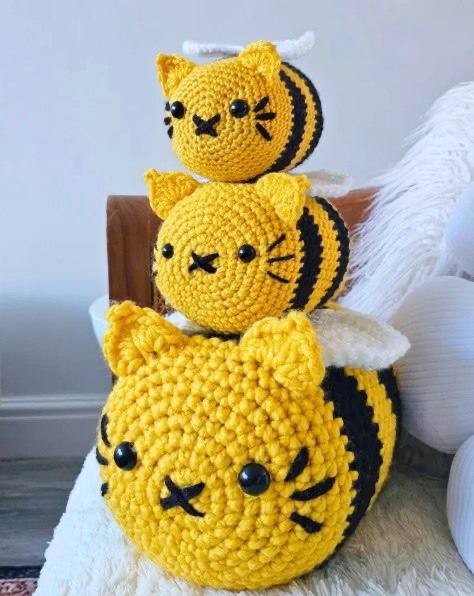
The Amigurumi Cat Bee is an easy and fun low-sew crochet that brings together the cuteness of a cat and a bee.
This pattern is simple enough for beginners but detailed enough to keep even experienced crocheters interested.
You’ll love how quick it works up and how little sewing it requires.
The Amigurumi Cat Bee can be made in three sizes based on the yarn you are going to use.
These are great for gifts, décor, or even a soft toy.
Learn how to crochet the Amigurumi Cat Bee with this tutorial.
Materials
- Acrylic DK Yarn – Yellow, White, Black
- Crochet hook - 3.5mm (small), 5mm (medium), 8mm (large)
- Toy stuffing
- Safety doll eyes (10mm, 12mm, or 18mm)
- Yarn needle
Size
- Small (9cm)
- Medium (12cm)
- Large (20cm)
Abbreviations
- sc – single crochet
- inc – increase (2sc in same stitch)
- dec – decrease (sc2tog)
- sl st – slip stitch
- yo – yarn over
- st(s) – stitch(es)
- sc blo – single crochet in back loop only
- sc flo – single crochet in front loop only
- pst – picot stitch
Instructions
The Bee’s Body
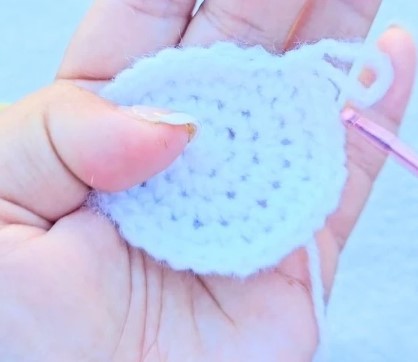
Using your chosen yarn weight and hook, create a magic ring.
Round 1: 6sc into the magic ring, pull the tail to close the magic ring shut = 6
Round 2: inc x 6 = 12
Round 3: *inc, sc* x 6 = 18
Round 4: *inc, sc in next 2sts* x 6 = 24
Round 5: *inc, sc in next 3sts* x 6 = 30
Round 6: *inc, sc in next 4sts* x 6 = 36
Round 7: *inc, sc in next 5sts* x 6 = 42
Round 8: *inc, sc in next 6sts* x 6 = 48
Rounds 9: sc in each stitch = 48
Round 10: sc in next 14sts, sk2, (2dc,2tr,Pst, 2tr, 2dc) in the front loop of next stitch, sk2, sc in next 6sts, sk2, (2dc, 2tr, Pst, 2tr, 2dc) in the front loop of the next stitch, sk2, sc in next 18sts = 60
Round 11: sc in next 14sts, flip the ear forwards, sc in the 2sts you skipped on Round 10, sc blo in next, sc in next 2sts that you skipped on Round 10, flip the ear forwards, sc in next 6sts, flip the next ear forward, sc in next 2sts, sc blo in next, sc in next 2sts, flip the ear forward, sc in next 18sts = 48
Rounds 12 – 14: sc in each stitch = 48
Close round 14 with a slip stitch and switch colors to black, but don’t cut the yellow yarn.
Rounds 15 – 18: sc in each stitch = 48
Close round 18 with a slip stitch and switch colors to yellow, but don’t cut the black yarn.
Rounds 19 – 22: sc in each stitch = 48
Close round 22 with a slip stitch and switch colors to black, cut the black yarn and leave a long tail on the inside of the bee.
Rounds 23 – 26: sc in each stitch = 48
Close round 26 with a slip stitch and switch colors to black, cut the black yarn and leave a long tail on the inside of the bee.
Rounds 27 – 30: sc in each stitch = 48
Round 31: *dec, sc in next 6sts* x 6 = 42
Round 32: *dec, sc in next 5sts* x 6 = 36
Round 33: *dec, sc in next 4sts* x 6 = 30
Round 34: *dec, sc in next 3sts* x 6 = 24
Round 35: *dec, sc in next 2sts* x 6 = 18
Place the eyes, 5 rounds from the magic circle center. If you imagine the circle as being the face of a clock, the left eye will be at 10 o’clock and the right one at 2 o’clock.
Start stuffing the bee’s body with toy stuffing. Keep adding stuffing as you work up the rounds. Make sure it is firmly stuffed.
Round 36: *dec, sc* x 6, fasten off = 12
Finish stuffing the bee’s body, then use the tail to close off the hole. Weave in the end.
The Bee’s Wings
Using the same yarn weight in white and same hook size that you used for the bee’s body, create a magic ring. Make 2 wings.
Round 1: 6sc into the magic ring, pull the tail to close the magic ring shut = 6
Round 2: inc x 6 = 12
Round 3: *inc, sc* x 6 = 18
Round 4: *inc, sc in next 2sts* x 6 = 24
Round 5: *inc, sc in next 3sts* x 6, sl st to close the round, fasten off and leave a long tail = 30
Weave in the magic ring end and use the tail to sew the wings to the bee’s body on the yellow stripe between the 2 black stripes.
Make sure you center them between the eyes.
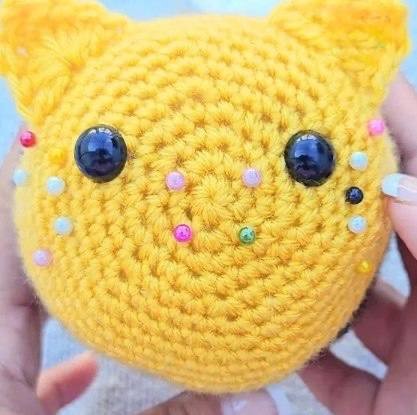
Embroidering The Face
Place your pins like in the picture below.
The cat bee has 3 whiskers on each side of the eyes, and an X for the mouth.
Your Cat Bee is now complete.