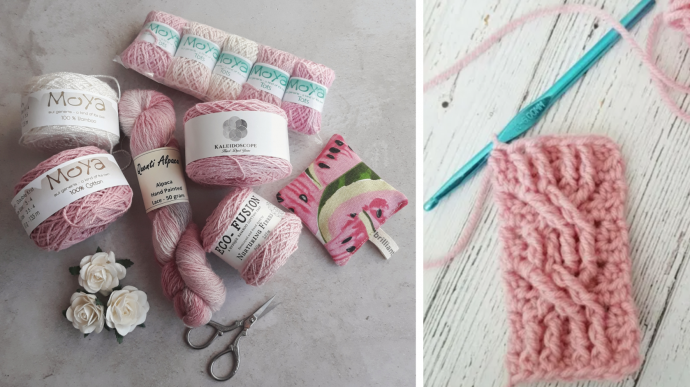
Crochet Cable Tutorial + Tips

Learning stitches is always a good thing. Some newbies want to jump straight to hat crocheting, jacket crocheting and alike. There is a misconception that the stitch tutorials is something that you can learn from some time later.
In reality the opposite is true. You have to know certain stitches in order to crochet original, unique and beautiful project. The best projects out there are made using stitch knowledge only.
Today we are going to learn to crochet a cable stitch. Imagine how beautiful your project may become if you use this stitch within them. For instance, I believe a very beautiful ear warmer or beanie can be made with the usage of this stitch. In the end of the post you will find the 1-page printable illustrated guide in case you need to see how it looks like.
Knitters aren't the only needlecrafters who get to create lovely cables. Cables infuse rich textures into the fabric and give them fun, visual interest. You can use this stitch to make blankets, hats, scarves, and more. Crocheted cables are made by skipping a set of stitches, then crossing front and back post stitches to create the twisted quality of a cable. The crochet cable stitch may seem complex, but it’s not as hard as you think. There are many ways to do the crochet cable stitch, but in this project, you will learn to make a five-stitch cable crochet stitch that’s easy for beginners.
In order to do crochet cable stitches, you will need to know how to do both front and back post treble crochet. They are not hard, but you do need to pay attention to where you place your hook.
Front Post Treble Crochet (FPTC): Yarn over two times. Insert your hook front-to-back through your work, so that the post you want to crochet around is in front of your hook. Yarn over. Pull up a loop, (yarn over, pull through two loops on your hook) three times.
Back Post Treble Crochet (BPTC): Yarn over two times. Insert your hook back-to-front through your work, so that the post you want to crochet around is behind your hook. Yarn over. Pull up a loop (yarn over, pull through two loops on your hook) three times.
We are going to make a left twisting 4 strand rope cable. Grab your yarn and hook. I am using a worsted weight yarn and a 6mm hook. This cable is worked over 5 stitches, plus however many sitches you want on either side or between cables.
Abbreviations:
Ch(s): chain(s)
Hdc: half double crochet
St(s): stitches
FpTr: front post treble crochet
Instructions:
Row 1: Ch 8, hdc in 2nd chain from hook and in each st across, turn.
Row 2: Ch 1, hdc in same st as ch 1 and in each st across. turn.
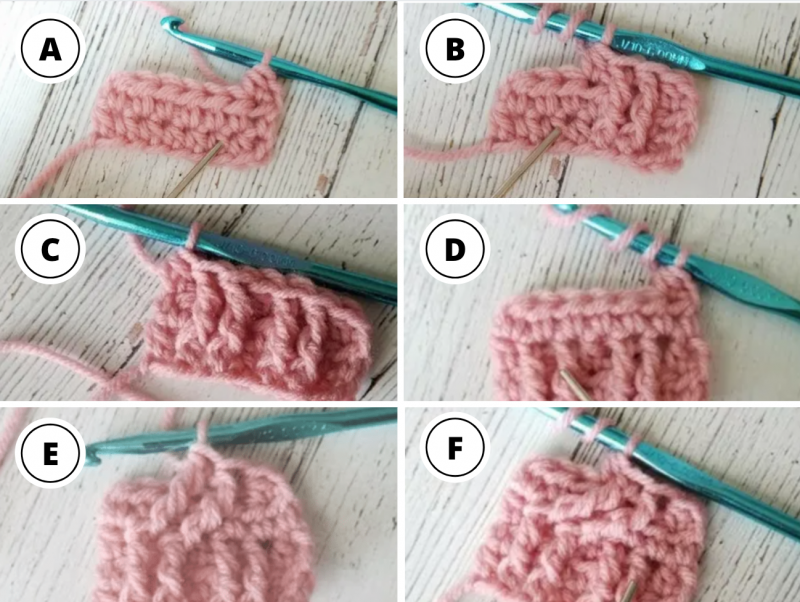
Row 3: Ch 1, hdc in same st as ch1. FpTr (front post treble crochet) around next 2 sts 2 rows below (picture B). Don’t rely on your eye to find the right stitch. On the 1st row Count in 2 stitches (or however many stitches are before the cable in your pattern) and make your FpTr around it. (picture A)
Hdc in next, FpTr around next 2 sts 2 rows below. (use that first fptr as a guide) Hdc in next (picture C). Turn.
Row 4: Ch 1, Hdc in same st as ch 1 and in each st across.
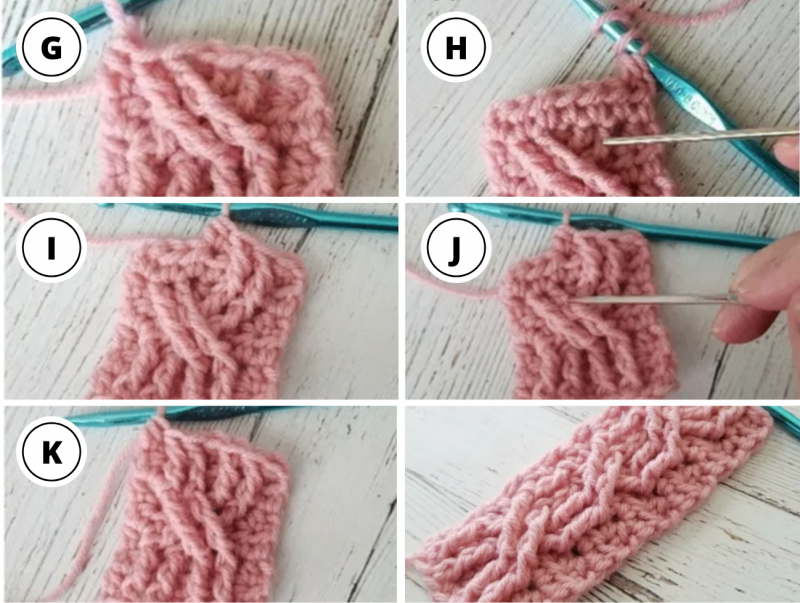
Row 5: Ch 1, hdc in same st as ch 1. Skip 3 sts. FpDtr (front post double treble crochet) around next 2 sts 2 rows below. This time it is a little easier to find where to place your sitches because you will be crocheting around the Front Post Treble Crochets you made in row 3 (pictures D and E). Hdc in last skipped st. The FpDtr “filled” 2 of the stitches we skipped. Place your hdc in the last of the 3 skipped stitches. Now comes the part that I found a little tricky. Working in front the sts you just made, FpDtr around the 2 skipped sts 2 rows below. Again you will be making your stitches around the FpTr from row 3. Hdc in next (picures F and G). Turn.
Row 6: Ch 1, hdc in same st as ch 1 and in each across. Turn
Row 7: This row is just like row 3. Ch 1, hdc in same st as ch 1. FpTr around next 2 st 2 rows below, hdc in next (pictures H and I), FpTr around next 2 sts 2 rows below. Hdc in next (pictures J and K). Turn.
Repeat rows 4-7 as many times as you want.
Tips:
If your pattern comes with a chart, use it! I find it easier to decipher the cable pattern from a chart than only written words. Or you can sketch out your own chart!
When you are just starting out with crochet cable stitches it is important to pick a yarn weight and fiber you are familiar with using. I would not recommend using stiff cotton or highly textured yarn for your first project. Also, make sure you are using a hook size appropriate for your yarn, not too big or too small.
Use a yarn that can hold up to frogging (aka taking out stitches) because let’s face it mistakes happen, especially when we are learning new things.
Color is also important. You want to be able to see your stitches (and all the pretty texture!) so be sure to pick a yarn that is a little lighter in color. Black is probably not the best choice.
There, you just crocheted a cable stitch! Was it easier or harder than you thought? Let me know in the comments!
When l am Crocheting do l Crochet under the chain to have two pieces of yarn on the hook or do I Crochet under two pieces of the chain to have three pieces of the yarn on the hook
Hello! It really depends on the project. Better use the standard way of inserting the hook through the top loop, because it’s the easiest loop to see and pick up. I’m going to write a few tutorials about where to insert the hook in different situations.
Thanks