Alternating Fishbone Crochet Cable Pattern Photo Tutorial


This lovely Fisbone crochet cable pattern has a fun alternating V cable stitches, which create a structure that looks like a fishbone!
Learn how to crochet the Fishbone Cable Pattern with this photo tutorial.
Materials
- Crochet hook 4.5 mm (I love the Etimo Hooks).
- Worsted (#4) weight yarn – I used We Crochet- Comfy Worsted
Gauge
- In pattern: 16 sts x 12 rows will result in a 4×4 in (10×10 cm) square.
Abbreviations
- ch – chain
- dc – double crochet
- FPtr – front post treble crochet: yo twice, insert hook from the front to the back and then to the front of the indicated stitch (working around the post), yo and pull up a loop, (yo and pull through 2 loops) x twice, yo again and pull through 2 remaining loops.
- dc-FPtr-tog – dc & FPtr worked together into 2 different sts
- FPtr-dc-tog – FPtr & dc worked together into 2 different sts
- RS – right side
- sp – space
- st – stitch
- sc – single crochet
- STsc – stacked single crochet: work 1 single crochet in the first st, then work another single crochet into the left leg of the single crochet you just worked.
- WS – wrong side
- […] – crochet the instructions within brackets into the same indicated st/sp.
- * – Repeats are shown via asterisks. Repeat begins at * and ends at ;
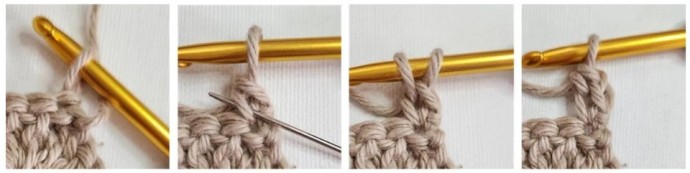
How to crochet the Stacked Single Crochet (STsc)
This stitch is an alternative to extended half double crochet, its intention in this pattern is to replace the ch3, or ch2 + dc at the beginning of the pattern and get a straighter edge.
At the beginning of the row, do not chain, keep your yarn behind your hook and work 1 single crochet in the first stitch, then work another single crochet into the left leg of the single crochet you just worked.
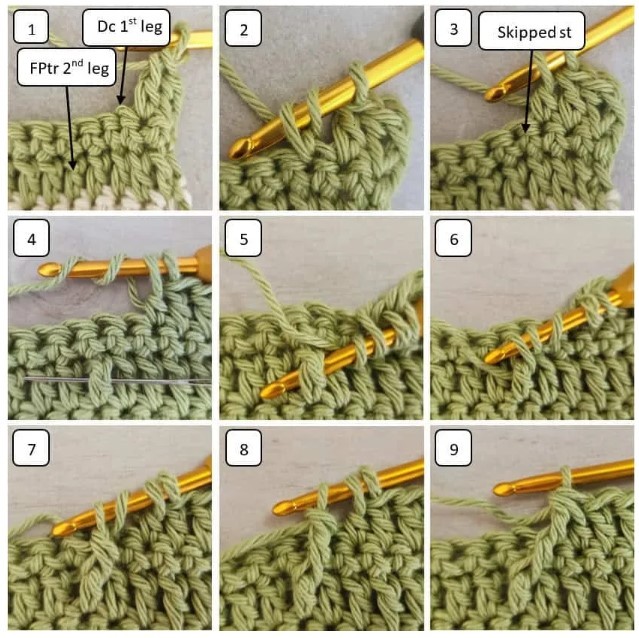
How to Crochet the Double Crochet Front Post Treble Together (dc-FPtr-tog)
Work the 1st dc leg: Yo insert hook into indicated st (pic 1), yo and pull up a loop (pic 2), yo and pull the yarn through 2 loops only, skip next st (pic 3).
Work the 2nd FPtr leg: Yo twice (pic 4), insert hook from the front to the back and then to the front of the indicated stitch (working around the post – pic 5), yo and pull up a loop and draw the hook back (pic 6), yo and pull through 2 loops (4 loops remain on the hook – pic 7), yo and pull through 2 loops (3 loops remain on the hook – pic 8), yo again and pull through 3 remaining loops (pic 9).
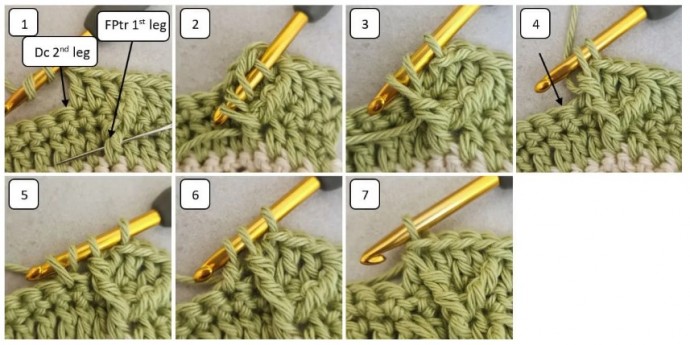
How to Crochet the Front Post Treble Double Crochet Together (FPtr-dc-tog)
Work the 1st FPtr leg: Yo twice (pic 1), insert hook from the front to the back and then to the front of the indicated stitch (working around the post), yo pull up a loop and draw the hook back (pic 2), yo and pull through 2 loops (3 loops remain on the hook – pic 3), yo and pull through 2 loops (2 loops remain on the hook – pic 4).
Work the 2nd dc leg: Yo, insert hook into indicated st (pic 4), yo and pull up a loop (pic 5), yo and pull the yarn through 2 loops only (3 loops remain on the hook – pic 6), yo again and pull through 3 remaining loops (pic 7).
Notes
- Stitch Multiple: multiple of 12 + 2 (+2 turning ch, if starting with chains).
- STsc is an alternative to the 1st double crochet, its intention in this pattern is to get a straighter edge. If you prefer, you can replace it with ch3, or ch2 + dc at the beginning of each row.
- Ch 1 at the beginning of the row does not count as a stitch.
Alternating Fishbone – Crochet Cable Pattern
Chain a multiple of 12 + 2 (+2 turning ch, if starting with chains). = after making a multiple of 12, add 2 chains, then add 2 more chains for turning ch
Row 1 (RS) –
Work 1 dc in 3rd ch from hook and in each ch across, turn.
Row 2 (WS) – Ch 1 (doesn’t count as a st), 1 sc in each st (each dc & ch1 when repeating this row) to the end of the row, turn.
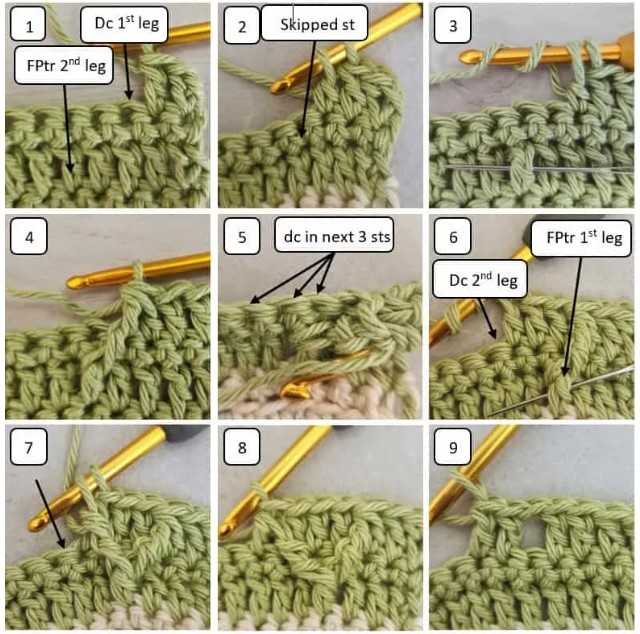
Row 3 (RS) – STsc in 1st st.
* 1 dc in next sc, 1 dc-FPtr-tog: work the 1st dc leg in next sc (pics 1-2), then skip 1 sc and work the 2nd FPtr leg around the dc 2 rows below (5th dc from the beginning – pics 3-4).
1 dc in next 3 sc (don’t skip sts – pic 5), 1 FPtr-dc-tog: work the 1st FPtr leg around the dc 2 rows below you just worked before (pic 6) then work the 2nd dc leg in next sc (pics 7-8).
1 dc in next 3 sc, ch 1, skip next sc, 1 dc in next 2 sc (pic 9); repeat from * until only 1 sc left, 1 dc in last sc, turn.
Rows 4-7 – Repeat rows 2-3 twice.
Rows 8 (WS) – Repeat row 2.
Row 9-10 – Repeat rows 1-2.
Row 11 (RS) – STsc in 1st st.
* 1 dc in next 3 sc, ch 1, skip next sc, 1 dc in next 3 sc, 1 dc-FPtr-tog: work the 1st dc leg in next sc then skip 1 sc and work the 2nd FPtr leg around the dc 2 rows below.
1 dc in next 3 sc (don’t skip sts), 1 FPtr-dc-tog: work the 1st FPtr leg around the dc 2 rows below you just worked before then work the 2nd dc leg in next sc; repeat from * until only 1 sc left, 1 dc in last sc, turn.
Row 12 (WS) – Ch 1 (doesn’t count as a st), 1 sc in each dc to the end of the row, turn.
Rows 13-16 – Repeat rows 11-12 twice.