Crochet Basics: Bobble Stitch. Step-by-Step Tutorial

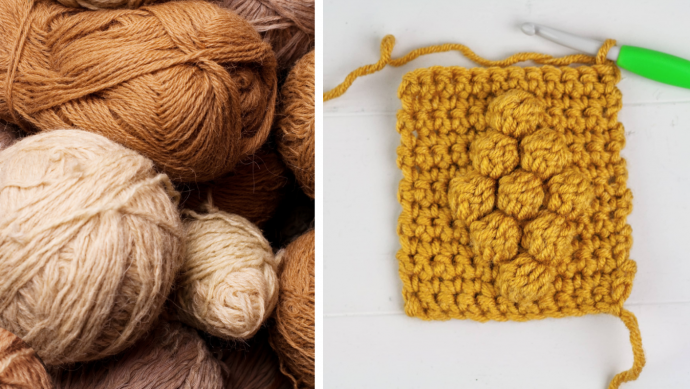
Bobbles are one of those unmistakable texture stitches that stand out dramatically against the surface of the crochet fabrics. Worked as an accent row, in pattern with other stitches, or in a bumpy 3-D fabric of their own, bobble stitches are a must-have for your crochet texture toolkit.
Today I want to teach you how to crochet a bobble stitch, and you’ll see that bobbles are fun and easy to make. Grab some yarn and a crochet hook and check the photo tutorial!
Bobbles are a cousin to decrease and cluster stitches (we will talk about them later), but rather than working the base of your stitches in different stitches and spaces like you would for a decrease or cluster, you work all of the stitches for your bobble into one stitch or space.
Bobbles are unique in that they are constructed on the back side of your working row. This means that, as you are working your row of bobble stitches, the stitches will stand against the back of the fabric. You can certainly choose to push the finished bobbles to the front side of your row, but it is the grouping of the bumps on the backs of the stitches making up the bobble that gives it that beautiful texture. Below you can see the bobble stitch worked spread out and create a polka-dot pattern. The stitch can be worked in a grid-like pattern and you can change colors to make a graphed picture. Variations are endless!
How to make the bobble stitch?
Step 1: Yarn over hook.
Step 2: Insert into Stitch and pull up a loop.
Step 3: Yarn Over.
Step 4: Pull First Loop through the second and third loop on the hook.
(2 loops on the hook)
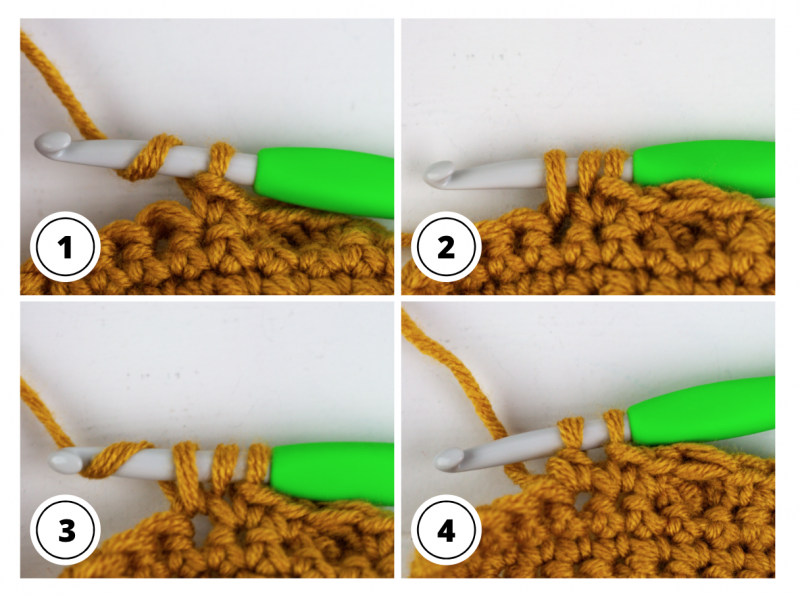
Step 5: Repeat Steps 1-4. (3 loops on the hook)
Step 6: Repeat Steps 1-4 again. (4 loops on the hook)
Step 7: Repeat Steps 1-4 again. (5 loops on the hook)
Step 8: Repeat Steps 1-4 again. (6 loops on the hook)
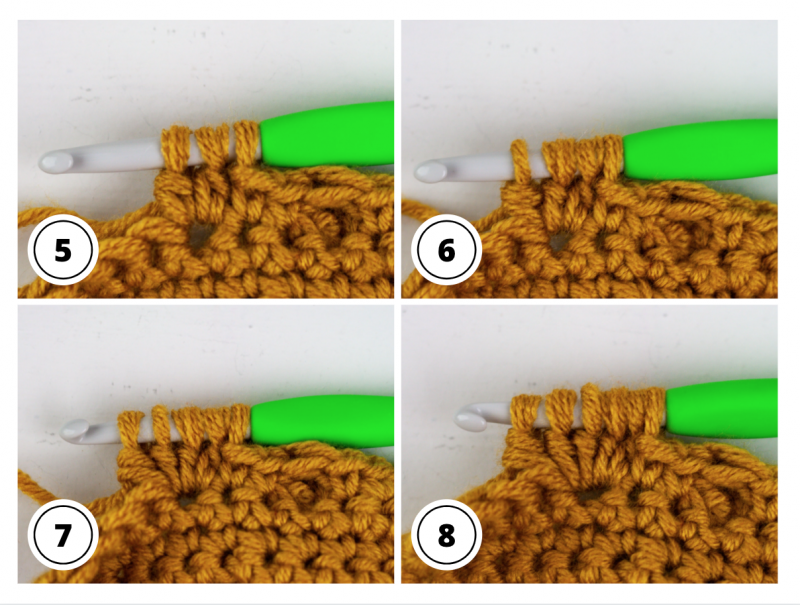
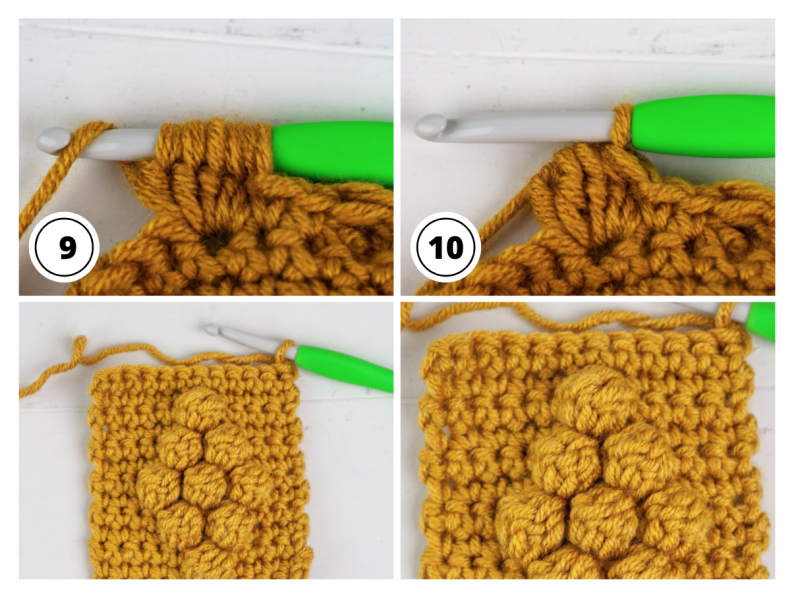
Step 9: Yarn Over.
Step 10: Pull the first loop on your hook through all the other loops on your hook. Bobble complete!
When working a pattern you will always see a single crochet worked after the bobble. This will crunch the stitch down and make it bubble up.
Bobble stitch tips
A few things to know for practicing the bobble stitch.
1. The row before and after your rows of bobble stitches can be any stitch. 2. Your row of bobble stitches will be only bobble stitches and single crochets.
3. You will only be working bobble stitches in every other row so that your bobbles are all on the same side.
4. To create the bobble you will have to work a single crochet on each side of the bobble stitch. This will scrunch down your stitch and make it puff out.
Practice swatch
CH 12
Row 1: SC in 2nd CH from hook. SC in next 10 CH.
Row 2: CH1, turn, Sc in next ST, BO, SC in next 3 STs, BO, SC in next 3 STs, BO, Sc in last ST.
Row 3: CH, 1 turn, SC in next 11 STs.
Row 4: CH1, SC in next 3 STs, BO, SC in next 3 STs, BO, SC in last 3 STs.
Row 5:CH, 1 turn, SC in next 11 STs.
Row 6-9: Repeat Rows 2-5.
Row 10-13: Repeat Rows 2-5.
Row 14: CH1, turn, Sc in next ST, BO, SC in next 3 STs, BO, SC in next 3 STs, BO, Sc in last ST.
Row 15: CH, 1 turn, SC in next 11 STs.
Fasten off and weave in your ends.
Do you like adding bobbles to your crochet projects? Tell me in comments!
This is the best explaination of the bobble stitch I have ever seen! Thanks 👍