Crochet Star Stitch: Step-by-Step Guide

Hello, my dears! Today we are talking about the star stitch (also known as the daisy stitch), which is one of the prettiest patterns I’ve ever worked with. Although it looks complicated, it’s actually an easy stitch to crochet once you know where to insert your hook. It’s the kind of stitch that makes me dream of all the possibilities – sweet bags, cozy hats and really anything that needs a little pop of gorgeous. Enjoy!
To be honest, I always thought this stitch was probably too complicated, so I never quite got around to learning it. Maybe you feel this way, too. Though it might look complicated, the star stitch is really easy to work and after a few, you will master them really fast, just like any other stitch combination. The secret is where you place your hook for each loop. This stitch is constructed with single crochet and half double crochet stitches and simple 2-row repeat that creates a star pattern sequence on the right side of your work.
Let’s go over it step by step:
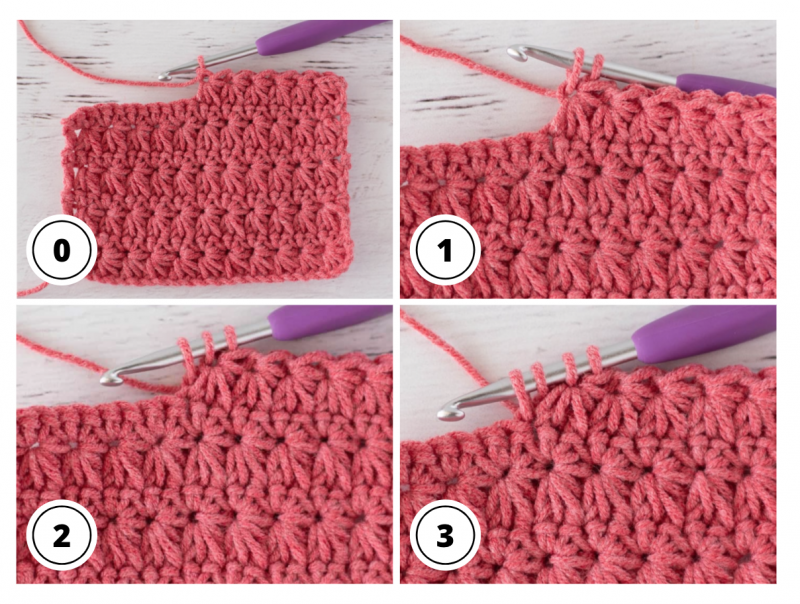
Step 0 (preliminary)
First of all, look at picture 0, you will see several rows in the pattern. Each star stitch row is separated by a row of single crochet, so the star stitch is always worked on the “odd” numbered row. It’s important to note that this is a stitch that has a “right” side and a wrong side. Odd number rows are the “right” side.
Note that just under the working loop on the hook there is a little “hole” formed at the end of the prior star stitch. This little hole is called the “eye” of the crochet start stitch. You will be working into this hole first.
Step 1:
Put your hook into the eye of the last star stitch and pull up a loop (2 loops on hook)
Step 2:
Put your hook into the back of the last loop of star just worked and pull up a loop. In my opinion, this is the trickiest part of the entire stitch. The easiest way I’ve found to do this is to look at the star just made and then look just behind that and work into that loop. Look carefully at where this loop is in the picture 2. There are now 3 loops on the hook.
Step 3:
Now put your hook into the same stitch that the last star was worked into and pull up a loop. At this point, you’ve now draw up loops basically around the top and left side of the last star and there are 4 loops on the hook.
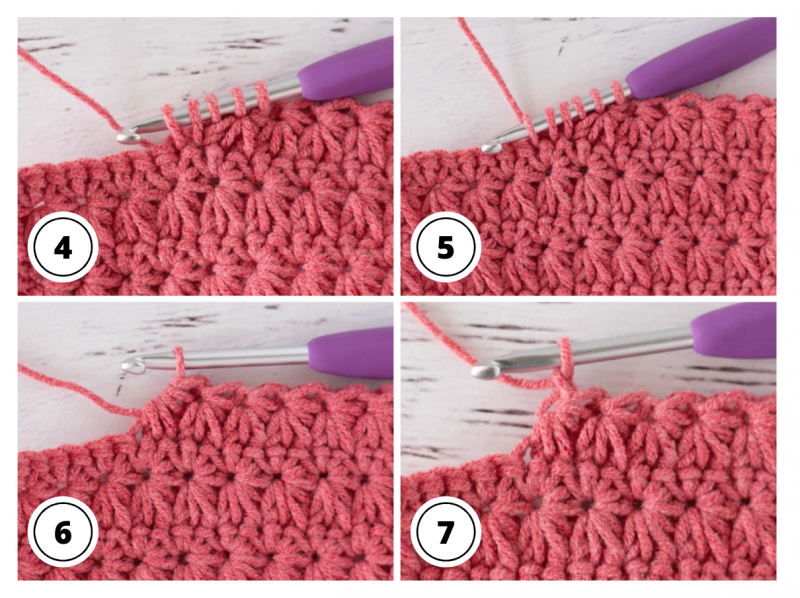
Step 4:
Insert your hook into the next stitch (which is a single crochet from the row before) and pull up loop. (5 loops on hook)
Step 5:
Insert your hook into the next stitch and pull up loop. (6 loops on hook)
Step 6:
Yarn over and pull through all 6 loops on hook.
Step 7:
To lock the star stitch in, chain one. This forms the “eye” of the star stitch.
Now you simply repeat the star process across the row.
That's it! Easy, right? Practice at home! Once you mastered, you'll be able to make amazing projects with this beautiful stitch!
Did you enjoy learning how to crochet the star stitch? Tell me in comments!
Thank you for the new Crochet sstich tutorial. I've been wanting to learn how to do this Stitch. 😆
wow! is all I can say. :D
Tami H Texas
Hello, Tami! Nice to meet you! Thank you for reading! I hope it is useful! :)
yes very thank you. I'm 69 and still learning stitches. The older girls that have passed on left us some kind of super duper stitches to learn, lol. Tami H
How do you start the first star stitch? It is very pretty.