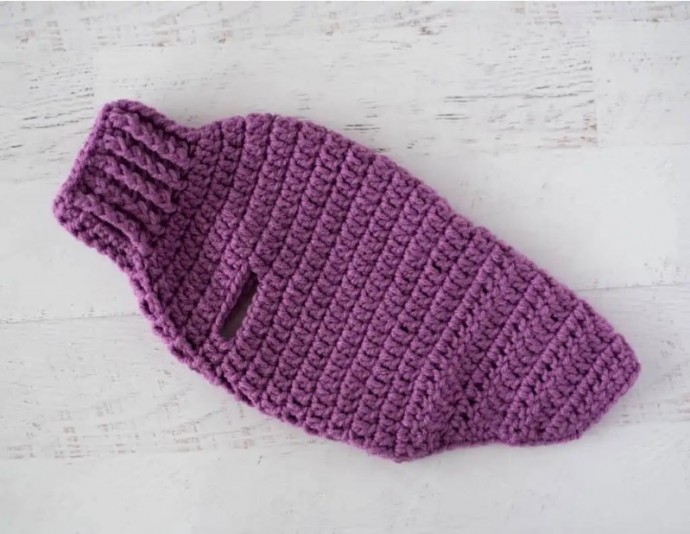
Crochet Cat Sweater


Do you know what your cat needs? A crochet cat sweater, that’s what.
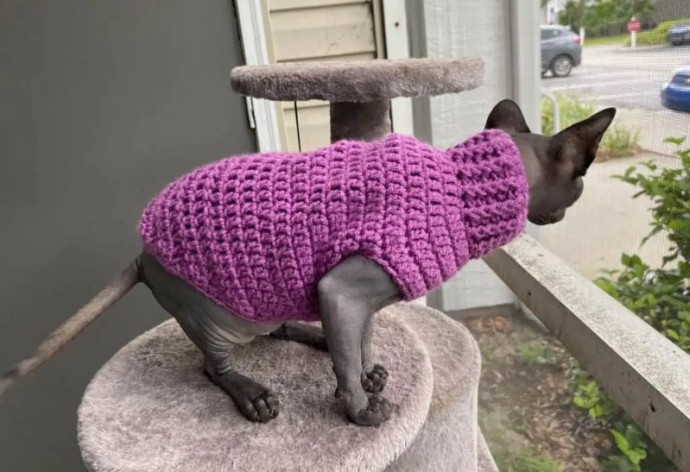
Ok, let’s be real. If your cat is like most cats, she probably isn’t too keen about your sweater ideas. But if you have a hairless cat breed, like the Sphynx cat, then staying warm is essential.
Crochet Cat Sweater
Here is what you will need for this cute pattern:
- US G 6/4.00 mm crochet hook
- 2-1/8 oz Worsted Weight Yarn
- Tapestry needle and scissors
Crochet Cat Sweater Finished Size:
Approximately 13” long x 13” around at widest point.
Gauge: 8 dc to 2”
Cat Sweater Sizing:
This cat sweater fits a small 7 lb Sphynx cat. Other sizes are NOT provided. However, you can follow the tips and tricks for help designing a sweater custom made to your cat’s size.
Cat Sweater Crochet Pattern
For the first part of the sweater, the rows are worked in joined rows.
R1: Work 28 foundation single crochet stitches. Join with a slip stitch to top of first sc in row (28 st). Note: If you are not comfortable with foundation stitches, you can instead loosely chain 28, join to form a ring and then, ch 1 and work a row of sc for this first row.
R2: Ch 3 (counts as dc here and throughout), dc in each stitch around. Join with sl st to top of starting ch 3. (28 st)
R3-7: Ch 3, *front post dc in next st, back post dc in next st* repeat * to * around. Join with sl st to top of starting ch 3. (28 st)
R8: Ch 3, dc in next 2 st, 2 dc in next st, *dc in next 3 st, 2 dc in next st. Repeat from * around. Join with sl st to top of starting ch 3. (35 st)
R9: Ch 3, dc around. Join with sl st to top of starting ch 3. (35 st)
R10: Ch 3, dc in next 3 st, 2 dc in next st, *dc in next 4 st, 2 dc in next st. Repeat from * around. Join with sl st to top of starting ch 3. (42 st)
R11: Ch 3, dc in next 10 st, 2dc in next st, dc in next 18 st, 2dc in next st, dc in next 11 st. Join with sl st to top of starting ch 3. (44 st)
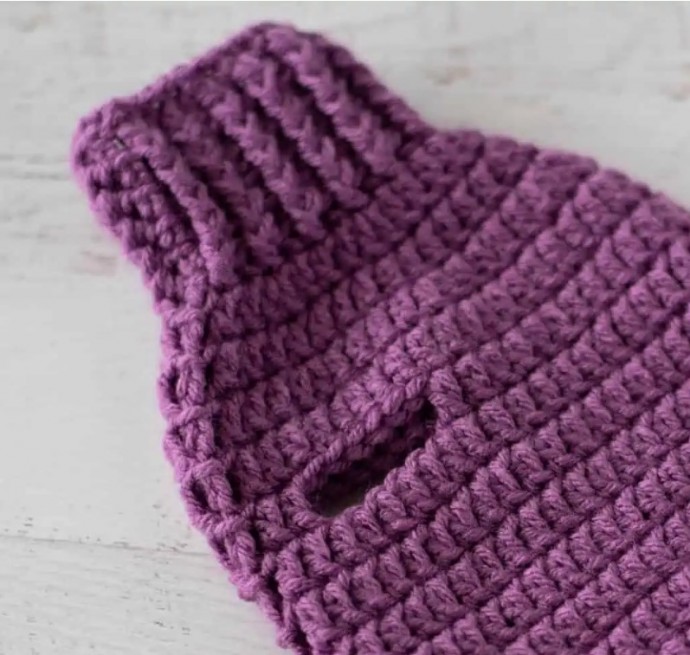
Create Arm Openings
R12: Ch 3, dc in next 2 st, ch 6, skip 6 st, dc in next 26 st, ch 6, skip 6 st, dc in last 3 st. Join with sl st to top of starting ch 3. (44 st)
R13: Ch 3, dc around, working a dc into every stitch and every chain. Join with sl st to top of starting ch 3. (44 st)
R14-17: Ch 3, dc around. Join with sl st to top of starting ch 3. (44 st)
R18: ch 3, dc in next 4 st, (dc 2 tog), *dc in next 4 st, (dc 2 tog). Repeat from * around, working a dc in in the last st. Join with sl st to top of starting ch 3. (37 st)
R19: Ch 3, dc around. Join with sl st to top of starting ch 3. At end of row, turn. (37 st)
Remainder of sweater is worked back and forth in rows. Note that the even numbered rows are the right side of the sweater.
R20: ch 2 (does NOT count as a stitch), (dc 2 tog), dc in next 32 stitches, (dc 2 tog). Leave last stitch unworked. Do NOT join, Turn. (34 st)
R21: ch 2 (does not count as a stitch), (dc 2 tog) twice, dc in next 26 st, (dc 2 tog) twice. Turn. (30 st)
R22: ch 2 (does not count as a stitch), (dc 2 tog) 3 times, dc in next 18 st, (dc 2 tog) 3 times. Turn. (24 st)
R23-27: ch 2 (does not count as a stitch), (dc 2 tog), dc until last 2 stitches, (dc 2 tog). Turn.
R28: ch 1, skip 1st st, sc in each stitch across row until last st, work sl st in last st. Continue to edging.
Cat Sweater Edging
Without turning work and with right side facing, rotate work and sc stitches evenly around bottom edges of sweater and join to top of 1st sc of last row.
Fasten off and weave in ends.
Cat Sweater Sizing Tips and Tricks:
This sweater is sized for a small, hairless breed cat. If your cat has fur and/or is bigger, here are some tips and tricks to custom make a sweater that fits your cat.
Think of the sweater as made in 5 parts. You will be trying the sweater on your cat as you go and making adjustments. Make sure to take good notes so that you can make additional sweaters later for your cat.
Part One: The Collar
Work the collar as described through row 7 and try it on your cat. It should fit close to the cat without being too tight. If you need to make this part bigger, increase the number of stitches in increments of 2.
Part Two: The Shoulder Area
The crochet on the collar needs to increase so that it fits around your cat’s shoulders. Evenly space double crochet increases every other row until you reach the top of the cat’s arms. This should be 4-6 rows.
Part Three: The Armholes
The armholes are formed by chaining and then skipping the same number of stitches in the next row. Determine where the holes will best fit your cat and how many chains you need to fit around them. This part can take some experimenting. I like to do this row and the next row so I can really see how the sweater is fitting on the cat.
Part Four: The Body of the Sweater
The next section of the sweater is the easiest. Just double crochet in joined rows until the sweater is long enough on the belly (but before the “cape” portion begins). You may need to work a decrease row to shape the sweater a little closer to your cat’s body.
Part Five: The Cape
This part of the sweater is like a cape and goes over your cats back. Follow the decrease rows similar to rows 20-22 (your stitch count between the decreases will vary). Then repeat the instructions in row 23 until you are satisfied with the length and shape of the bottom of the sweater. Work row 28 after your last row.
To finish work a row of single crochet edging around the sweater.