Crochet Lace Flower Stitch


The Lace Flower Stitch is a true masterpiece that captures the essence of nature's beauty. Its intricate design showcases delicate petals and lacy details, making it perfect for creating dreamy shawls, scarves, and other lightweight garments that are perfect for warmer seasons.
In this tutorial, we'll guide you through the step-by-step process of crocheting the Lace Flower Stitch. You'll learn how to create the foundation row, work the flower motifs, and maintain a consistent tension to achieve a flawless finish. Along the way, we'll share useful tips and tricks to make your crocheting journey a breeze.
Chain stitch – ch
Slip stitch – sl.st
Treble / Double crochet – tr / dc
Triple treble / Double treble – t.tr/d.tr: Yarn over the hook 3 times, insert the hook in st, yarn over the hook and pull it through the st. Yarn over the hook and draw yarn through the first 2 loops on the hook. Repeat the preceding step three more times until you have only 1 loop left on the hook.
Stitch – st
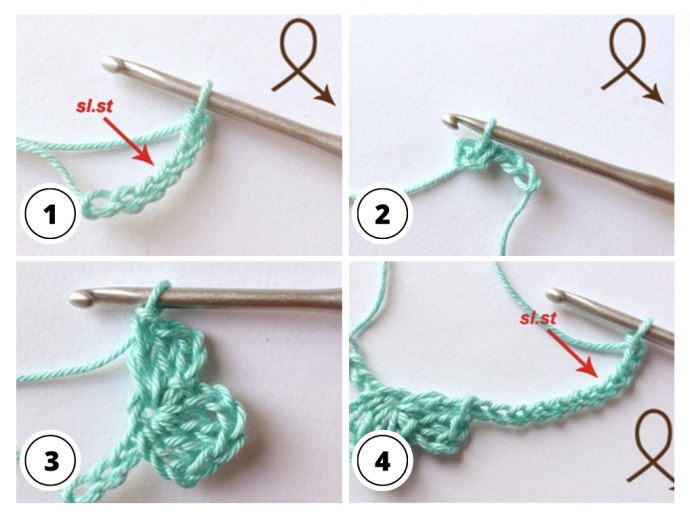
Row 1: Make 7ch and sl.st in the 4th ch from the hook.
Make { 3ch + 2tr/dc + 3ch + sl.st + 3ch + 2tr/dc} in ring of 4ch.
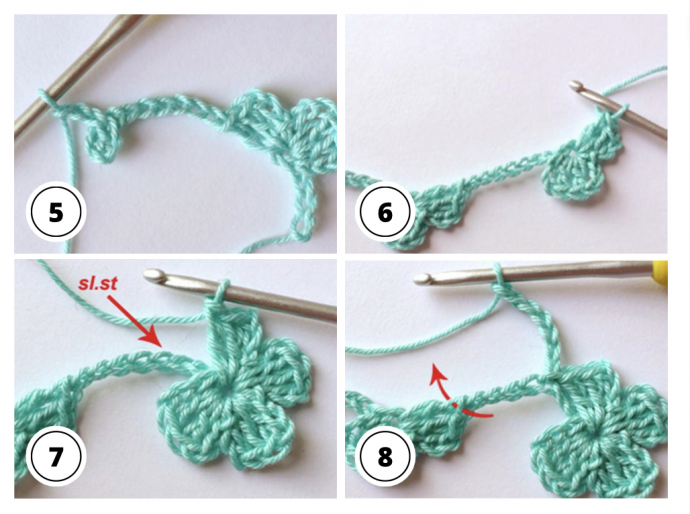
* 11ch, sl.st in the 4th ch from the hook.
Make { 3ch + 2tr/dc + 3ch + sl.st + 3ch + 2tr/dc} in ring of 4ch; rep from *.
Row 2: * Work {3ch + sl.st + 3ch + 2tr/dc + 3ch + sl.st + 3ch + 2tr/dc} in ring of 4ch, make sl.st in 3rd ch from the ring, 7ch.
Make sl.st in two loops of tr/dc of next flower (see pictures); rep from *.
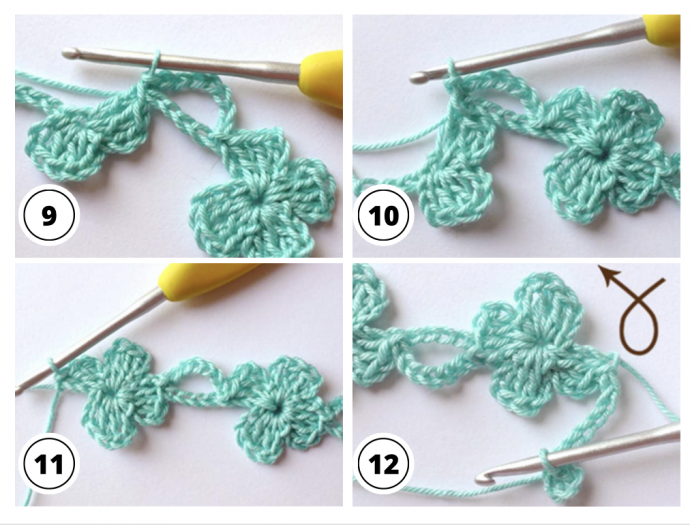
For last flower work {3ch + sl.st + 3ch + 2tr/dc + 3ch + sl.st + 3ch + 2tr/dc} in ring of 4ch and sl.st in last ch (or in 3rd ch from the ring for all next rows).
Row 3: Work 10ch, sl.st in the 4th ch from the hook.
Make { 3ch + 2tr/dc } in ring of 4ch.
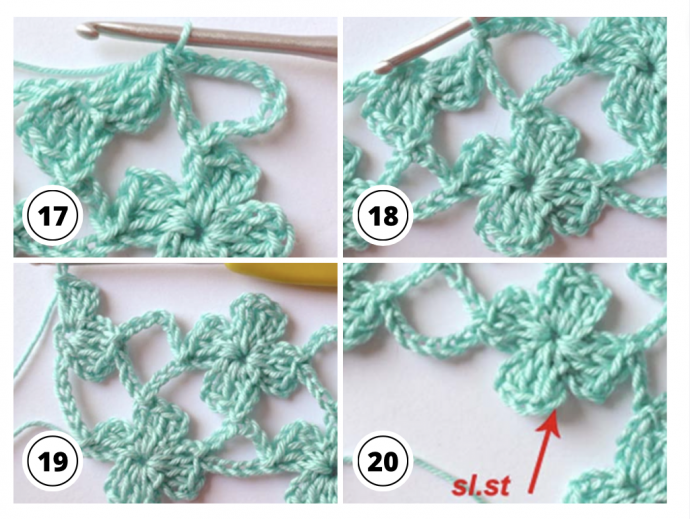
* Work 3ch, sl.st in 1st ch of top petal (see pictures),
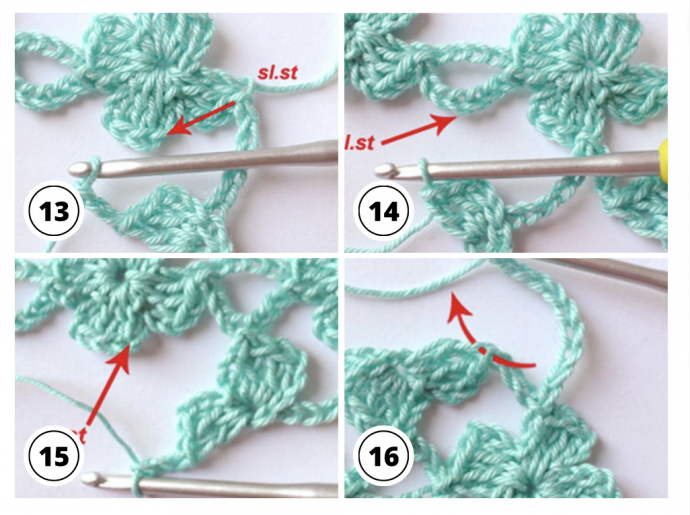
10ch, sl.st in the 4th ch from the hook. Make { 3ch + 2tr/dc} in ring of 4ch,
sl.st in 4th ch (of 7), {3ch + sl.st + 3ch + 2tr/dc} in ring of 4ch; rep from *.
Work 3ch, sl.st in 1st ch of top petal.
Row 4: Make 10 ch, sl.st in two loops of tr/dc.
* Work {3ch + sl.st + 3ch + 2tr/dc + 3ch + sl.st + 3ch + 2tr/dc} in ring of 4ch, make sl.st in 3rd ch from the ring, 7ch. Make sl.st in two loops of tr/dc of next flower; rep from *.
Work {3ch + sl.st + 3ch + 2tr/dc } in last ring of 4ch.
Row 5: * 10ch, sl.st in the 4th ch from the hook. Make { 3ch + 2tr/dc} in ring of 4ch, sl.st in 4th ch (of 7), {3ch + sl.st + 3ch + 2tr/dc} in ring of 4ch, 3ch, sl.st in 1st ch of top petal; rep from *.
10ch, sl.st in the 4th ch from the hook. Make { 3ch + 2tr/dc} in ring of 4ch, sl.st in 4th ch (of 10),
{3ch + sl.st + 3ch + 2tr/dc} in ring of 4ch.
Repeat rows 2 - 5 until you have reached your desired length.
Finnishing
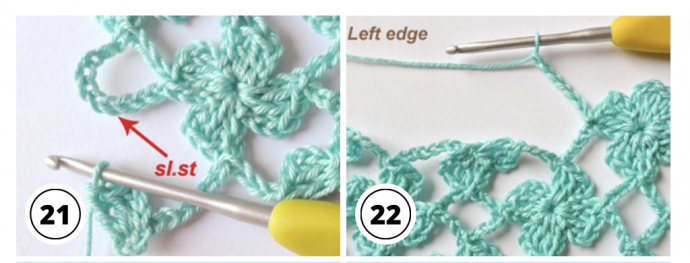
Work left edge after " Row 2": * 7ch, make sl.st in two loops of tr/dc of next flower, work {3ch + sl.st + 3ch + 2tr/dc + 3ch + sl.st + 3ch + 2tr/dc} in ring of 4ch, make sl.st in 3rd ch from the ring; rep from *.
Make 7ch and sl.st in last foundation ch.
Multicolored flower stitch
Row 1: work Row 1 of one-color flower stitch.
Row 2: work Row 2 of one-color flower stitch. After last sl.st of the row fasten off and cut the yarn.
Row 3: fasten yarn to the 1st ch of top petal (see pictures) and work Row 5 of one-color flower stitch. Finish this row after *.
Row 4: work Row 4 of one-color flower stitch. To finish Row 4 work: {3ch + sl.st + 3ch + 2tr/dc + 3ch + sl.st + 3ch + 2tr/dc} in ring of 4ch, make sl.st in 3rd ch from the ring, 3ch, 1 t.tr/d.tr in 1st ch of top petal below (see pictures), fasten off and cut the yarn.
Row 5: fasten yarn to t.tr/d.tr, work 7ch, sl.st in the 4th ch from the hook. Make { 3ch + 2tr/dc} in ring of 4ch, sl.st in in 1st ch of top petal. Then continue work Row 5 of one-color flower stitch.
Repeat rows 2 –5 until you have reached your desired length.