Crochet Tutorial: Ripple Stitch

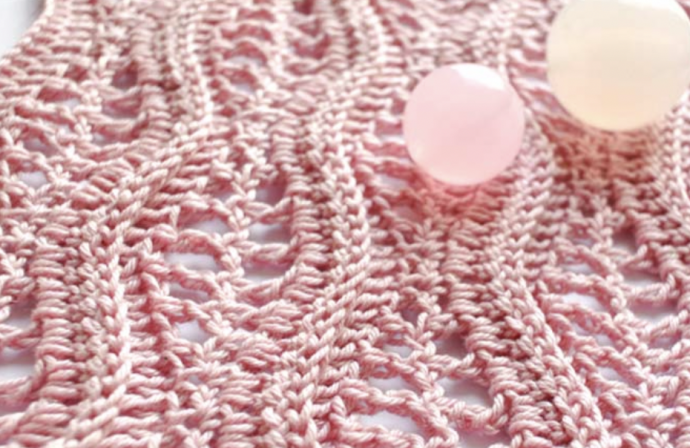
Are you ready to learn the ripple stitch? This beautiful crochet stitch has it all - it's easy to make and has an eye-catching design. This small, intricate stitch pattern is perfect for simple, graphic blankets. If you have mastered triple crochet, the ripple stitch is a breeze to make. It's all about repetition and shaping. This tutorial will teach you the basics of creating the pattern so you can use it for any crochet project. If you want to use the pattern for a blanket with ripple stitches, all you have to do is make sure the length of the initial stitches is the right size for the blanket you want - it's that easy!
Crochet ripple stitch, also known as chevron stitch, is a basic pattern used for afghans, scarves, and everything in between. In crochet, a "ripple stitch" is a stitch pattern with ups and downs. Increases and decreases are used to create the ripple effect. There are several ways to execute the ripple stitch. This simple version creates a smooth look with very few holes or gaps. Some versions have larger holes for a lace-like look. This stitch is perfect for advanced crocheters. You will need to know how to decrease stitches to make the ruffle stitch. You can use any yarn of any color and gage. It looks especially nice if you use sweeping color gradients or gradient yarns. This great pattern is knit with just three simple stitches! It's so simple, you'll have it memorized in no time. It's the perfect pattern to crochet while you watch TV.
Instructions
Foundation Chain: Multiples of 16 + 5
Techniques used in this stitch (British term / American term):
Chain stitch – ch
Double crochet / Single crochet – dc/sc Half treble / half double crochet – h.tr / h.dc Treble / Double crochet – tr / dc
Double treble / Treble – d.tr/tr
Back Post tr /dc – BPtr/dc: work like normal tr/dc but insert your hook from back to front between the the first and second stitches in the row below, and then from front to back again between the second and third stitches.
Stitch - st
Row 1: Skip 3ch, work 1tr/dc in each of the next ch, turn.
Row 2: 1ch, *1dc/sc, 1ch, skip 1st, 1dc/sc in next st, 1ch, skip 1st, 1h.tr/h.dc in next st, 1ch, skip 1st, 1tr/dc in next, 1ch, skip 1st, 1d.tr/tr in next, 1ch, skip 1st, 1d.tr/tr in next, 1ch, skip 1st, 1tr/dc in next, 1ch, skip 1st, 1h.tr/h.dc in next, 1ch, skip 1st, 1dc/sc in next, 1ch,skip 1st; rep from*,1dc/sc in next st, 1ch, 1dc/sc in 3rdch, turn.
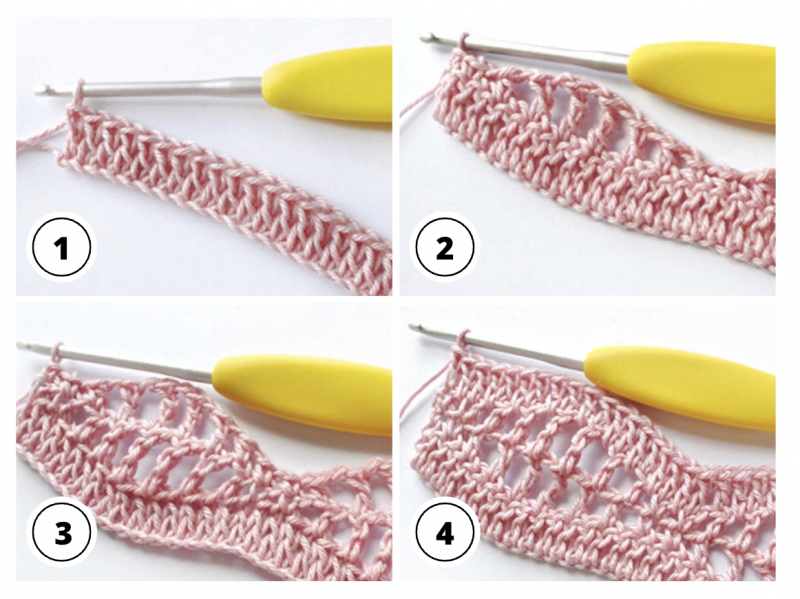
Row 3: 1ch, * 1dc/sc in dc/sc below, 1ch, 1dc/sc in next dc/sc, 1ch, 1h.tr/h.dc in h.tr/h.dc below, 1ch, 1tr/dc in tr/dc, 1ch, 1d.tr/tr in d.tr/tr below, 1ch, 1d.tr/tr in next d.tr/tr below, 1ch, 1tr/dc in tr/dc, 1ch, 1h.tr/h.dc in h.tr/h.dc, 1ch; rep from*, 1dc/sc in dc/sc below, 1ch, 1dc/sc in last dc/sc, turn.
Row 4: 3ch, *1tr/dc in space of 1ch, 1tr/dc in st below; rep from*, turn.
Row 5: 3ch, * 1 BPtr/dc over next tr/dc below; rep from*, 1tr/dc in 3rd ch, turn.
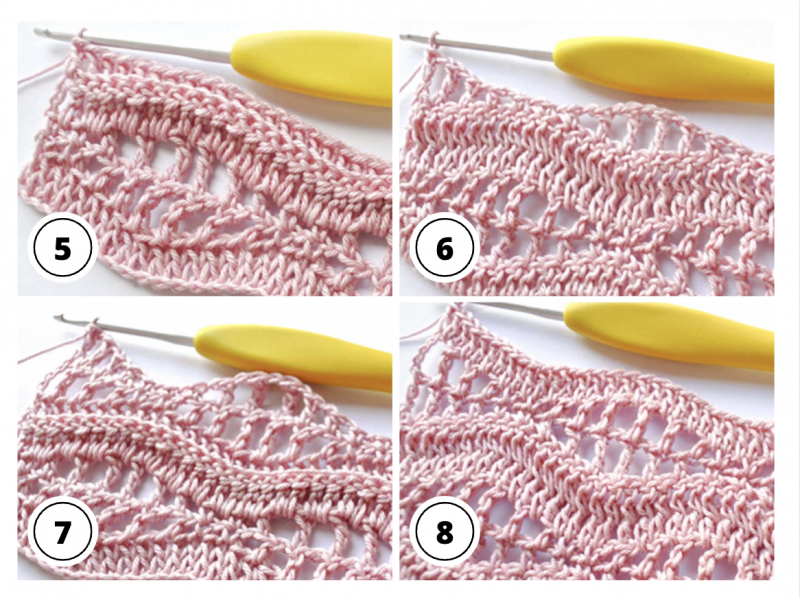
Row 6: 6ch, skip 2st, * 1d.tr/tr in next, 1ch, skip 1st, 1tr/dc in next, 1ch, skip 1st, 1h.tr/h.dc in next, 1ch, skip 1st, 1dc/sc in next, 1ch,skip 1st, 1dc/sc in next, 1ch, skip 1st, 1h.tr/h.dc in next st, 1ch, skip 1st, 1tr/dc in next, 1ch, skip 1st, 1d.tr/tr in next, 1ch, skip 1st; rep from *, 1d.tr/tr in 3rd ch, turn.
Row 7: 6ch, * 1d.tr/tr in next d.tr/tr below, 1ch, 1tr/dc in tr/dc, 1ch, 1h.tr/h.dc in h.tr/h.dc, 1ch, 1dc/sc in dc/sc below, 1ch, 1dc/sc in next dc/sc, 1ch, 1h.tr/h.dc in h.tr/h.dc below, 1ch, 1tr/dc in tr/dc, 1ch, 1d.tr/tr in d.tr/tr below, 1ch; rep from* 1d.tr/tr in 5th ch, turn.
Row 8: 3ch, *1tr/dc in space of 1ch, 1tr/dc in st below; rep from*, 1tr/dc in space of 6ch, 1tr/dc in 5th ch,turn.
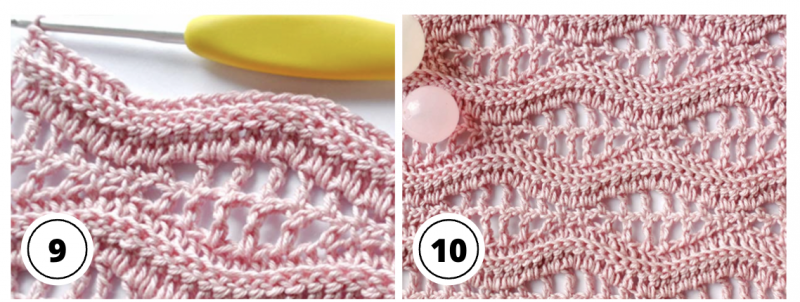
Row 9: 3ch, * 1 BPtr/dc over next tr/dc below; rep from*, 1tr/dc in 3rd ch, turn.
Repeat rows 2 - 9 until you have reached your desired length.
I am a visual person who learns by seeing a person in a video tutorial… do u have any on u Tube?