Finger Crochet Tutorial

Finger crochet is a great way to enjoy crocheting if you do not have a crochet hook handy (or if your hook is not the right size for your yarn). It's also a great way to learn crochet, since your fingers only need to focus on the mechanics of the stitches, not how you are holding the crochet hook. In this photo tutorial, I'll show you the basics.
When you drop the crochet hook and deftly guide the yarn to create a beautiful crochet, you will have learned finger crochet. You can finger crochet from start to finish or finish the work with a crochet hook.
Finger Crochet Tutorial
Finger crochet is best made with thick yarns. It is good to know that finger crochet scarves are made in the same way as regular crochet scarves. The only difference is that in this case you need to use your fingers instead of a crochet hook.
What you should keep in mind when finger crocheting
Stick to short stitches; your finger can only pick up a certain number of stitches at a time. High stitches are not suitable for finger crochet.
Try to keep your work loose. Do not tighten your stitches and chains too much.
Thick yarn for finger crochet
So far, we have only talked about using one yarn for your crochet projects. However, for finger crochet, you can use 2-3 skeins at a time to get a more voluminous crochet piece. This way you can make a crocheted piece with alternating colors. However, since we are addressing beginners, let us keep it simple and start with just one skein for a simple scarf (a rectangle) and crochet double stitches.
Instructions
You will start with a basic stitch. As we said before, these are the same steps as for double crochet. But let us go through it again, because this time there is no crochet hook involved.
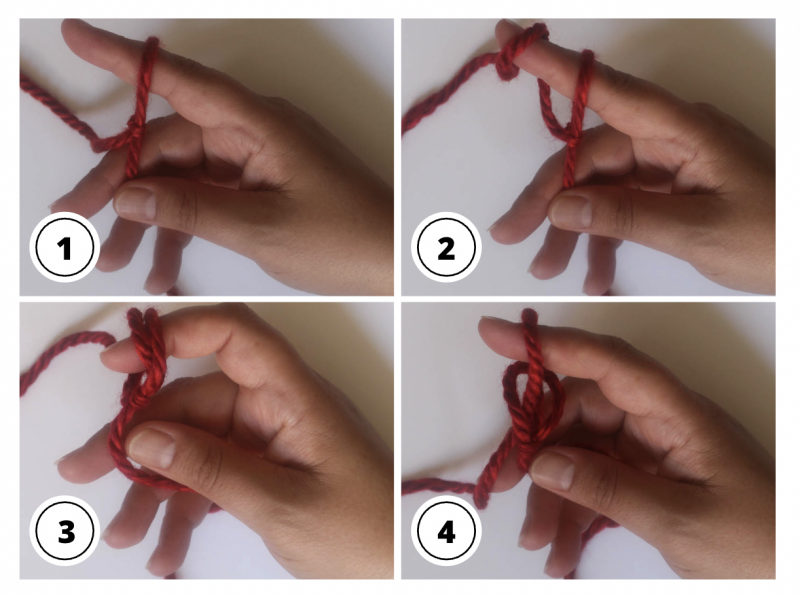
1) Start with a slip knot.
Once you have selected your yarn, start with a slip knot on the index finger of your dominant hand (i.e. your right hand if you are right-handed, or your left hand if you are left-handed). Leave the slip knot loose.
2) Make a basic chain.
With your other hand, wrap the thread from back to front over your index finger. This step is like an envelope (yo) in regular crochet.
Bend your index finger and pull the yarn through the loop that is already on your finger. You may need to use your other hand to help pull the yarn through.
You have made a necklace!
Continue these steps until the basic chain is as long as you want it to be for your project. Keep the stitches loose so your fingers can easily work through them.
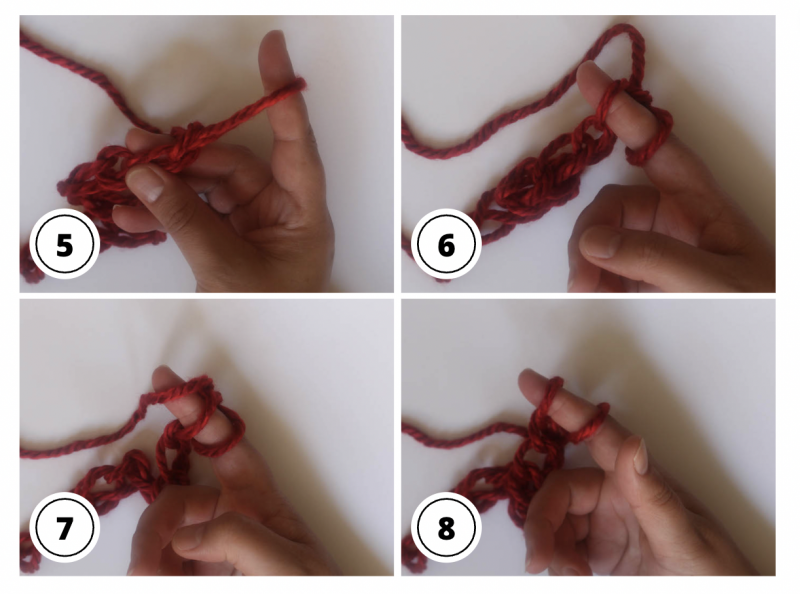
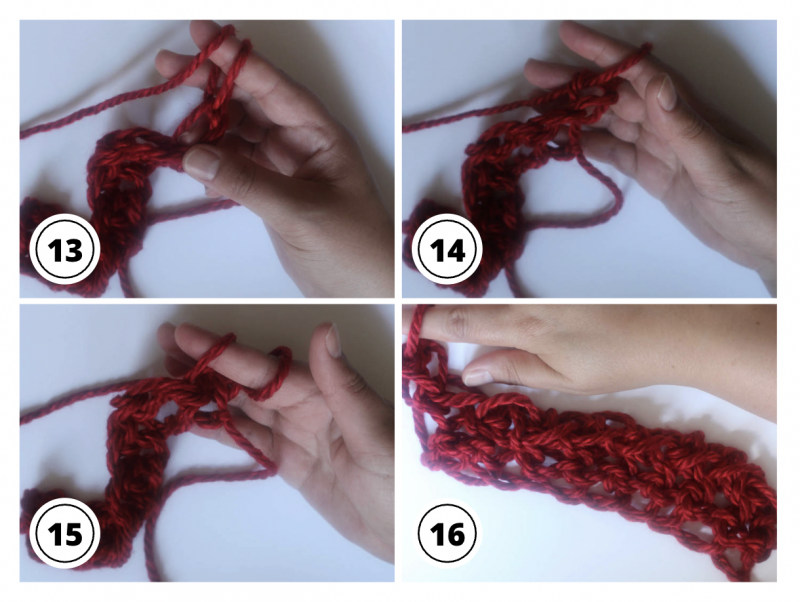
3) Make single crochet stitches.
Skip the first chain. (The loop on your finger does not count as a chain, so skip the first one that is no longer on your finger.) This step is like skipping the reversible chain (t-ch) in regular crochet.
Put your index finger into the next chain.
With your other hand, wrap the yarn around your index finger.
Pull the yarn through the first loop on your index finger. You should still have two loops on your finger.
With your other hand, wrap the yarn around your index finger.
Pull the thread through both loops on your finger. You have made a simple crochet!
Put your index finger into the next chain. With your other hand, wrap the yarn around your index finger. Pull the yarn through the first loop on your index finger. You should still have two loops on your finger. With your other hand, wrap the yarn around your index finger. Pull the thread through both loops on your finger. Repeat these steps until you have a row of single crochet stitches.
To crochet the next row of single crochet stitches, turn.
Form a chain by wrapping the yarn over your index finger...
and pull the yarn through the loop on your index finger.
Repeat for a single crochet stitch, inserting your index finger into the next (first) stitch.
With your other hand, wrap the yarn around your index finger.
Pull the yarn through the first loop on your index finger. You should still have two loops on your finger.
With your other hand, wrap the yarn around your index finger.
Pull the yarn through both loops on your finger.
Repeat these steps until you have as many single crochet stitches as you need for your project.

When you are ready to finish your project, cut the yarn, leaving an end of yarn about 13 inches long. Pull this short end through the last loop on your finger to finish the project. Use a yarn needle or crochet hook to weave in the yarn strands.
Photos: undergroundcrafter.com
Happy Crochet!
I am a Vietnam Vet, from 1966 — to 1968
Please explain how to get started.