Ripple Crochet Variations

The ripple pattern has been a favorite for many decades, and for good reason. It is easy to learn, quick to work up, and gives you plenty of chances to show your creativity. When you look at a ripple afghan you will see it has peaks and valleys separated by lengths of single stitches. At the peaks, there are three stitches crocheted into one stitch. At the valleys there are three stitches crocheted as one, or stitches are skipped to draw the fabric up into a valley. On one end of the afghan there will be a starting chain and various numbers of stitches crocheted into the first stitch depending on what the pattern calls for. On the other end, stitches are worked into the top of the starting chain. How many stitches separate the peaks and valleys decide on how sharp the wavy pattern will be. There are many variations of the ripple pattern. Today we’ll go over some of the most popular variations on the ripple pattern.
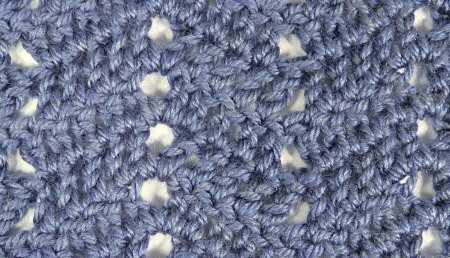
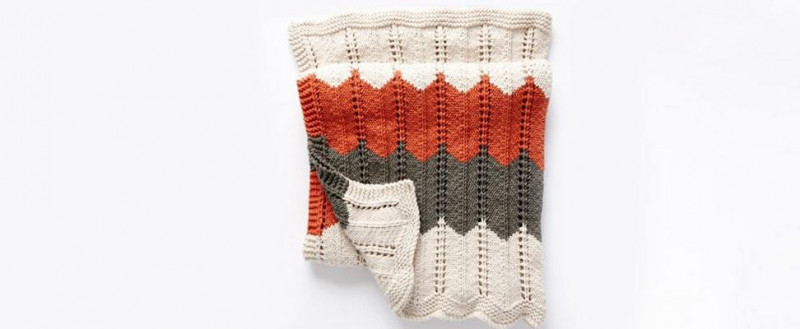
Eyelet Ripple
The eyelet ripple uses skipped stitches to form the valleys. By skipping stitches you create eyelets in the fabric. We’ll make a cute dishcloth to practice the pattern. You will need two colors of cotton or cotton/polyester yarn, a size I/9 (5.50mm) crochet hook, and a tapestry needle. I used Premier Cotton yarn in Orange and Sunshine. Don’t cut the yarn, but carry it up the side of the dishcloth.
Wavy Dishcloth Written Pattern
With Color A chain 30
Row 1: dc into the 3rd chain from the hook, dc into each of the next 3 sts, sk2 sts *dc into each of the next 3 sts, 3dc into the next st, dc into each of the next 3 sts, sk 2 sts* rep across row ending with a dc into each of the next 3 sts, dc2tog in the last ch, turn
Row 2: ch3, dc into the 1st st, dc into each of the next 3 sts, sk2 sts *dc into each of the next 3 sts, 3dc into the next st, dc into each of the next 3 sts, sk 2 sts* rep across row ending with a dc into each of the next 3 sts, dc2tog in the last ch, turn
Rows 3 & 4: Repeat Row 2 with Color B
Rows 5 & 6: Repeat Row 2 with Color A
Rows 7 & 8: Repeat Row 2 with Color B
Rows 9 & 10: Repeat Row 2 with Color A
Rows 11: ch1, sc across the top, 3sc into the corner, sc evenly along the side, 3sc into the corner, sc across the bottom, 3sc in the corner, sc evenly along the side, 2sc in corner, join in ch1, fasten off and weave in tails.
Ridge Ripple Pattern
The ridge ripple pattern used back and front loop stitches to create a pretty ridge along the rows. In this pattern the abbreviation flodc stands for front loop only double crochet. You insert the hook into the front loop of the stitch. Blodc stands for back loop only double crochet. Insert the hook into the back loop of the hook. Work the pattern alternating colors every two rows until you reach the desired length. The foundation chain is crocheted in sets of 14 plus 4. Since you are crocheting only in the front or back loops, the stitches will be very loose as you work.
For this pattern I used Premier Home yarn in Lavender and Sunshine. I also used a size I/9 (5.50mm) crochet hook and a tapestry needle. You can use any cotton yarn you like.
Ridged Washcloth
With Color A chain 32
Row 1: flodc in the 4th ch from the hook, flodc into each of the next 5 sts, flo dc3tog *flodc into each of the next 5 sts, (flodc, ch1, flodc) in the next st, flodc into each of the next 5 sts, flo dc3tog* rep across row, end with flodc into each of the next 5 sts, 2flodc into last chain, turn
Row 2: ch3, blodc into 1st st, blodc into each of the next 5 sts, blo dc3tog *blodc into each of the next 5 sts, (blodc, ch1, blodc) in the next st, flodc into each of the next 5 sts, flo dc3tog* rep across row, end with blodc into each of the next 5 sts, 2blodc into last st, turn
Row 3: With Color B ch3, flodc into 1st st, flodc into each of the next 5 sts, flo dc3tog *flodc into each of the next 5 sts, (flodc, ch1, flodc) in the next st, flodc into each of the next 5 sts, flo dc3tog* rep across row, end with flodc into each of the next 5 sts, 2flodc into last chain, turn
Row 4: Repeat Row 2 with Color B
Row 5: Repeat Row 3 with Color A
Row 6: Repeat Row 2 with Color A
Row 7: Repeat Row 3 with Color B
Row 8: Repeat Row 2 with Color B
Row 9: Repeat Row 2 with Color A
Row 10: Repeat Row 2 with Color A
Row 11: ch1, sc across the top, 3sc into corner, sc evenly along side, 3sc into corner, sc across bottom, 3sc in corner, sc evenly along side, 2sc into corner, join in ch1, weave in tails.

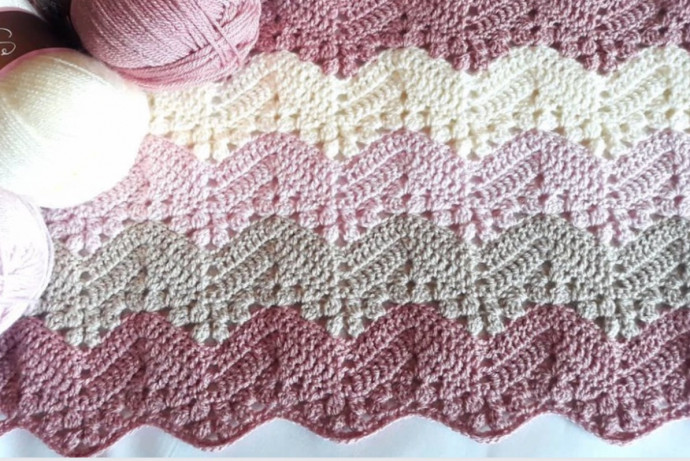
Granny Ripple Pattern
The Granny ripple uses shells of three double crochet stitches just like a Granny square. The valleys are formed by cluster stitches and skipped stitches. The peaks are formed with shells and two chain stitches. The pattern has a repeat of 28 stitches plus 3 for the first double crochet stitch. Let’s crochet up a small sample so you can get the hang of the pattern.
The pattern repeat has repeats within it. Complete all of the stitches between the first and last asterisks across the row if you have a longer foundation chain. This pattern is a good example where knowing how to read and work a crochet diagram comes in handy. The written pattern can be a bit confusing, but reading the diagram is much easier because you can see exactly where the stitches should go and how many repeats you need to crochet.
You’ll need 3 colors of any medium weight yarn and a size I/9 (5.50mm) crochet hook and a tapestry needle.
With Color A chain 59
Row 1: Cluster st, in the 5th chain from the hook, ch1 **sk 2 sts, 3dc into next st, sk 2 sts, ch 1* rep three times, sk 2 sts, 3dc into next st, ch2, 3dc into next st *3dc, ch1,sk 2 sts* rep three times cluster st into next st, sk 2 sts, cluster st into the next st, ch1 *sk 2 sts, 3dc into next st, ch1* rep three times, ch1, 3dc into next st, ch1 *sk 2 sts, 3dc into next st, ch1* rep three times, ch1** cluster st into next st, dc into last st, turn
Row 2: ch3, cluster st into the next st, ch1 **sk 2 sts, 3dc into next st, sk 2 sts, ch 1* rep three times, sk 2 sts, 3dc into next st, ch2, 3dc into next st *3dc, ch1,sk 2 sts* rep three times cluster st into next st, sk 2 sts, cluster st into the next st, ch1 *sk 2 sts, 3dc into next st, ch1* rep three times, ch1, 3dc into next st, ch1 *sk 2 sts, 3dc into next st, ch1* rep three times, ch1** cluster st into next st, dc into last st, turn
Repeat Row 2 until desired length.