Knitting Basics: Italian Tubular Cast On

Add this elegant cast on to your repertoire for pieces with incredible polish and elasticity. Unlike traditional tubular cast ons, this special technique uses no waste yarn, so you are ready to begin knitting once you have the right amount of stitches, no snipping required!
This tubular cast on appears to be like the Provisional Cast On, but in fact it is not the same, so be careful when making the stitches. Some people use smaller needles through the tubular knit rows to avoid a loose edge, but you want the edge to be stretchy, so make sure to swatch if you are thinking of decreasing the needle size. This cast on does not use waste yarn; just begin with your knitting yarn. Many people love this cast on for its simplicity; it’s nice not to mess with pulling out waste yarn. This cast on has a distinctive, seamless look and an extremely stretchy edge. It works wonderfully on scarves and hats. Learn how to make this beautiful cast on with this simple tutorial!
Extras Smaller needle size than used for rest of project (optional)
CHARACTERISTICS
Perfect for hats, gloves, mittens, socks, and cuffs.
Working the Cast On
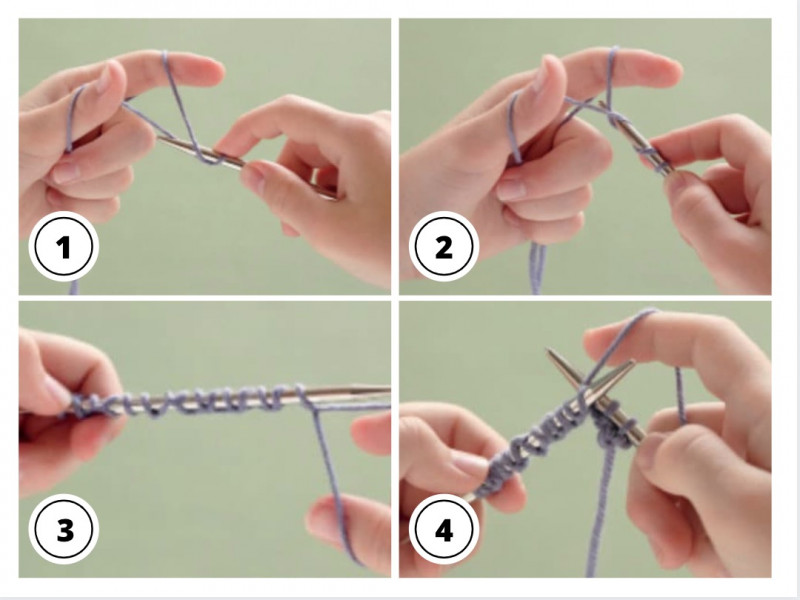
1. Make a slip knot, with a tail that is four times in length what you are casting on. Place the slip knot on the needle and hold the needle in your right hand. Hold yarn in your left hand in the slingshot position, with the tail over the thumb and the working yarn over the index finger.
2. Reach the needle tip over the top of the working yarn (over your index finger), down underneath, then over the top of the tail (thumb yarn) and pull the loop back up behind and to the top of the working yarn. This stitch has a bump at the base and resembles a purl stitch.
3. Reach the needle tip in front of and then under the tail (thumb) yarn, over the top of the working yarn, and pull the loop forward underneath the tail yarn and back up to the top. This stitch is smooth on the bottom and resembles a knit stitch.
4. Repeat steps 3 and 4 for the desired number of stitches. The last stitch will be unsecured and treated in one of two ways: Twist the yarns around each other before working the next row, or make the last stitch as if doing a Long-Tail Cast On. This creates a half hitch that secures the yarns.
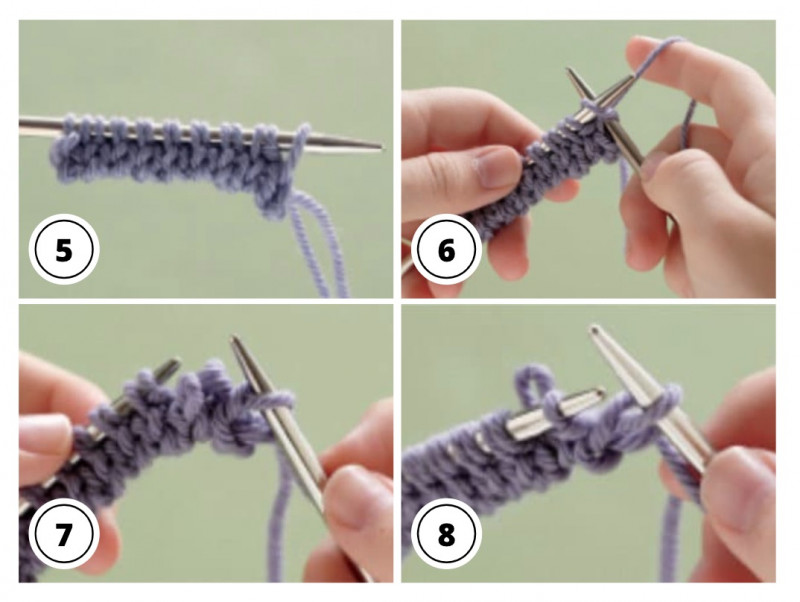
5. You now work 2 or 4 rows of tubular knitting. For tubular knitting, you knit the knit stitches and slip the purl stitches purl-wise with the yarn in front. For the first row only, knit into the backs of the knit stitches. (This keeps the stitches from twisting.) If the last stitch was cast on as in step 3, the first stitch of row 1 will be a knit. If the last stitch was cast on as in step 4, the first stitch of row 1 will be slipped purlwise with yarn in front.
6. Note that you work an even number of rows of the tubular knitting because each row worked is essentially only a half-row knit (you slip half the stitches on each row). The number of rows you work in tubular knit is up to you; more rows means more of a section that is a tube. Then, continue in K1, P1 ribbing.
For K2, P2 Ribbing
Work through the directions to finish the tubular rows. Then, on the next row, you switch stitches to get 2 knits and 2 purls next to each other, as follows.
7. Work the first stitch as it presents (knit or purl).
8. The next stitch is the opposite, so you switch it with the stitch that follows by slipping the next 2 stitches off the left-hand needle and inserting the same needle tip into the first stitch, going in front of the second stitch. Put the second stitch back on the left-hand needle.
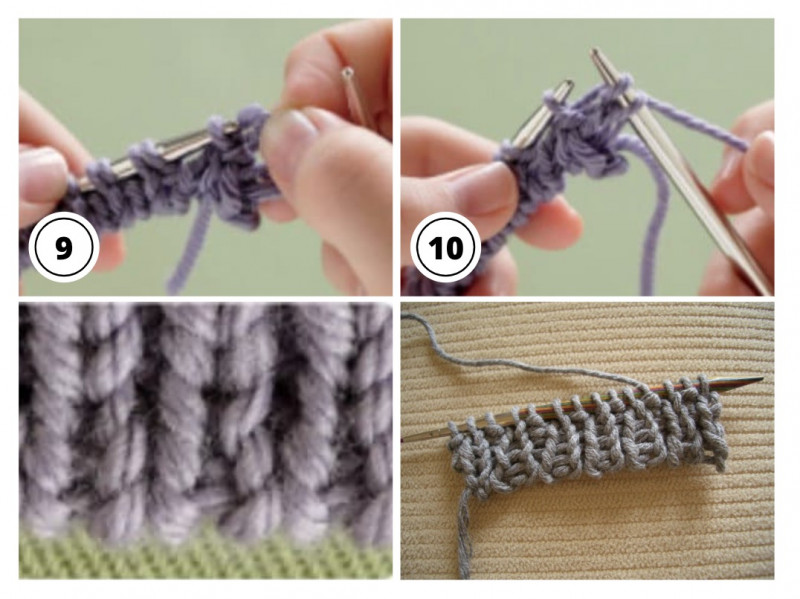
9. Work the next stitch on the left-hand needle (it will be the same as the first stitch you worked — knit or purl).
10. The next 3 stitches are in order, but then you must switch stitches again. Continue across the row, switching stitches every 4 stitches.
Happy knitting!