Crochet Basics: Crocodile Stitch

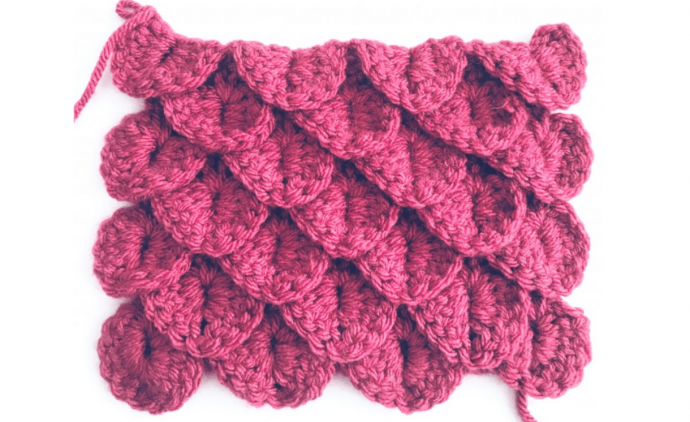
Crocheting remains a great way to make clothes and other types of things that you may want to have around the house, like blankets and scarves or baby blankets. It’s a time-consuming process, but the results are always rewarding. Many crocheters think of crochet as an art form, a passion, a therapy, whatever you want to call it, to me it is the most fun you can have with yarn. This is a calming activity and the fact that you also get to have something to show off at the end with, is pretty awesome. So, let’s continue to create yarn magic, one stitch at a time! Today’s stitch is the Crocodile Stitch. This incredible design is made using the crocodile stitch, also known as the “scale” stitch thanks to its overlapping scallop shapes. It looks more complicated than it really is, but it is best left to those who have a bit of experience.
This stitch's frilled look makes it ideal for fantasy items inspired by dragons and mermaids, but it's even fun for textured pillow covers, sweater yokes, and bags!
Crocodile Stitch
The crocodile crochet stitch is a relatively new invention in the history of crochet but one that gained quick popularity as soon as it emerged on the craft scene. The layered look of this crochet stitch has an appealing style that really makes a project stand out as unique. Learning to crochet crocodile stitch is a little bit difficult (the stitches aren't difficult though), because you work with your crochet turned in different directions. Once you make a few scales, it feels natural. And after you've gotten used to it you'll find that it's a great addition to your set of existing crochet skills. This guide will show you the basics of the stitch so that you understand how it works along with the most popular variations for how to crochet the crocodile stitch.
Instructions
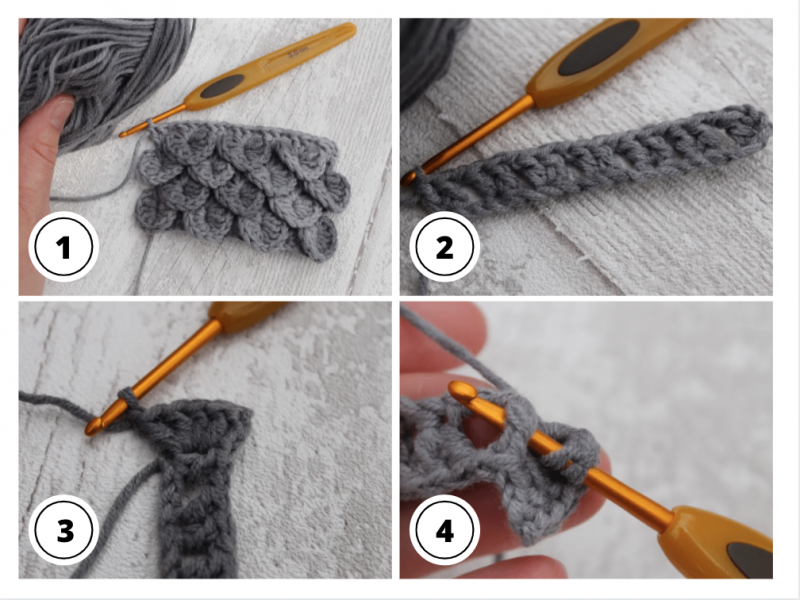
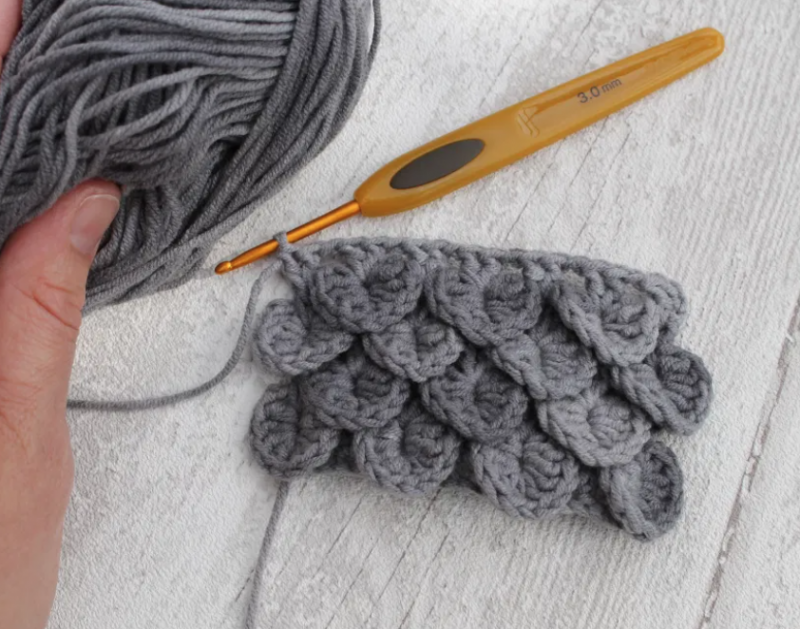
1. Chain multiples of 6+1. Just to orientate you, you’re beginning at the bottom of your work and progressing upwards. In the little sample I’m making below, I’ve chained 19, i.e. (3×6)+1. This will give me a piece with rows alternating between 4 scales and 3 scales wide
2. Pinch your last chain and ch3 (to act as your first dc). 1dc into the st you’ve pinched. (Ch1. Sk2 links of chain and work 2dc into next stitch) until the end of the row. (You should find yourself working 2dc into the final stitch.) You will have made something that looks rather like a ladder. There will be an odd number of pairs of dcs
3. Turn your work clockwise through 90◦ so that your ladder is hanging downwards. To make the crocodile scale, you’re going to work stitches into the gap between the pair of dc posts, initially from right to left down the first dc, and then back up the other side via the other dc in this first pair. So, ch3 (counts as your first dc), then, working from right to left along the first dc, make 4dc. Ch1.
4. Turn your work through 180◦ so that the rung of the ladder you’re working on is now at the bottom. Working from right to left, make 5dc in the second of the pair of dc stitches from row 2.
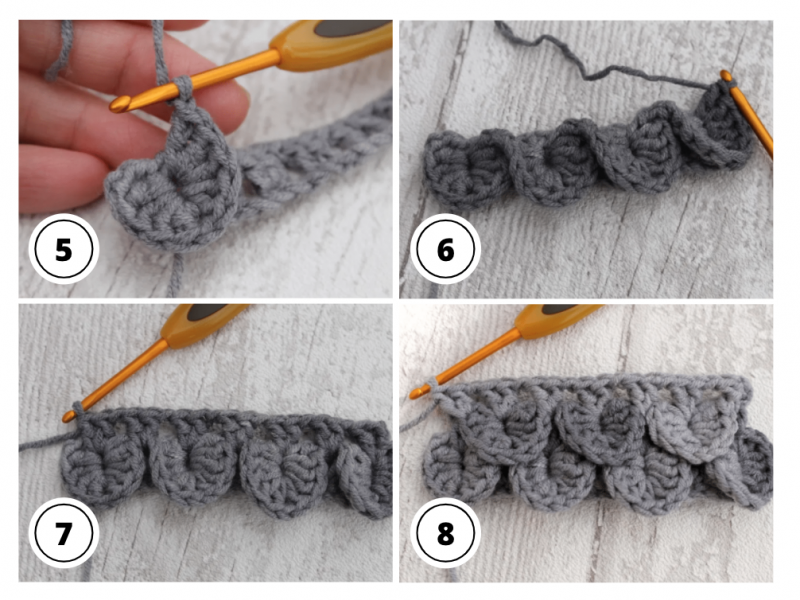
5. Now ch1. You’ve made a scale.
6. Turn your ladder through 180◦ again, so that it’s hanging downwards. Skip the next pair of dc sts from row 2 and instead work 5dc from right to left into the first dc of the following pair. Ch1, then turn your work through 180◦ and work another 5dc back up the other dc of the pair. Ch1.
7. Continue in this way, working down and then up every alternate pair of the dcs that you made in row 2. You should finish on the final pair of dcs and should now have 4 scales. Instead of your final ch1, work a ss into the top of the middle of the last scale, so that its right hand side curves nicely at the top. Your scales won’t look very neat at the moment but don’t worry, as you work the next (set-up) row, you’ll anchor them in place and make them behave.
8. Hold your work horizontally with the scales facing you and pointing downwards, and with your initial chain at the bottom. You’ll now make a new row of pairs of dcs, each pair separated by a ch1, with each pair worked into the gap between one of the pairs of dcs below. Where this coincides with the edges of two scales (ie alternate occasions), you work your dcs into the ch1 between scales as well as into the gap between dcs, thus anchoring these together. The first dc of the very first pair only should be replaced by a ch3. You should have the same number of pairs of dcs as in row 2, i.e. 7 pairs in this example.
9. You’re now going to work across again with another set of scales. However, on this row you will make one fewer scales than before – 3 in this case – because they’re slightly offset from the previous row. So, no need to begin with a ch3 this time. Instead, work 5dcs from top to bottom into the first post of the second pair of dcs. Ch1. Work 5dcs up the other side. Ch1. Continue working scales across the row until you have 3. This time, you’ll finish the final scale with a ss into the last pair of dcs, and your scale will not protrude any further than this pair of posts.
10. Make the next set-up row, as in row 6. Ch3 (to act as your first dc). 1dc into the base of this ch3. (Ch1. Sk2 stitches and work 2dc into next stitch) until the end of the row.
Repeat 3-8.
Have fun!
Dear Anna.
Thanks for the beautiful Crocodile stitch. Did you all had the Covid injection? Hope you all well. My hubby & me had that two week ago, now wait for 3 month time have second one.
Lots of love to you,
Geok Hoon
Wonderful crochet guides! I love it!!