Invisible Ribbed Bind Off

The invisible ribbed bind-off is my newest favorite method to bind off the stitches. This sewn bind off creates a very elastic edge on ribbing. The edge is, as the name implies, nearly invisible, and the flexibility produced makes it ideal for necks, cuffs, and toe-up socks. This method is particularly suitable for cuffs, necks, or socks knitted toe-up. Enjoy!
As you’re sewing, keep in mind that each stitch is worked twice: first with its opposite move (through a knit stitch purlwise) and next by sliding it off the needle with its matching maneuver (a knit stitch coming off as the tapestry needle goes through it knitwise).
Preparation Rows (Optional)
This part is optional. You can follow instructions in the “Bind Off Itself” part right away, but working preparation rows gives the bind off edge a more polished look. Plus, these rows ensure that the edge won’t become too wide as you wear the project. If you’d like to make the edge moderately stretchy and nicely rounded, work two preparation rows before you start binding off stitches:
Row 1: [knit 1, slip 1 with the yarn at the front of the work], repeat brackets to the last two stitches of the row, then knit 1 and purl 1.
Row 2: same as row 1.
As a result, you’ll get a look that is very similar to the look of 1×1 ribbing, but there will be strands in place of purl stitches in the top row.

Working the Bind Off
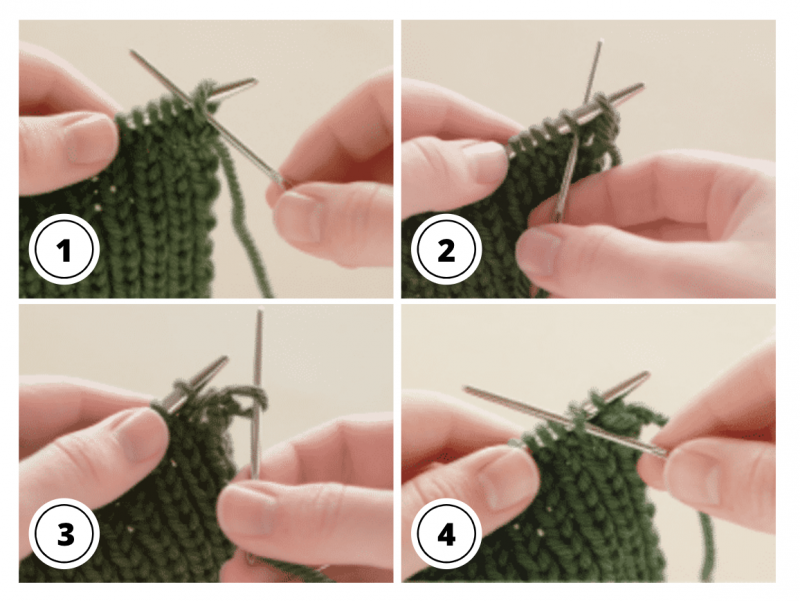
1. Measure out a tail of yarn three times the width of the knitting to be bound off and thread it on a tapestry needle. You will be working from right to left, with the right side facing you.
2. Insert the tapestry needle from right to left (purlwise) through the first (knit) stitch on the needle and pull through.
3. Insert the tapestry needle knitwise through the next (purl) stitch and pull the yarn through.
4. Insert the tapestry needle knitwise into the first knit stitch and pull the yarn through, letting the stitch fall off the needle.
5. Insert the tapestry needle purlwise into the next knit stitch and pull the yarn through.
6. Insert the tapestry needle purlwise into the first purl stitch and pull the yarn through, letting the stitch fall from the needle.
7. Bring the tapestry needle behind the first knit stitch and insert it knitwise into the next purl stitch, pulling the yarn through.
8. Repeat steps 4–7 until 1 stitch remains. Pull the tail through the last stitch and weave in the end.
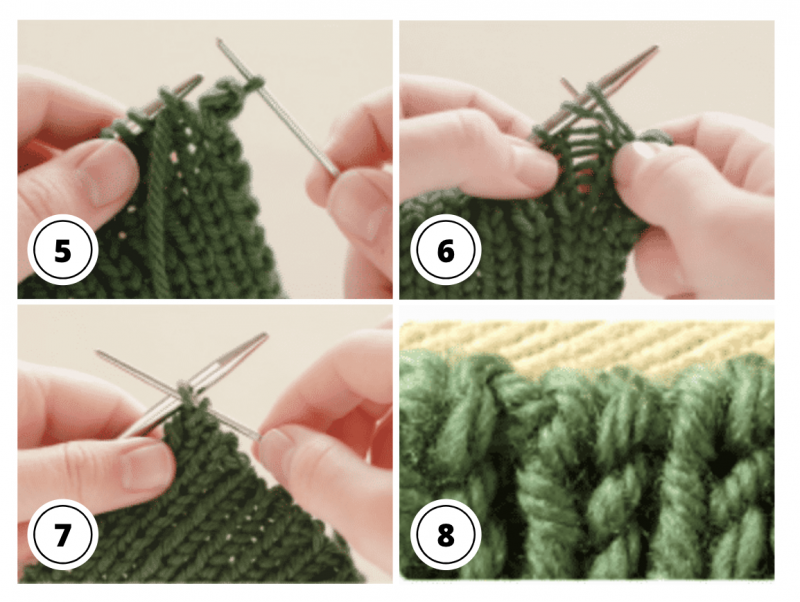
Enjoy the beautiful bind off edge you’ve just created!
Thanks for this one too. Pinning all for my knitting instructions. Just learning.
Debbie
reactivate my account please