Knitting Basics: Möbius Cast On

Hello, my dear knitters! Today I'd like to share with you a very nice Möbius Cast On. It only seems fitting to end the cast ons with a technique so unique it stands on its own. A Möbius is a half-twisted loop with only one edge. Many patterns have you knit a rectangle and twist it before sewing the ends or twist the cast-on edge deliberately before knitting. But they are faux Möbiuses and have a full twist in them. The glory and magic of a true Möbius is that it is knit from the center out and has but one edge and a half twist. This cast on creates a true Möbius strip. The need to use long circular needles limits how small the project can be. Good for bags and baskets with twisted handles, Möbius wraps, shawls, and scarves.
Working the Cast On
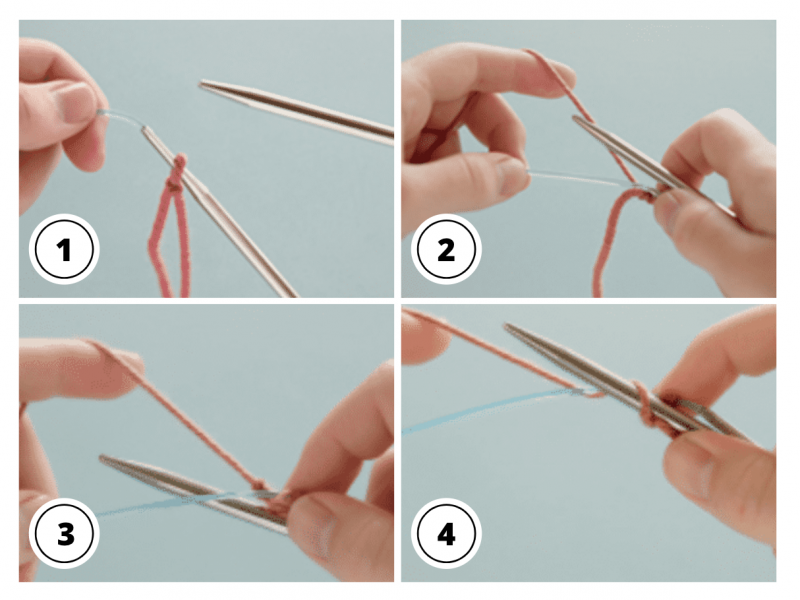
Step 1
Holding the needle in a circle, with the tips at the top, make a slip knot with a short tail and place it on the left-hand needle tip. Slide the slip knot into the middle of the cable and let the left-hand tip dangle. The right-hand needle tip does the casting on, and the left-hand tip just hangs and waits.
Step 2
Hold the yarn going to the ball from behind the needle with your left hand (point your index finger up to hold the yarn) and pinch the left side of the cable with the thumb and middle finger of your left hand. The yarn, your hand, and the cable of the circular needle make a kind of triangle. Your right hand holds the right-hand needle tip, while pinching the slip knot with the thumb and middle finger of the right hand. This is the “home” position.
Step 3
Reach the right-hand needle tip in front of the cable, then underneath the cable and up between the cable and yarn.
Step 4
Reach the needle over the top of the yarn and scoop it forward and under the cable, then back up top to the home position.
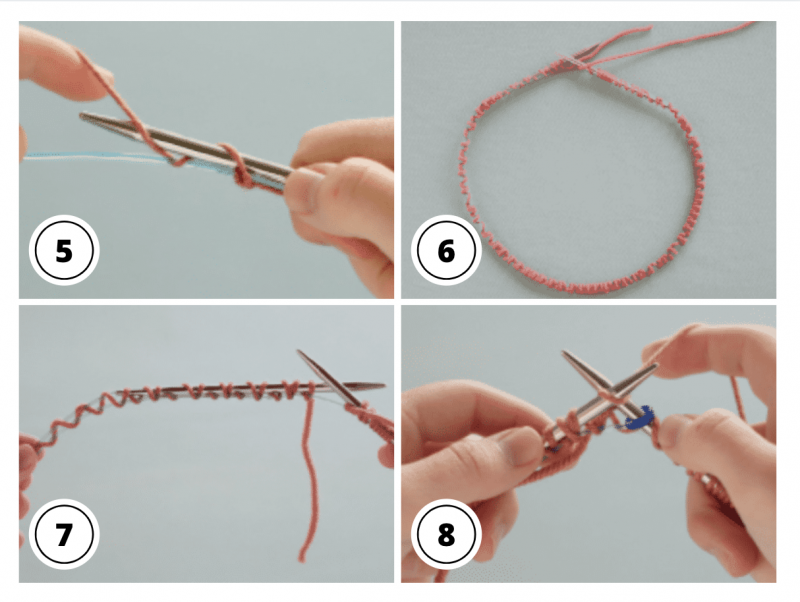
Step 5
Reach the needle up, over, and behind the yarn and scoop a loop forward. (This looks like a yarnover). Both stitches will be slanting the same way.
Step 6
Repeat steps 3–5 for the desired number of stitches. Count each stitch made by the right-hand needle as 1 stitch. Do not count the stitches that appear on the cable beneath the needle.
Beginning to Knit
Step 7
In order to keep the stitches from twisting, you need to make sure the cable and needles cross only once (making that Möbius twist). To do this, push/pull the cable, needles, and stitches so that the cable is flat and the sides are parallel to each other. (Cat likens this to a railroad track.) With both needles at the top ready to knit, let the right-hand needle cross the cable at the top. The cable and left-hand needle are parallel to each other all the way around. You may have to rotate the left-hand needle around the cable to make this happen.
Step 8
Place a marker on your right-hand needle and knit the slip knot.
Step 9
The stitches on the first half of the round often tend to slide out of order and over each other, so make sure you spread them out as you move them up onto the left-hand needle. Notice, too, that the stitches are mounted alternately. Your job is simply to knit through whatever open triangle presents itself. This means you knit one stitch through the back and the next through the front across the round.
Step 10
When you have knit to the point where your stitch marker is hanging on the cable beneath your needle (it cannot be removed at this point), you are halfway around! You’ll see your original slip knot again, too. Tug down on it, and knit into the stitch formed by the side of the slip knot.
Steps 11-12
Continue knitting (all stitches are now mounted correctly, although they now look as though you’ve purled them!) until the stitch marker reaches the left-hand needle tip. You have completed the first round. From this point on, knit each round as desired.
