Knitting Basics: Provisional Cast On


Hello, my dear knitters! Today I'd like to share with you a new knitting cast on technique - Provisional Cast On! It's a very useful cast on, and very simple to learn. A provisional cast on is a temporary cast on. It is worked so that the cast-on stitches can be removed later and the live stitches placed on a needle to be knit. The cast on is done with waste yarn — a smooth, slippery yarn, often in a contrasting color, that can be easily removed. It is a useful cast on for knitting hems and for edges where you want to add a border or knit in the opposite direction later. It is ideal for scarves when you want both ends to be identical: Start with a provisional cast on at what will be the center of the scarf, knit half, and then go back and remove the cast on and work the second half of the scarf to match the first.
One thing that should be noted about provisional cast ons is that the stitches are actually formed by the loops between the upper stitches, and thus are one-half stitch off from the stitches going upward. This doesn’t matter if you are knitting stockinette or ribbing. If you plan, however, to continue a color or texture pattern, the stitches will be offset from each other. You can get around this by working a few rows of another stitch or adding a contrasting color stripe before working down.
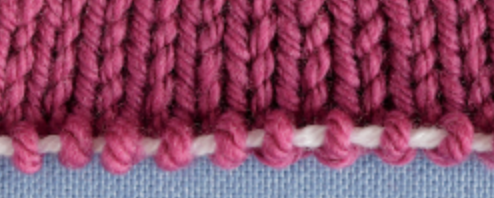
This method has you cast on stitches around a piece of waste yarn. The waste yarn is never knit; it merely serves as a base to hold the cast-on stitches together. I find it easiest to use a contrasting color of waste yarn so I can tell the two yarns apart. But I love this method the most because of this tip: Instead of using waste yarn, I use the cable of a circular needle to cast on, and when I am ready to knit the second half, the stitches are already on the needle, so I don’t have to pull anything out!
Characteristics: Provisional edge and the easiest provisional method if you have a circular needle
Good for adding a border or I-cord, working in the opposite direction later, and hems.
Working the Cast On
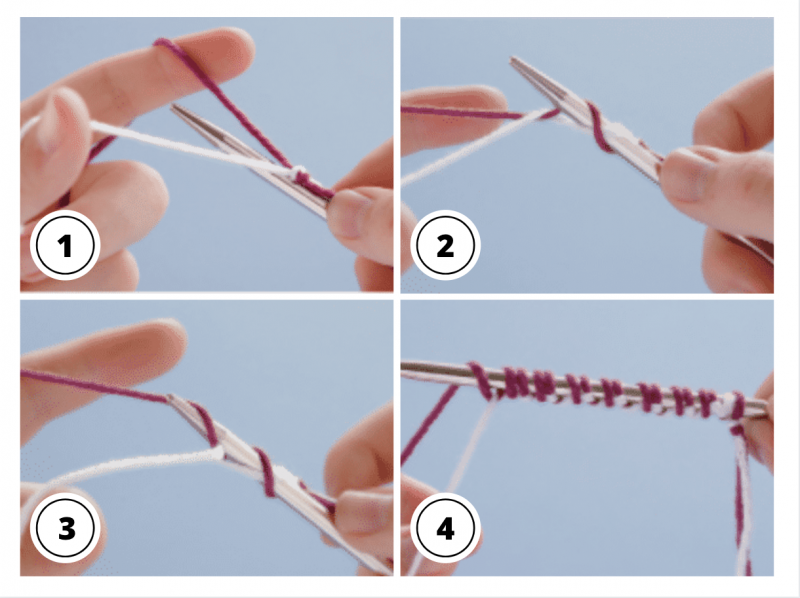
Step 1
Knot the working yarn together with the waste yarn in an overhand knot. Hold the knot and needle in your right hand, using the index finger to hold the knot against the needle.
Step 2
Hold the waste yarn over your left thumb, and the working yarn over your index finger in the slingshot position.
Step 3
Reach under the waste yarn, over the top of the working yarn, and bring the working yarn under and in front of waste yarn. This is 1 stitch.
Step 4
Reach over the top of the waste yarn and behind the working yarn, pulling it forward (like doing a yarnover). This is your second stitch.Repeat steps 3 and 4 until you have the desired number of stitches cast on. If you need to cast on an even number of stitches, start with step 4 (yarnover step). Note that the waste yarn only loops through the bottom of the stitches. All the stitches are made with the working yarn, ready to be knit.
Picking up the Live Stitches
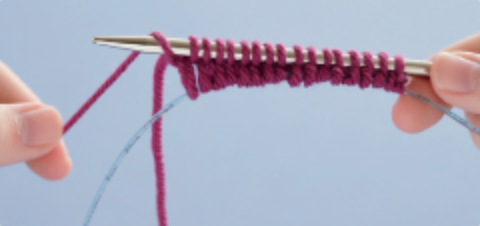
Later, when you’re ready to knit in the opposite direction or add a border, pull the waste yarn out and place the live stitches on a needle.
Getting It Right
To use a circular needle instead of waste yarn, skip steps 1 and 2 and instead make a slip knot with the working yarn and slide it onto the cable of a circular needle, using your right index finger to hold the knot in place. Hold the yarn over your left index finger and the cable of the needle between your thumb and middle finger. Proceed with step 3, substituting “cable” for “waste yarn.” When you are ready to knit in the opposite direction, your needle is already in place.
Happy knitting!