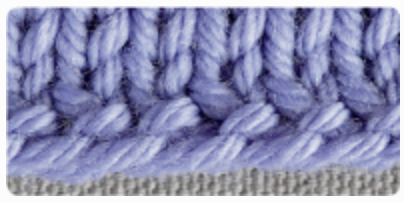
Knitting Basics: Twined Cast On


This unique cast on also can be done with two or three colors, creating a striking edge for colorwork garments. Worked in two colors, the edge is a decorative contrast to the knitted garment and creates an interesting braided effect. With three colors, you get the contrasting edge and alternating colors in the first row, making it the perfect setup for corrugated, or two-color, ribbing. In structure, the cast on is using multiple colors of yarn. It differs from the other multicolor cast ons in that the thumb yarn remains the same throughout, forming the single-color contrast edge. Main characteristics of this cast on are: distinctive, colorful edge, elastic edge. It is perfect for: corrugated, or two-color, ribbing, bottoms of mittens and hats, any multicolor knitting: stranded, helix, mosaic, twined, and more.
Before You Begin
Decide how many colors (one, two, or three) you want to be part of your twined edge. To work in two colors as pictured on the previous page, yarn A (light blue) is the contrast color and yarn B and yarn C are both lavender.

If you want to set up two-color ribbing, as pictured here, yarn A (navy) is the contrast color, and yarn B (light blue) and yarn C (lavender) set up the body of the fabric.
Or, three strands of the same color yarn create a beautiful textured edge.
Working the Cast On
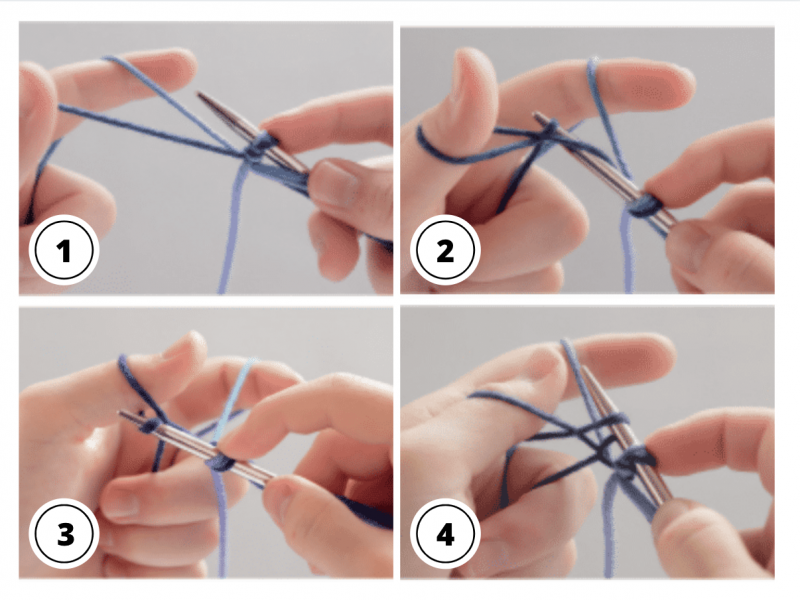
Step 1
With all three yarns and leaving short tails, make a slip knot and place on the needle. The slip knot does not count as a stitch.
Step 2
Hold the yarns in the slingshot position, with yarn A (this is the color that forms the contrast edge; in this case, navy) going to the thumb and yarn B (light blue) going to the index finger.
Allow yarn C (lavender) to just hang out of the way at the back. Yarn A (navy) is always on the thumb; yarns B (light blue) and C (lavender) alternate on the finger.
Step 3
Insert the needle tip under both strands of yarn on your thumb.
Step 4
Bring the needle over the top and down into the thumb loop, coming out underneath the strand that is in front of your thumb.
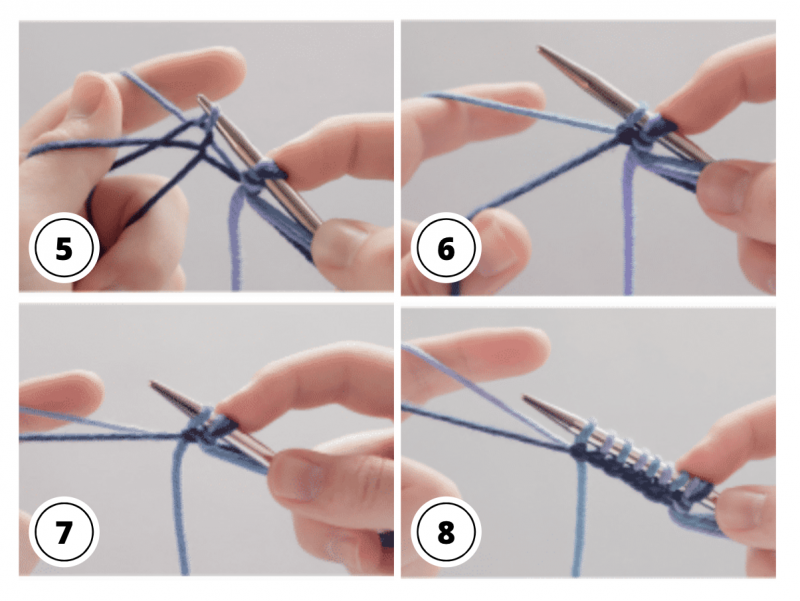
Step 5
Bend your left thumb toward the index finger and reach over the top of the strand on your index finger.
Step 6
The loop on your thumb now has an X in it. Bring the needle tip through the bottom (nearest the needle) of the X.
Step 7
Drop the thumb loop and tighten the stitch.
Step 8
Drop yarn B (light blue) to the front and bring yarn C (lavender) up behind it, holding yarn C over the index finger. Repeat steps 3–8, always dropping one color yarn to the front and bringing the new color yarn up behind it. The thumb yarn always stays the same.
Beginning to Knit
Remove the slip knot when working the first row of knitting. Your first row of knitting will be a wrong-side row if working flat. If knitting in the round, join stitches and begin with the first right-side row.
Happy knitting!
got to try it and thanks for more knitting patterns and instructions on how to make them