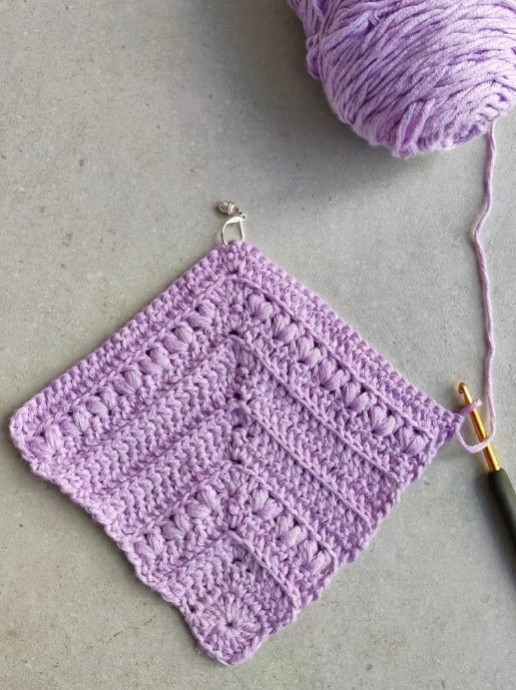
Mitered Tulips Crochet Afghan Square Photo Tutorial


The Mitered Tulips square is a fun crochet afghan square with a beautiful texture.
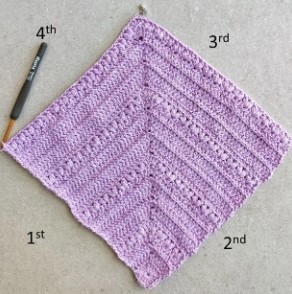
It is crocheted using the Mitered square crochet method, which means that it starting from one corner and is worked in diagonal to the other corner, so you can make it as big as you’d like.
Learn how to crochet the Mitered Tulips Afghan Square with this photo tutorial.
Materials
- 3.5 mm / E crochet hook (I used Tulip Etimo).
- DK (#3) weight yarn. For this pattern I used Lion Brand Coboo yarn, total amount of yarn needed: 70gr/162yds/184m
Gauge
- Work until row 2, the length in the center of the square should be 1.5in / 3.8cm.
Finished Size
- 6×6 in (15×15 cm)
Abbreviations
- RS – right side
- WR – wrong side
- PM – place marker
- ch – chain
- ss – slip stitch
- sc – single crochet
- sp – space
- blo – through back loop only
- flo – through front loop only
- dc – double crochet
- in 3rd loop – work st into third loop (the loop is below top 2 loops).
- tr – treble crochet
- Puff – (yo, insert hook into next st, yo and pull up a loop) x 3 times working into same st, yo and pull through 6 loops, yo again and pull through 2 remaining loops.
- Tulip – [1puff, ch1, 1puff] in same stitch
Notes
- ch3 at the beginning of the row counts as 1dc.
- The square is worked from one corner to corner (similar to the C2C method, but without the decreasing).
- Place marker in the corner stitch (tr) and move marker along the rows to make it easier to find the corner.
- This square needs a blocking to obtain its final shape, don’t skip this step.
Stitch counting
- Each tulip row adds a total of 8 tulips (4 at each side).
- Each dc row adds a total of 4 dc (2 at each side). When working a dc row after a tulip row, you add a total of 8 dc in compared to the last dc row
Mitered Tulips Square Crochet Instructions
Setup Section
Make a magic ring
Row 1 (RS): ch4 (counts as 1tr), working into the ring: 3dc, (1tr, 3dc) x3 times, ss to top of ch-4. Pull the ring tight, turn. (12dc, 3 tr)
Row 2 (WS):
ch3 (counts as 1dc here and throughout), 1dc in next 3 dc, [2dc, 1tr-PM, 2dc] in next tr, 1dc in next 3 dc, 1dc in next tr, turn. (12 dc, 1 tr)
** To meet gauge, make sure the length in the center of the square is 1.5in / 3.8cm.
Row 3 (RS):
ch3, 1dc in next 5 dc, [2dc, 1tr-PM, 2dc] in next tr, 1dc in next 6 dc, turn. (16 dc, 1 tr)
Row 4 (WS):
ch3, 1dc in 3rd loop in next 7 dc, [2dc, 1tr-PM, 2dc] in 3rd loop in next tr, 1dc in 3rd loop in next 7 dc, 1dc in flo of top ch-3, turn. (20 dc, 1 tr)
Row 5 (RS):
ch3, skip 1 dc, tulip in next dc.
* skip 2 dc, tulip in next dc; repeat from * 1 more time, skip 1 dc, [2dc, 1tr-PM, 2dc] in next tr.
skip 1 dc, tulip in next dc, * skip 2 dc, tulip in next dc; repeat from * 1 more time, skip 1 dc, 1dc in top of ch-3, turn. (6 dc, 1 tr, 6 tulips)
Main Section
Row 6 (WS):
ch3, 1dc in flo of each st (each puff and ch) until marker, [2dc, 1tr-PM, 2dc] in flo of next tr, 1dc in flo of each st to the end of the row, turn. (28 dc, 1 tr)
Row 7 (RS):
ch3, 1dc in each dc until marker, [2dc, 1tr-PM, 2dc] in next tr, 1dc in each dc to the end of the row, turn. (32 dc, 1 tr)
* work row 7 a but looser, to make it easier to work into the 3rd loop on row 8.
Row 8 (WS):
ch3, 1dc in 3rd loop in each dc until marker, [2dc, 1tr-PM, 2dc] in 3rd loop in next tr, 1dc in 3rd loop in each dc to the end of the row, turn. (36 dc, 1 tr)
* Last dc is worked in flo of top ch-3
Row 9-10: Work rows 7-8 (44 dc, 1 tr at row 10)
Row 11 (RS):
ch3, skip 1 dc, tulip in next dc.
* skip 2 dc, tulip in next dc; repeat from * to 1 dc before marker, skip 1 dc, [2dc, 1tr-PM, 2dc] in next tr.
skip 1 dc, tulip in next dc, * skip 2 dc, tulip in next dc; repeat from * to last 2 dc, skip 1 dc, 1dc in top of ch-3, turn. (6 dc, 1 tr, 14 tulips)
Rows 12-23: work rows 6-11 twice (6 dc, 1 tr, 30 tulips at row 23)
Stitch counting
Each tulip row adds a total of 8 tulips (4 at each side).
Each dc row adds a total of 4 dc (2 at each side). When working a dc row after a tulip row, you add a total of 8 dc in compared to the last dc row
* Before working row 23, measure your square, if it’s already 10in, skip the last row and start the border (skip the border instruction to see the alternative border option).
** Don’t turn your work after row 23.
Border (worked on the right side)
When the right side is facing you, start working the border, turn the square in 90 degrees.
1st side:
ch1 and start working 2sc in each side of a dc (44 sc), when reaching the beginning square work 1 ss in next tr and next 3 dc (4 ss).
Work corner: (1ss, ch1, 1ss) in next tr.
2nd side:
1 ss in next 3 dc and in next tr (4ss).
Work 2sc in each side of a dc (44 sc)
Working the corner: (1sc, ch1, 1sc) in blo of top of ch-3.
3rd side:
1 sc in blo of each st (each puff and ch) until marker (47 sc).
Working the corner: (1sc, ch1, 1sc) in blo of next tr.
4th side:
1 sc in blo of each st (each puff and ch) until last dc (the one you worked in the 1st side) (47 sc).
Working the corner: (1sc, ch1, 1sc) in blo of next dc, ss to 1st sc.
Weave in the ends, soak and block the square.
Alternative Border (worked on the right side)
When the right side is facing you, start working the border, turn the square in 90 degrees.
1st side:
ch1 and start working 1 sc in blo of each dc until marker (45 sc).
Work corner: (1ss, ch1, 1ss) in next blo of tr.
2nd side:
1 sc in blo of each dc until last dc (45 sc).
Work corner: (1ss, ch1, 1ss) in blo of last dc.
3rd side:
Work 2sc in each side of a dc (42 sc), when reaching the beginning square (see photos of 1st side at regular border) work 1 ss in next tr and next 3 dc (4 ss).
Work corner: (1ss, ch1, 1ss) in next tr.
4th side:
1 ss in next 3 dc and in next tr (4ss).
Work 2sc in each side of a dc (42 sc)
Working the corner: (1sc, ch1, 1sc) in blo of top of ch-3, ss to 1st sc.
Weave in the ends, soak and block the square.