Crochet Basics: Common Questions & Answers

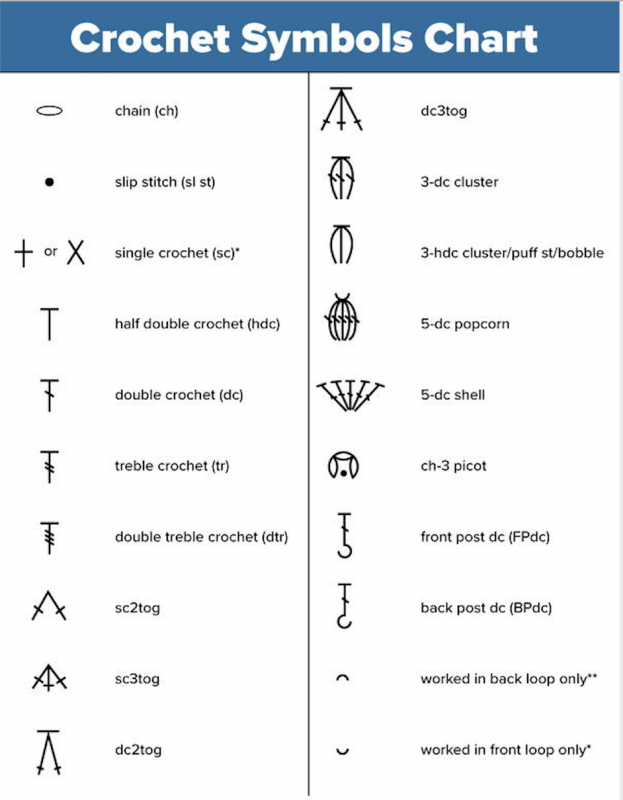
Hello, my dear crocheters! I keep answering some of the most common questions you have and to anticipate some questions you didn’t know you had. Today I invite you to learn more about pattern language and symbols as well as some tricks to determine whether the pattern goes in line with your skill level or is it too difficult for the moment. I hope that this information will lead you down the road to gaining the confidence that makes for good crocheting.
Question 1. How do I know if a pattern is too difficult for me?
Some pattern publishers designate skill levels as beginner, easy, intermediate, and advanced to suggest the ease with which certain types of crocheters may be able to follow a pattern. These labels can be somewhat arbitrary, however, as many of us have some mix of beginner and more advanced skills. Some pattern will designate “skills used” in a design, which may be somewhat more helpful. However, if the instructions are well written, even beginners can learn advanced skills. Let skill designations be a guide, but not a rule, when choosing patterns.
Question 2. If skill levels aren’t given, how do I know if I can follow the pattern?
Scan the pattern to see if you recognize the stitches and techniques used. Ask yourself these questions:
- Is the pattern well written?
- Do I understand the techniques used?
- If I’m not familiar with the techniques used, am I willing to learn them?
- Does it have shaping? If so, just a little or a lot?
- Is it an easy-to-see stitch pattern worked in an easy-to-see-yarn? Does that matter to me?
Don’t let anybody tell you that you can’t stitch something. If you are willing to learn new techniques, you can do it!
Question 3. Why do I need to look at the gauge statement before I even get my yarn?
If you have been crocheting for a while, you know that the suggested gauge can give you an idea of the size/weight of the yarn called for in the pattern. It also gives you an idea of how heavy the fabric will be and, if you are using a yarn other than the yarn called for in the pattern, what kind of yarn you should use. In some cases, you may find (to your delight) that gauge is not crucial in the project.
Question 4. All these punctuation marks are giving me a headache. Why are there so many?
Your high-school English teacher was right: punctuation matters. In our written language, punctuation marks show us where to pause and collect our thoughts before continuing on through a paragraph. In crochet patterns, they serve the same role by helping us move through a row. Each pattern publisher has its own punctuation style, but there are many similarities from pattern to pattern.
Periods usually mean the end of a row.
Semicolons are often used mid-row to set off a series of instructions.
Parentheses may be used to denote sizes, as described earlier in this chapter.
Parentheses are also used to set off stitches to be worked as a group. These sets are followed by a number indicating how many times to repeat the group.
For example: (Yo, pull through 2 loops on hook) 3 times.
Parentheses also may indicate steps to be done all into the same stitch.
For example: (sc, hdc, dc, hdc, sc) into ch-3 space.
Translation: Into the next space made by 3 chains, put a single crochet, half double crochet, double crochet, half double crochet, and single crochet, in that order.
Brackets or braces may be used instead of, or in combination with, parentheses to set off more complicated instructions.
For example: [(dc in next dc, ch 1, skip 1 dc) two times, dc in next dc] two times
Translation: Into the previous row of double crochet stitches, work double crochet, chain 1, skip 1 double crochet, double crochet, chain 1, skip 1 double crochet stitch, double crochet (that’s the first whole set written with brackets), double crochet, chain 1, skip 1 double crochet, double crochet, chain 1, skip 1 double crochet, double crochet.
Asterisks indicate a point of repeat.
For example: Ch 1, sc in same stitch, *ch 1, skip 1 stitch, sc in next stitch; repeat from * two more times.
Translation: Chain 1, single crochet in same stitch, chain 1, skip 1 stitch, single crochet in next stitch, chain 1, skip 1 stitch, single crochet in next stitch, chain 1, skip 1 stitch, single crochet in next stitch.
Some directions are worded “repeat from * twice,” instead of “repeat from * two more times.” Both examples mean the same thing: specifically, that you should work through the entire set of instructions from the asterisk (*) to “repeat from” once, then repeat that section two more times, for a total of three times.
Repeat from * across row means to work the instructions after the asterisk as many times as needed in order to reach the end of the row. If you don’t finish your row at exactly the end of the repeat, you’ve done something wrong.
Exception: Repeat from * to last 3 stitches, end sc in last 3 stitches.
Translation: You are to repeat the pattern until there are only 3 stitches left in the row, then work 1 single crochet into each of the next 3 stitches to end the row. If you don’t finish the repeated portion of the pattern with 3 stitches left to go on your row, you’ve done something wrong.
Daggers (†) and double asterisks (**) are sometimes used in combination with other punctuation to designate repeated sets. Other times they denote an incomplete pattern repeat, offering a stopping point for the last repeat of the row or round.
For example: Ch 1, sc in first sc, *ch 2, sc in next sc**, ch 2, dc in next sc; rep from * around, ending last rep at **
Translation: The last stitch of the round will be a single crochet.
Question 5. What if different punctuation marks are used in the same row?
A: This means that there are multiple steps within a row. You still follow a prescribed order for the steps. Start at the beginning of the row or round, and do each step as it comes. When you reach a set of parentheses or brackets, follow the sequences as described above as many times as necessary, then move on to the next step. For example, here’s what you might find for a border written for working around an afghan:
Ch 1, *[sc in next 2 sts, (sc, ch 5, sc) in next st, sc in next 7 sts] to corner st, (sc, ch 5, sc) in corner st, sc in next 5 sts; rep from * around.
Translation:
ch 1 to begin the round;
*sc in each of the next 2 sts, (sc, ch 5, sc) in the next st, sc in each of the next 7 sts;
repeat the line above until you reach the corner stitch;
work (sc, ch 5, sc) in the corner stitch;
sc in each of the next 5 sts;
repeat the entire section from * along each side of the afghan until you reach the beginning.
That's it! Try it at home! I know how frustrating it is when your crochet project just isn’t going right. So feel free to leave your questions below! Be sure to make them as detailed as possible, and I will try to help you as good as I can.
does this pattern have a name for the design
when it says to do a gauge pattern of a certain stitch pattern in a baby blanket such as the V-st, and the shell stitch how do you know how many stitchs to ccast on?