Crochet Lovey Pattern Tutorial: Rudolph The Reindeer

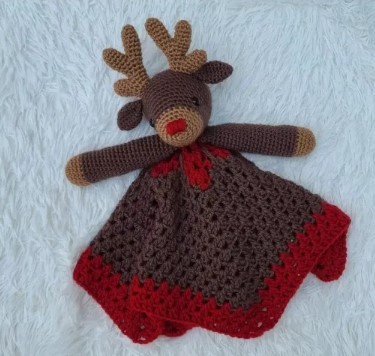
Meet Rudolph the Reindeer Lovey, the cutest animal security blanket to make this holiday season.
I designed this baby lovey to be easy and beginner-friendly, so this is perfect if you’re new to crochet and looking to make a beautiful gift for these Christmas holidays.
I stuck to Rudolph’s signature colors, threw in some adorable antlers, and, of course, that iconic red nose for that extra touch of holiday cheer.
Learn how to crochet Rudolph the Rendeer Lovey Pattern with this tutorial.
Materials
- Acrylic Aran Yarn (165m/ball), yarn quantities: 1 x 100g in brown, 1 x 100g in red, 2 x 100g in dark brown
- 4mm, 5mm crochet hooks
- tapestry needle, scissors
- 12mm safety doll eyes
- toy stuffing
Abbreviations
- magic ring
- st(s) – stitch(es)
- ch(s) – chain(s)
- sl st – slip stitch
- yo- yarn over
- sc – single crochet
- dc – double crochet
- inc – increase (2sc in the same stitch)
- dec – decrease (sc2tog)
- pst – picot stitch
- Ldc – long double crochet
- dc cl – double crochet cluster
Notes
- the stitches between ( ) are to be made into the same stitch or chain space (as instructed)
- the stitches between * * are to be repeated as many times as instructed
- if the pattern contains stitches between ** **, they are to be repeated as many times as instructed, including the * * repeats
- the number at the end of the row or round is the number of stitches unless otherwise stated
Instructions
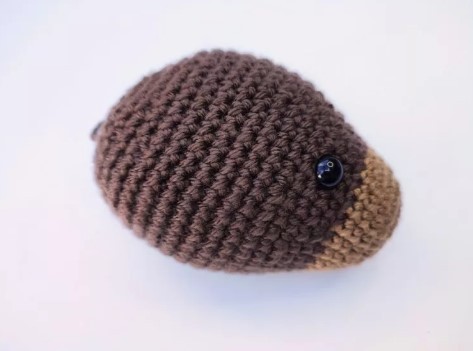
The Head
Make 1 using brown and dark brown yarn and a 4mm crochet hook.
Start with brown, and create a magic ring.
Round 1: 6sc in the magic ring, pull the tail of the magic ring to close it shut = 6
Round 2: inc x 6 = 12
Round 3: *inc, sc* x 6 = 18
Round 4: *inc, sc in next 2sts* x 6 = 24
Rounds 5 – 7 (3): sc in each stitch = 24
Change colors to dark brown
Round 8: sc in each stitch = 24
Round 9: *inc, sc in next 3sts* x 6 = 30
Round 10: sc in next 6sts, place a piece of yarn to mark the spot for the eye, sc in next 12sts, place another piece of yarn to mark the spot for the other eye, sc in next 12 sts = 30
Round 11: *inc, sc in next 4sts* x 6 = 36
Round 12: sc in each stitch = 36
Round 13: *inc, sc in next 5sts* x 6 = 42
Round 14: sc in each stitch = 42
Round 15: *inc, sc in next 6sts* x 6 = 48
Round 16: *inc, sc in next 7sts* x 6 = 54
Rounds 17-21: sc in each stitch = 54
Insert the eyes in the marked spots on Round 10. Start filling the head with toy stuffing. Continue stuffing the head as you work up the rounds.
Round 22: *dec, sc in next 7sts* 6 = 48
Round 23: *dec, sc in next 6sts* x 6 = 42
Round 24: *dec, sc in next 5sts* x 6 = 36
Round 25: *dec, sc in next 4sts* x 6 = 30
Round 26: *dec, sc in next 3sts* x 6 = 24
Round 27: *dec, sc in next 2sts* x 6 = 18
Round 28: *dec, sc* x 6 = 12
Fasten off, and leave a long tail. Finish stuffing the head, and use the tail to close the hole shut.
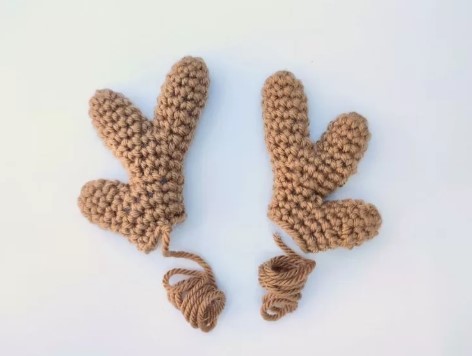
The Antlers
The pattern for the antlers is made out of 3 smaller parts:
horn #1
horn #2
horn #3
Make 2 of each using brown yarn and a 4mm crochet hook.
Horn #1
With brown yarn and a 4mm crochet hook, make a magic ring.
Round 1: 6sc in the magic ring, pull the magic ring tail to close the hole shut = 6
Round 2: *inc, sc* x 3 = 9
Rounds 3 – 6 (4): sc in each stitch, don’t fasten off = 9
Horn #2
With brown yarn and a 5mm crochet hook, make a magic ring.
Round 1: 6sc in the magic ring, pull the magic ring tail to close the hole shut = 6
Round 2: *inc, sc* x 3 = 9
Rounds 3 – 5 (3): sc in each st, fasten off, weave in the ends = 9
Horn #3
With brown yarn and a 4mm crochet hook, make a magic ring.
Round 1: 6sc in the magic ring, pull the magic ring tail to close the hole shut = 6
Round 2: *inc, sc* x 3 = 9
Rounds 3 & 4: sc in each st, fasten off, weave in the ends = 9
Joining the 3 horns
Round 1: 9sc around horn #1, 9sc around horn #2 = 18
Round 2: *dec, sc in next 4sts* x 3 = 15
Round 3: *dec, sc in next 3sts* x 3 = 12
Round 4: *dec, sc in next 2sts* x 3 = 9
Round 5: sc in the next 6sts around the main piece, sc in the next 9sts around horn #3, sc in the next 3sts around main piece = 18
Round 6: *dec, sc in the next 4sts* x 3 = 15
Round 7: *dec, sc in the next 3sts* x 3 = 12
Round 8: sc in each stitch = 12
Fill the horns with toy stuffing, and use the hook to push the stuffing all the way up.
You might have gaps where 2 horns were joined. Use the needle and brown yarn to sew them close.
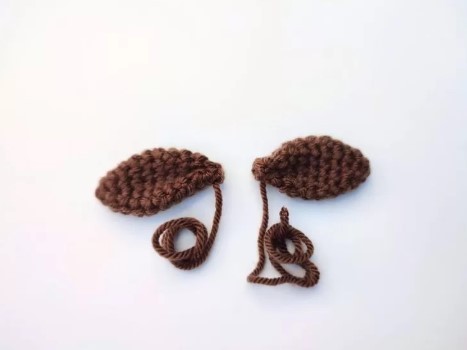
The Ears
Make 2 using dark brown yarn and a 4mm crochet hook.
Create a magic ring.
Round 1: 4sc in the magic ring, pull the tail of the magic ring to close it shut = 4
Round 2: inc x 4 = 8
Round 3: sc in each stitch = 8
Round 4: *inc, sc* x 4 = 12
Rounds 5 – 8 (4): sc in each stitch = 12
Round 9: *dec, sc in next 4sts* x 2 = 10
Round 10: *dec, sc in next 3sts* x 2 = 8
Don’t fill, fasten off and leave a long tail.
Fold the ears in half and stitch through the edge a couple of times to hold them securely in place.
The Arms
Make 2 pieces using brown and dark brown yarn and a 4mm crochet hook.
Start with brown, and create a magic ring.
Round 1: 5sc in the magic ring, pull the tail of the magic ring to close it shut = 5
Round 2: inc x 5 = 10
Round 3: *inc, sc* x 5 = 15
Round 4: *inc, sc in next 2sts* x 5 = 20
Rounds 5, 6, 7 (3): sc in each stitch = 20
Change colors to dark brown
Rounds 8 – 11 (4): sc in each stitch = 20
Round 12: sc in next 9sts, dec, sc in next 9sts = 19
Rounds 13 – 16 (4): sc in each stitch = 19
Round 17: dec, sc in next 17sts = 18
Rounds 18 – 21 (4): sc in each stitch = 18
Round 22: sc in next 8sts, dec, sc in next 8sts = 17
Rounds 23 – 26 (4): sc in each stitch = 17
Round 27: dec, sc in next 15sts = 16
Rounds 28 – 31 (4): sc in each stitch = 16
Fill the arm with toy stuffing. Fasten off, flatten the arm edge, and sl st through both layers to close the hole.
The Blanket
The blanket is crocheted using red and dark brown yarn and a 5mm crochet hook. Make 1.
With red yarn and a 5mm crochet hook, make a magic ring.
Round 1: in the magic ring, ch2 (counts as 1 incomplete dc), dc, ch2, *dc cl, ch2* x 5, sl st to close the round. Pull the magic ring tail and close the hole shut = 6
Round 2: sl st in the next ch2 space, *(ch2(counts as 1 incomplete dc), dc, ch2, dc cl) in the same ch2 space, ch2, *(dc cl, ch2, dc cl, ch2) in the next ch2 space* x 5, sl st to close the round = 12
Round 3: sl st in the next ch2 space, (ch2(counts as 1 incomplete dc), dc, ch3, dc cl, ch3) in the same ch2 space, sc in next ch2 space, ch3, *(dc cl, ch3, dc cl, ch3) in next ch2 space, sc in next ch2 space, ch3* x 5, sl st to close the round = 18
Round 4: sl st in the next ch3 space, (ch2(counts as 1 incomplete dc), dc, ch1, dc cl, pst, ch1, dc cl, ch3) in the same ch3 space, *(sc, ch3) in the next ch3 space* x 2, *(dc cl, ch1, dc cl, pst, ch1, dc cl, ch3) in the next ch3 space, (sc, ch3) in the next ch3 space, (sc, ch3) in the next ch3 space* x 5, sl st to close the round = 30
Change colors to dark brown
Round 5: *(2sc) in the next ch1 space, ch1, push the picot in front, (2sc) in next ch1 space, (2dc) in next ch3 space, (dc, Ldc, dc) in next ch3 space, (2dc) in next ch3 space* x 6, sl st to close the round = 66
Round 6: Sl st in next stitch, sl st in the next ch1 space (right behind the picot). Work between the cluster of stitches from this point on. (Ch3 (counts as 1dc), dc, ch3, 2dc) in the same ch1 space, (2dc) in the next 4 spaces between the clusters of dc stitches, *(2dc, ch3, 2dc) in the next ch1 space behind the picot stitch, (2dc) in the next 4 spaces between the clusters of dc stitches* x 5, sl st in the top ch of ch1 made at the beginning to close the round = 72
Round 7: sl st into ch3 space, (ch3 (counts as 1dc), dc, ch3, 2dc) in the same ch3 space, *(2dc) in next 5 spaces between clusters of 2dc below, (2dc, ch3, 2dc) in the ch3 space* x 5, (2dc) in the next 5 spaces between clusters below, sl st at the top of ch3 made at the beginning to close the round = 84
Round 8: sl st into ch3 space, (ch3 (counts as 1dc), dc, ch3, 2dc) in the same ch3 space, *(2dc) in next 6 spaces between clusters below, (2dc, ch3, 2dc) in the ch3 space* x 5, (2dc) in the next 6 spaces between clusters below, sl st at the top of ch3 made at the beginning to close the round = 96
Rounds 9 – 15 (7): Repeat round 8 by crocheting (2dc) in between the clusters of 2dc below and (2dc, ch3, 2dc) in each ch3 space.
Change colors to red
Rounds 16 – 18 (3): Repeat round 8 by crocheting (2dc) in between the clusters of 2dc below and (2dc, ch3, 2dc) in each ch3 space.
Fasten off and weave in all ends.
Assembling The Lovey
Assembling The Head
Start with the nose. Use pins to mark a rectangle section 2 rounds above the magic ring, 3 stitches wide and 2 rounds tall, equally spaced between the eyes.
Use red yarn and a tapestry needle. Thread the yarn in from the bottom of the head and out through the bottom corner of the rectangle.
Then insert it in the top edge of the rectangle and out of the bottom edge. Work from one side of the rectangle and make a back and forth stitches until you reach the other side, making sure the nose looks full.
Pin all the head parts to the head to make sure you are happy with the end result.
The antlers go at the top of the head, a few rounds above the eyes. Make sure they are pointing up. The ears are pinned right below the antlers.
Sew the antlers first. Next, use the yarn tails to sew the ears right below the antlers.
Assembling The Reindeer Lovey
Place the head in the middle of the blanket and sew it on with back-and-forth stitches. You should cover a circular area about 3cm in diameter.
Sew the arms right below the head at an angle. If you imagine the clock face on the blanket, the arms would be at the 4 o’clock and 8 o’clock positions.
Your reindeer lovey is now complete. Enjoy your new creation.