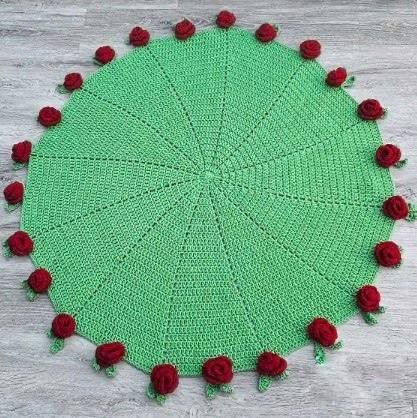
Crochet Rose Bouquet Blanket Pattern

Without a doubt, you are going to have so much fun making this gorgeous Crochet Rose Bouquet Blanket!
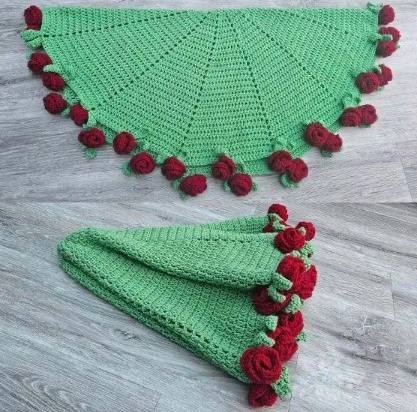
It’s such a unique and beautiful design that’s perfect for adding a touch of floral elegance to any room.
The blanket itself is a lovely shade of green, and it’s decorated with the most charming little red roses all around the edge.
It really looks like a beautiful bouquet of flowers, and it’s a wonderful project to make for yourself or as a special gift for someone you love.
Learn how to crochet the Rose Bouquet Blanket with this pattern.
Materials
- Paintbox Yarns Simply Chunky (Spearmint Green: 7 and Pillar Red or Rose Red: 2)
- 6 mm crochet hook
- tapestry needle
- scissors
Project Size
- 120 cm in diameter, Flowers are 6cm/dia
Abbreviations
- magic ring
- ch(s) – chain(s)
- st(s) – stitch(es)
- sl st – slip stitch
- sk – skip
- sc – single crochet
- dc – double crochet
- hdc – half double crochet
- tr – treble crochet
Notes
- The stitches between ( ) are to be made into the same stitch or chain space (as instructed).
- The stitches between * * are to be repeated as many times as instructed.
- The stitches between ** **, are to be repeated as many times as instructed, including the * * repeats within.
- The number at the end of the row or round is the number of stitches unless otherwise stated.
Pattern
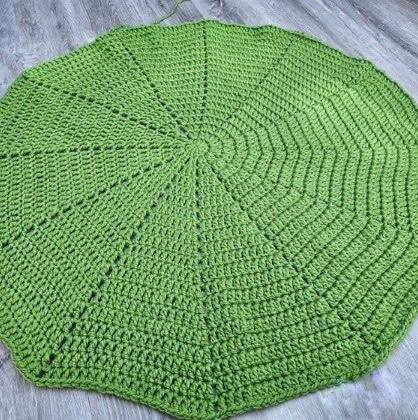
The Blanket
With green and a 6 mm hook, make a magic ring.
Round 1: ch3 (counts as 1 dc), 11 dc in the magic ring, sl st to close the round, pull the magic ring tail to close it = 12
Round 2: ch3 (counts as 1 dc), dc in the same st where you sl st, ch 1, * (2 dc) in next, ch 1* × 11, sl st to close the round = 24
Round 3: ch3 (counts as 1 dc), (2 dc) in next, ch 1, * dc in next, (2 dc) in next, ch 1 * × 11, sl st to close the round = 36
Round 4: ch 3 (counts as 1 dc), dc in next, (2 dc) in next, ch 1, * dc in next 2 sts, (2 dc) in next, ch 1 * × 11, sl st to close the round = 42
Round 5−27(23): repeat Row 4 by increasing each section by 1 dc
: ch 3 (counts as 1 dc), dc in next X, (2 dc) in next, ch 1, * dc in next X, (2 dc) in next, ch 1 *
× 11, sl st to close the sound = previous stitch count + 6
Don’t fasten off, we will continue with the border.
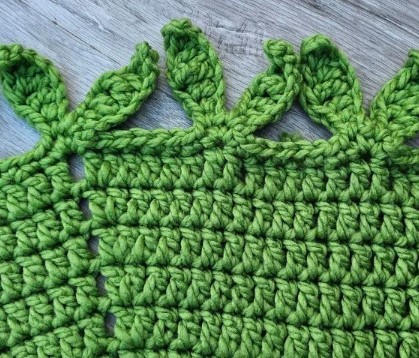
The Blanket Border
Round 28: ** sc in next 14 sts, * ch 9, sc in 2nd ch from hook, hdc in next ch, dc in next ch, tr in next ch, dc in next ch, hdc in next ch, sc in next 2 chs, sc back in the stitch below * × 2 **, repeat from ** until the end of the round, sl st to close the round, fasten off, weave in all ends.
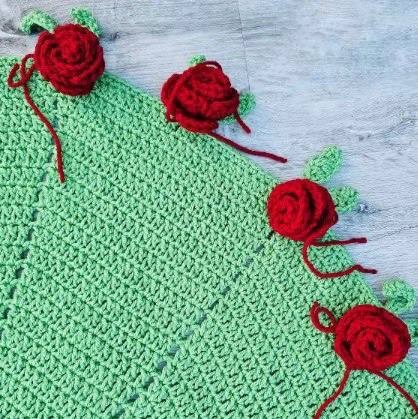
The Roses
Make 24 roses using red yarn and a 6 mm hook.
Row 1: ch 18 leaving a long tail, dc in 4th ch from hook, (2 dc) in the same 4th ch, * ch 1, sk 1, (3 dc) in next ch *, repeat from * until the end of the row, turn.
Row 2: * hdc in first dc of (3 dc) below, (2 hdc) in the 2nd dc of (3 dc) below, hdc in the 3rd dc of (3 dc) below, ch 1, sl st in the ch 1 space*, repeat from * until the end of the row, fasten off, leave a long tail (about 25cm).
To form the rose, first, thread the long tail through a tapestry needle. Then roll the rose making sure edges align at the bottom. Use the needle and sew the rose at the bottom, making sure to go through all layers. Then use the 2 tails to make a knot.
How To Assemble The Blanket
Use the 2 ends to attach the roses under each leaf. Thread one end through the stitch below the leaves, and the other going between the 2 leaves. Make a double knot and weave in the ends.