How to Knit Socks: Short-Row Sock Heels

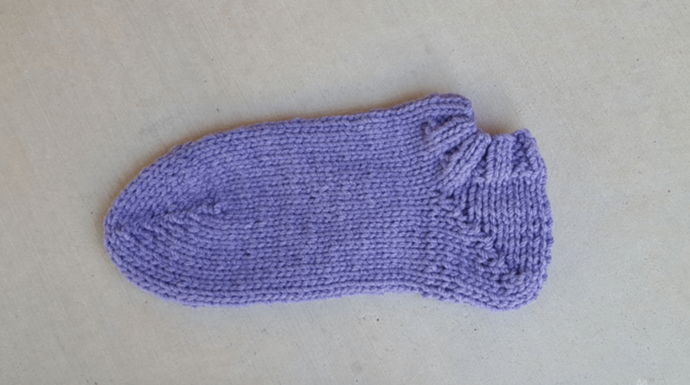
Hello, dear knitters! In the third lesson of the series of lessons, aimed to teach you how to knit socks from scratch, I invite you to learn how to make short-row sock heels. Find out how to work short-row heels, when to use them, and how to adapt them for wider or narrower heels.
Typically, it is worked using the wrap-and-turn method of creating short rows, but you can opt for your favorite short-row method. Once you learn how to knit socks using a short row method, you will likely never make heel flaps or afterthought heels again.
They look much neater than heel flaps and there is no need to go back and insert the heel after the rest of the sock is made as in afterthought heels. At first, the idea of short rows seems a little mysterious, but in my opinion they are easier and actually speed up the sock knitting process.
Knitting two socks simultaneously is particularly useful if you are knitting a short row heel. It helps remember what you are doing as you work both heels at the same time and you will have both socks looking the same. The short row heel is worked over 30 stitches (half of the total stitches cast on for the sock). The heel is knit in two parts. For the back of the heel you are decreasing the number of stitches gradually until you are ready to turn the heel. Then you gradually increase the number of stitches until you have 30 stitches again.
Abbreviations:
sl 1 - slip 1 stitch; p - purl; k - knit;
Instructions
Place 30 stitches onto one needle.
Back of Heel
Turn the Heel
Row 22: Sl 1, k14, begin the new round in the center of of the heel from this point
Continue from the center point of row 22, start the next round, k14, sl 1, picking up the loop in the gap between the instep stitches and heel stitches. Work as for Heel Turn Row 2. There will be 15 stitches on each of the 4 needles.
Tip
You can adjust the width of your heel by adjusting the number of short rows you work. When changing the numbers, always make sure your unwrapped center stitches plus all wrapped side stitches equal the total number of heel stitches.