Knitting Basics: Turkish Cast On

The Turkish cast on seems almost too good to be true. The Turkish cast on is quick and probably the easiest of the double-sided cast ons to learn and remember, because you are just wrapping yarn around the needles. And precisely because you are just wrapping around both needles, it tends to get a bit loose and is harder to maintain even, neat stitches.
Turkish cast-on is a great method for creating seamless, even toe-up socks. It’s also useful for making hoods, purses, toys, mittens, and gloves without seams or gaps. With this step-by-step tutorial, you’ll be on your way to making smooth, beautiful pieces in no time!
You'll probably want to practice a couple of times before using it on a real sock so your hands can get used to the moves and learn how tightly to wrap around the needle. But it's quick and easy to cast on this way, so you won't mind too much if you have to rip it out and try again.
This method can be done with two circular needles, or it can be started with two double-pointed needles, with stitches distributed onto one or two more double-pointed needles as the first half rounds are worked. But try it with two circular needles; working socks on two circulars instead of on sticks has many benefits. For one, you can try your sock on while you're making it!
Characteristics
Working the Cast On
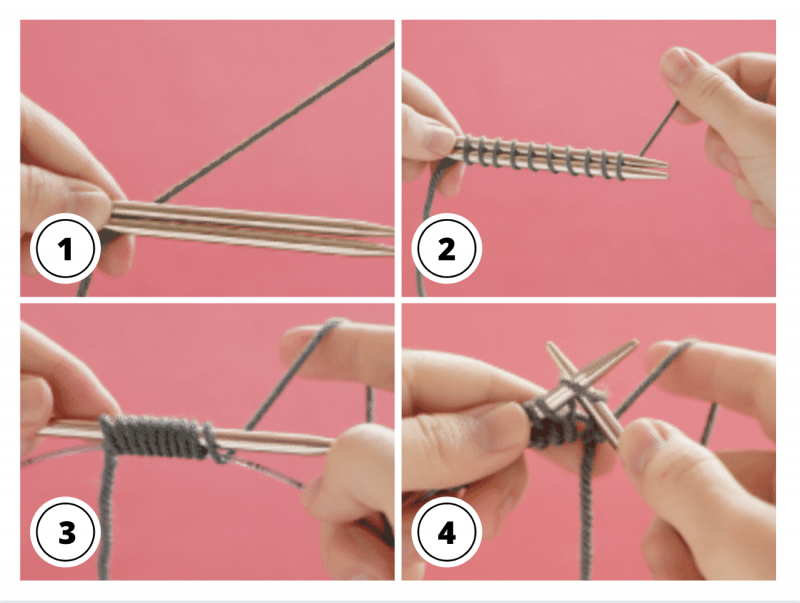
Step 1
Begin with the two needles parallel to each other. Make a slip knot, leaving a 4 to 6-inch tail.
With the needle tips pointing right and the yarn held behind the needles, with the tail hanging down in the back.
Step 2
Working left to right, wrap the yarn around both needles counterclockwise. Wrap the yarn half as many times as the desired number of stitches (that is, if the pattern calls for casting on 20 stitches, wrap it 10 times around the needles). End with yarn behind the needles. Make sure that you have an equal number of wraps around each needle.
Step 3
Beginning to Knit
Pull the bottom needle so that the bottom loops are on the cable of the needle, allowing the tips to dangle.
Step 4
Knit across the stitches on the top needle.
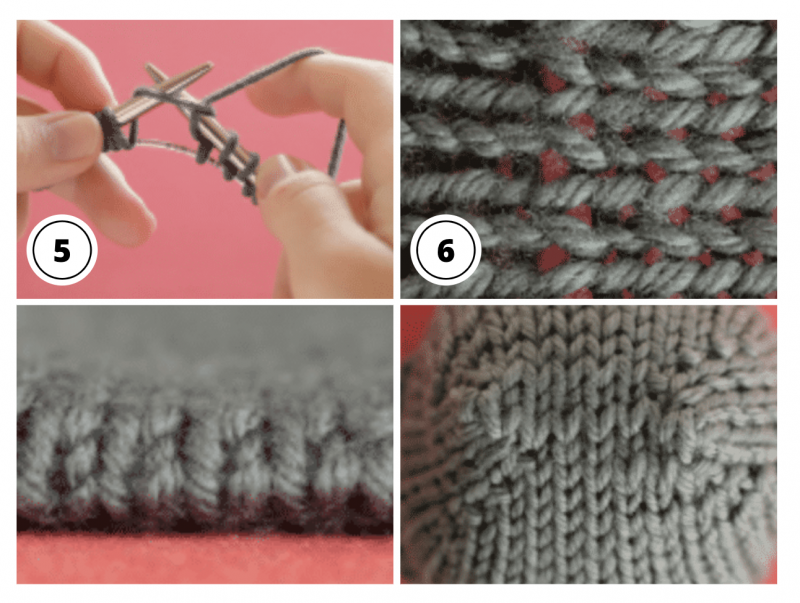
Step 5
Rotate your work so the bottom needle is now on top and turn to knit across the needle. Slide the loops of the top needle to the tip so they are ready to knit; slide the bottom stitches onto the cable of that needle.
Step 6
Knit across the stitches on the top needle. If you want to switch to double-point needles, do so after the first row or two of knitting.
Getting It Right
This cast on can also be started with a slip knot to hold the yarn in place. To begin, make a slip knot and place it on the bottom needle. Then wrap the yarn as in step 2. When you reach the slip knot on the first round of knitting, just slip it off the needle without knitting it.
i have been doing this for several years now. I didnt know it was a «thing» it just seemed to work for me in toe up socks, two at a time so I dont have to have a lone ranger.
Great! Thank you!
I cannot wait to try this method. I’m somewhat confused but once I’m doing it, all should become clear. Thank you.
Thank you, Anne! I'm sure, everything will become easy with a bit of practice! Happy knitting!