Knitting Basics: Double-Sided Cast On

Today I’d like to show you the technique that is commonly used for toe-up socks. It can be used, though, for any piece that starts with an enclosed end, such as the bottoms of bags and top-down hats or mittens. The construction of this cast on creates two rows of stitches that are connected in the middle, allowing you to knit a tubelike piece with no hole in the center. Try it, and you’ll see that it is really simple.
Although this double-sided cast on can be worked on the double-point needles you’ll most likely be using for your project, it is easiest to cast on with two same-size circular needles. (It’s okay if they are different lengths; they just need to be the same diameter.) The benefit of circular needles is that after casting on you can slide the lower stitches onto the cable of the needle where they stay out of the way while you work on the upper stitches. This makes this cast on considerably easier to maneuver.
I find this wonderful cast on neat and nice. It is possible to start this cast on with a slip knot on the top needle, though I’ve found that it can be a bit looser than the surrounding stitches. If it makes it easier or less confusing for you, go ahead and use a slip knot instead of wrapping the yarn.
Working the Cast On
Hold the two needles together with your right hand, tips pointing left.
Loop the yarn around the top needle, with the tail sandwiched between the top needle and the bottom needle and coming out the back. The tail should have approximately ¾″ for each stitch you are casting on. The working yarn will go over the top needle.
Step 3
Pick up the yarns with your left hand in the slingshot position, with the tail over your index finger and the working yarn over your thumb. This twists the yarns and creates a loop on the top needle that counts as the first stitch.
Step 4
While holding the stitch in place with a finger on your right hand, rotate the pair of needles up and wrap the yarn on your finger around the bottom needle, as if making a yarn over. Gently tighten the loop.

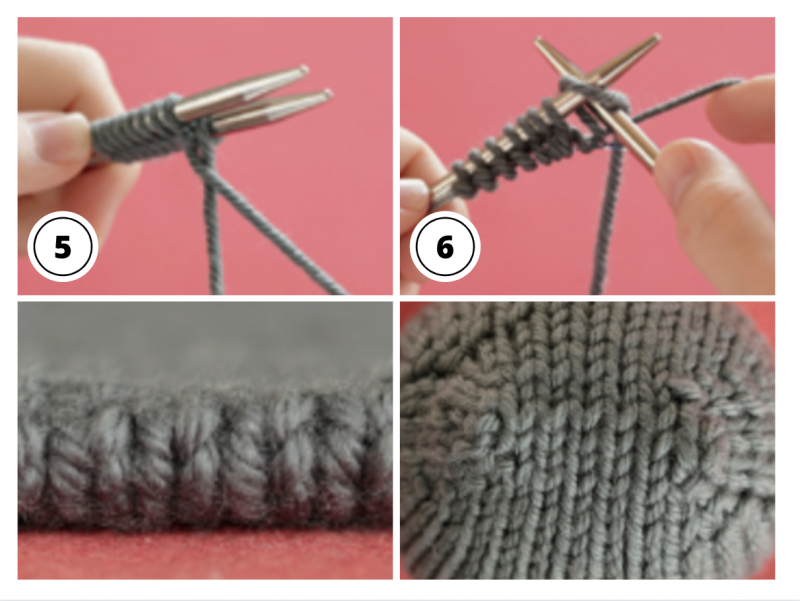
Step 5
Rotate the pair of needles downward and wrap the thumb yarn around the top needle as if making a yarn over. Gently tighten the loop.
Step 6
Repeat steps 4 and 5 to cast on the desired number of stitches. Alternate between top and bottom needles, with thumb yarn wrapping around top needle and finger yarn wrapping around bottom needle. End with step 4.
Beginning to Knit
Turn the needles so that the bottom one is on top and the yarn ends on the right. Drop the tail and bring the working yarn up behind the top needle. Make sure the tail lies under the working yarn, between it and the needle. This twists the yarns so you can knit the first stitch. Knit the first row. The first stitch may become a little loose; just pull on the tail to tighten it.
Turn needles at end of first row and knit the next row (the second half of the first round).
thanks will try it need all the knitting help I can get
Thank you, Shirley!
Pinned for future reference.
Thanks🙂