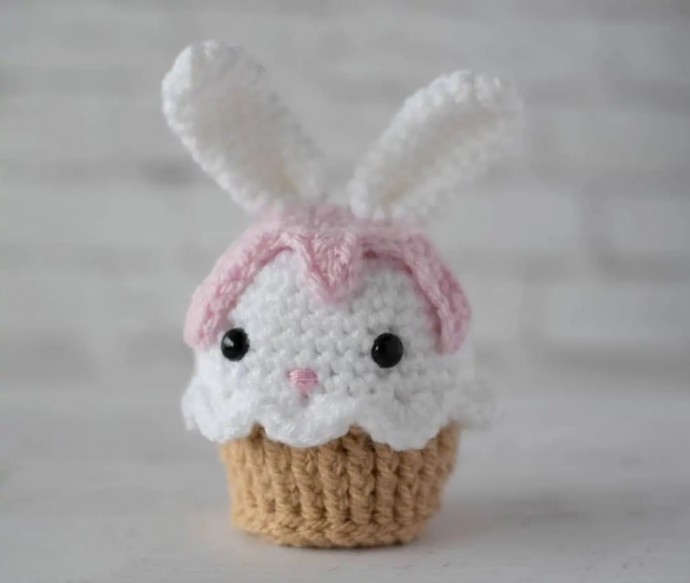
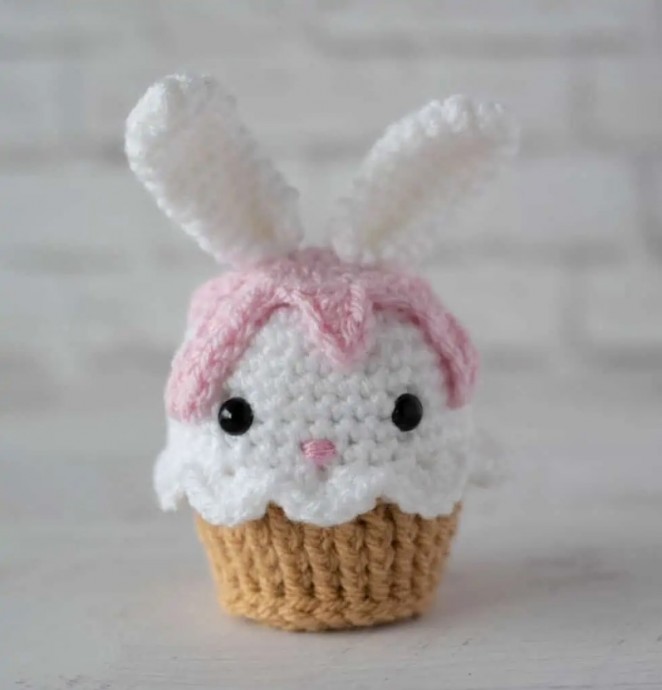
Crochet Cupcake: A Bunny To Love


Sometimes we all just need a little sweetness in life. And today, that delectable bit of goodness is the darling bunny crochet cupcake.
Sigh. Looking at this bit of adorable just makes me so happy. I’m in love with the soft spring colors. That crochet cupcake wrapper looks pretty darn ‘for real’. And those pink frosting drips look good enough to eat!
Crochet Cupcake
Here is what you will need:
- US G 6/4.00 mm crochet hook
- Worsted Weight Yarn (3/4 oz White, 1/4 oz Brown, 1/4 oz Pink)
- 9 mm Black Safety Eyes
- Embroidery Floss for Nose
- Fiberfill
- Tapestry needle and scissors
Bunny Cupcake Size:
Approximately 3.5″ tall from top of head (excluding ears) to bottom of cupcake
Special Stitches:
Front Post Half Double Crochet: A front post half double crochet stitch is a half double crochet worked AROUND the indicated stitch.
Cupcake Bottom:
With Brown Color yarn, make a magic
R1: 6 sc into ring (6 sts). (Do not join, worked in rounds)
R2: 2 sc in ea st (12 st)
R3: *sc in next st, 2 sc in next. Repeat from * around. (18 st)
R4: *sc in next 2 st, 2 sc in next. Repeat from * around. (24 st)
Slip stitch to next stitch. Then fasten off brown yarn, weave in end and reserve this piece to attach later.
Cupcake:
With White Color yarn, make a magic ring
R1: 6 sc into ring (6 sts). (Do not join, worked in rounds)
R2: 2 sc in ea st (12 st)
R3: *sc in next st, 2 sc in next. Repeat from * around. (18 st)
R4: *sc in next 2 st, 2 sc in next. Repeat from * around. (24 st)
R5: sc in next st, 2 sc in next *sc in next 3 st, 2 sc in next. Repeat from * around until last 2 stitches then work a sc in next 2 st. (30 st)
R6: *sc in next 4 st, 2 sc in next. Repeat from * around. (36 st)
R7-10: sc around. (36 st)
R11: sc around to last st, then sl st in last st
R12: continuing with white yarn, sc in back loop only around, changing to brown yarn in last stitch.
R13: With brown yarn and working over both loops again, *sc in next st, sc 2 tog. Repeat from * around. (24 st).
Now, without cutting brown yarn, drop it behind work to work the scallop around the cupcake with white yarn as follows:
Reattach white yarn in a front loop from row 12. Working in the front loops, *skip next st, 5 hdc in next st, skip next st, sl st in next st. Repeat from * around. At end of round fasten off white yarn.
Pick up the brown yarn to continue crocheting bottom of cupcake.
R14-16: Ch 1 (does not count as a stitch here and throughout), front post hdc around each stitch. (24 st)
R17: Ch 1, front post hdc around each stitch. At end of round, sl st to next st. Do NOT fasten off yarn (24 st)
Eyes and Stuffing:
Insert safety eyes between rows 9 and 10, leaving 6 stitches between them. Be mindful to place eyes so that a scallop is centered in the front of the cupcake. Then stuff cupcake.
Attach Cupcake Bottom:
Crochet the cupcake to the cupcake bottom as follows: Place cupcake bottom on bottom of stuffed cupcake. With brown yarn, slip stitch through both pieces, working through the front loops of the cupcake and both loops of the bottom. Work slip stitches in this manner all the way around. Fasten off and weave in ends.
Frosting:
With Pink Color yarn, make a magic ring
R1: 6 sc into ring (6 sts). (Do not join, worked in rounds)
R2: 2 sc in ea st (12 st)
R3: *sc in next st, 2 sc in next. Repeat from * around. (18 st)
Now make frosting “drips” around as follows:
Frosting drip A: ch 4, sc in 2nd ch from hook, hdc in next 2 ch, skip next st on row 3, slip st in next 2 st.
Frosting drip B: ch 5, sl st in 2nd ch from hook, sc in next ch, hdc in next 2 ch, skip next st on row 3, slip st in next 2 st.
Frosting drip C: Ch 7, sc in 2nd ch from hook, sc in next 3 ch, hdc in next 2 ch, skip next st on row 3, slip st in next 2 st.
Frosting drip D: Repeat Drip A instructions
Frosting drip E: Repeat drip C instructions
Frosting drip F: Repeat drip B instructions
Fasten off pink yarn, leaving a very long tail for sewing.
Place frosting on top of cupcake, using pins to hold in place. Then carefully sew down.
Ears (Make 2):
With White Color yarn, make a magic ring
R1: 5 sc into ring (5 sts). Work in rounds
R2: *2sc in ea st*, repeat * to * around (10 st)
R3-11: sc around (10 st)
R12: *sc in next 3, sc 2 tog, repeat from * once. Sl st in next st and fasten off, leaving a long strand for sewing. (8 st)
Fold ear in half and sew bottom closed. Then, using same strand of yarn, sew to top of cupcake.
Repeat for 2nd ear.
Bunny Cupcake Facial Features:
Use pink floss to embroider a satin stitch nose. Make one stitch vertically below the nose.
Weave in any remaining ends.