Crocheted Easter Bunny Hat Crochet Pattern

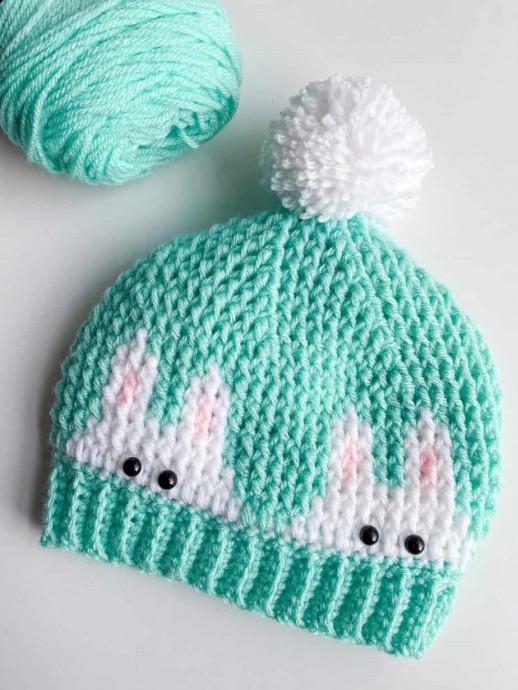
With Easter being a little bit earlier this year at the end of March I know we will most likely have cooler temps and probably some more winter-like weather as we head to Easter time. I thought an adorable peek a boo Bunny hat would be perfect!
Supplies:
Red Heart Super Saver, Weight 4 Medium (100% acrylic)
- Color Minty 2.6 oz / 136 yards (MC)
- Color White 0.8 oz / 42 yards (W)
- Color Sweet Pink 0.2 oz / 11 yards (P)
Crochet hook size I (5.5 mm)
8 (8, 10) 9 mm Black Plastic Dome Buttons
Embroidery thread to sew on buttons
Pom Pom (optional)
Scissors
Tapestry Needle
Approximate finished size:
- Toddler: Approximately 16” circumference x 7” height
- Child: Approximately 17” circumference x 8” height
- Adult: Approximately 21” circumference x 9” height
Gauge: 13 FPdc sts x 10 rows = 4” x 4”
Abbreviations:
- MC = main color
- W = white
- P = pink
- RS = right side
- ch(s) = chain(s)
- dc = double crochet
- sl st = slip stitch
- yo = yarn over
- FPdc = front post double crochet
- sc = single crochet
- BLO = back loop only
- FPdc2tog = front post 2 double crochet stitches together
- Rnd(s) = round(s)
Special Stitches:
FPdc (front post double crochet stitch): Yo and insert your hook from front to back to front around the dc stitch post from the row below, yo, pull up a loop (3 loops on hook), yo, pull through 2 loops, yo, pull through remaining 2 loops.
FPdc2tog: Yo, insert hook from front to back to front around the dc stitch post from the row below, yo, pull up a loop (three loops on hook), yo, pull through two loops (two loops on hook), yo, insert hook from front to back to front around the next dc stitch post from the row below, yo, pull up a loop (four loops on hook), yo, pull through two loops (three loops on hook), yo, pull through remaining three loops on hook.
Pattern Notes:
Three different graphs are provided – toddler size, child size, adult size. Variations of size can be achieved by simply changing up hook size.
Hat is worked from bottom up, adding ribbing to bottom edge of hat at the end.
Graph is worked as FPdc around the stitch in the round directly below, with the exception of the first round which is a round of double crochet.
Each pixel of the graph corresponds to 1 FPdc (rounds 2 – 10) or dc (round 1) stitch.
Main body of the hat is worked in the round without turning. Slip stitch join at the end of each round into the top of the first FPdc, not the beginning ch-2.
Graph rounds represent rounds that are NOT decreasing rounds. Refer to written round instructions for decreasing stitch details.
To work color changes, work last dc stitch before new color until there are two loops on the hook, pull in new color with last yo.
To reduce ends to weave in, I carried the non-working yarn as yarn “floats” on the wrong side of the hat.
Ch-2 at beginning of each round does not count as a stitch.
Pattern Instructions
Toddler Hat Instructions
With W, ch 55, without twisting ch, change to MC and sl st in first ch to form a ring.
Rnd 1: (Begin color changes see below) (RS) Ch 2 (does not count as st), dc in same st and in each ch to end, sl st in top of first dc st. (55)
Rnd 1 color changes: MC 2, W 10, [MC 4, W 10] 3 times, MC 1.
Rnd 2: Ch 2, FPdc in st below ch-2 (first dc st), FPdc in each st around, sl st in first st.
Rnd 2 color changes: MC 2, W 10, [MC 4, W 10] 3 times, MC 1.
Rnds 3-7: Repeat as for Round 2 with the following color changes:
Rnd 3: MC 3, W 8, [MC 6, W 8] 3 times, MC 2.
Rnd 4: MC 3, W 1, P 1, W 1, MC 2, W 1, P 1, W 1, [MC 6, W 1, P 1, W 1, MC 2, W 1, P 1, W 1] 3 times, MC 2.
Rnd 5: Repeat round 4.
Rnd 6: MC 3, W 3, M 2, W 3, [MC 6, W 3, MC 2, W 3] 3 times, MC 2.
Rnd 7: MC 4, W 1, MC 4, W 1, [MC 8, W 1, MC 4, W 1] 3 times, MC 3.
Rnd 8: With MC, repeat round 2.
Rnd 9: Ch 2, *FPdc2tog, FPdc next 9 sts,* repeat from * to * to end. (50)
Rnd 10: Ch 2, *FPdc2tog, FPdc next 3 sts,* repeat from * to * to end. (40)
Rnd 11: Ch 2, *FPdc2tog, FPdc next 2 sts,* repeat from * to * to end. (30)
Rnd 12: Ch 2, *FPdc2tog, FPdc next st,* repeat from * to * to end. (20)
Rnd 13: Ch 2, FPdc2tog around. (10)
Rnd 14: Ch 2, FPdc2tog around. (5)
Fasten off leaving a long tail for sewing hat closed. Weave in remaining ends.
Continue to Bottom Edge & Ribbing Instructions to complete hat.
Child Hat Instructions
With W, ch 60, without twisting ch, change to MC and sl st in first ch to form a ring.
Rnd 1: (Begin color changes see below) (RS) Ch 2 (does not count as st), dc in same st and in each ch to end, sl st in top of first dc st. (60)
Rnd 1 color changes: MC1, W12, [MC3, W12] 3 times, MC2.
Rnd 2: Ch 2, FPdc in st below ch-2 (first dc st), FPdc in each st around, sl st in first st.
Rnd 2 color changes: MC2, W10, [MC5, W10] 3 times, MC3.
Rnds 3-7: Repeat as for Round 2 with the following color changes:
Rnd 3: MC3, W8, [MC7, W8] 3 times, MC4.
Rnd 4: MC3, W1, P1, W1, MC2, W1, P1, W1, [MC7, W1, P1, W1, MC2, W1, P1, W1] 3 times, MC4.
Rnd 5: Repeat round 4.
Rnd 6: MC3, W3, MC2, W3, [MC7, W3, MC2, W3] 3 times, MC4.
Rnd 7: MC4, W1, MC4, W1, [MC9, W1, MC4, W1] 3 times, MC5.
Rnd 8: With MC, repeat round 2.
Rnd 9: Ch 2, *FPdc2tog, FPdc next 8 sts,* repeat from * to * to end. (54)
Rnd 10: Ch 2, *FPdc2tog, FPdc next 7 sts,* repeat from * to * to end. (48)
Rnd 11: Ch 2, *FPdc2tog, FPdc next 6 sts,* repeat from * to * to end. (42)
Rnd 12: Ch 2, *FPdc2tog, FPdc next 5 sts,* repeat from * to * to end. (36)
Rnd 13: Ch 2, *FPdc2tog, FPdc next 4 sts,* repeat from * to * to end. (30)
Rnd 14: Ch 2, *FPdc2tog, FPdc next 3 sts,* repeat from * to * to end. (24)
Rnd 15: Ch 2, *FPdc2tog, FPdc next 2 sts,* repeat from * to * to end. (18)
Rnd 16: Ch 2, *FPdc2tog, FPdc next st,* repeat from * to * to end. (12)
Rnd 17: Ch 2, FPdc2tog around. (6)
Fasten off, leaving a long tail for sewing hat shut. Weave in remaining ends.
Continue to Bottom Edge & Ribbing Instructions to complete hat.
Adult Hat Instructions
With W, ch 70, without twisting ch, change to MC and sl st in first ch to form a ring.
Rnd 1: (Begin color changes see below) (RS) Ch 2 (does not count as st), dc in same st and in each ch to end, sl st in top of first dc st. (70)
Rnd 1 color changes: MC1, W12, [MC2, W12] 4 times, MC1.
Rnd 2: Ch 2, FPdc in st below ch-2 (first dc st), FPdc in each st around, sl st in first st.
Rnd 2 color changes: MC2, W10, [MC4, W10] 4 times, MC2.
Rnds 3-8: Repeat as for Round 2 with the following color changes:
Rnd 3: MC3, W8, [MC6, W8] 4 times, MC 3.
Rnd 4: MC3, W1, P1, W1, MC2, W1, P1, W1, [MC6, W1, P1, W1, MC2, W1, P1, W1] 4 times, MC3.
Rnd 5: Repeat round 4.
Rnd 6: MC3, W3, MC2, W3, [MC6, W3, MC2, W3] 4 times, MC3.
Rnd 7: MC4, W1, MC4, W1, [MC8, W1, MC4, W1] 4 times, MC4.
Rnds 8 – 10: With MC, repeat round 2.
Rnd 11: Ch 2, *FPdc2tog, FPdc next 8 sts,* repeat from * to * to end. (63)
Rnd 12: Ch 2, *FPdc2tog, FPdc next 7 sts,* repeat from * to * to end. (56)
Rnd 13: Ch 2, *FPdc2tog, FPdc next 6 sts,* repeat from * to * to end. (49)
Rnd 14: Ch 2, *FPdc2tog, FPdc next 5 sts,* repeat from * to * to end. (42)
Rnd 15: Ch 2, *FPdc2tog, FPdc next 4 sts,* repeat from * to * to end. (35)
Rnd 16: Ch 2, *FPdc2tog, FPdc next 3 sts,* repeat from * to * to end. (28)
Rnd 17: Ch 2, *FPdc2tog, FPdc next 2 sts,* repeat from * to * to end. (21)
Rnd 18: Ch 2, *FPdc2tog, FPdc next st,* repeat from * to * to end. (14)
Rnd 19: Ch 2, FPdc2tog around. (7)
Fasten off, leaving a long tail for sewing top of hat shut. Weave in remaining ends.
Bottom Edge
Attach MC to bottom edge of hat in any unused loop from foundation ch with sl st.
Rnd 1: Ch 1, sc in each unused loop around, sl st to first st. 55 (60, 70) Do not fasten off.
Ribbing
Ch 6 (7, 9).
Row 1: Sc in second ch from hook and in each ch to end, now working in sc sts from previous round of bottom edge, sl st in next two sts. Turn. 5 (6, 8)
Row 2: Sk 2 sl sts, working in BLO of sc sts from row 1 of ribbing, sc in BLO of each st to end. Turn. 5 (6, 8)
Row 3: Ch 1, sc in BLO of each st to end, sl st in next two sts of main body of hat. Turn. 5 (6, 8)
Rows 4 – 55 (60, 70): Repeat rows 2 – 3.
Fasten off leaving a long tail for sewing ribbing edges of hat together.
With mattress seam stitch, sew ribbing edges together.
With long length of yarn left for sewing, sew top of hat shut.
Fasten off and weave in ends.
Toddler Graph

Child Graph

Adult Graph
