Adorable Little Lamb Pattern + Invisible Decrease Technique

Hello, my dears! I’ve got several messages regarding the cute little sheep from my yesterday’s post picture, and I decided to share the pattern with you today. That would be not only a great practice for beginners but also a nice gift for your beloved ones or just a tiny cute friend for you. And as I promised, we are covering the invisible decrease in crochet today! I hope you will like it! Enjoy!
This little crochet lamb pattern is such a fun project! And I do have few tips for you. The hardest part is not the actual crocheting. You can actually feel where the stitches go pretty well! It is the decreasing/increasing. It is hard to see those stitches so you must count. And use a stitch marker! This is not the project to make while watching your favorite series on TV, it needs attention. But the upside is that this yarn is also extremely forgiving. It is really hard to see any kind of mistake. I honestly think you will be pleasantly surprised at how easy it is!
One more tip before you get started… Stuff VERY firmly. The little feet and (hands?) of the sheep will look much better if firmly stuffed and you will be able to see the nose if the whole head is fully stuffed. You will almost always need more than you think you need. I like to stuff them as full as I can. But don’t stuff TOO much or your stitches will stretch.
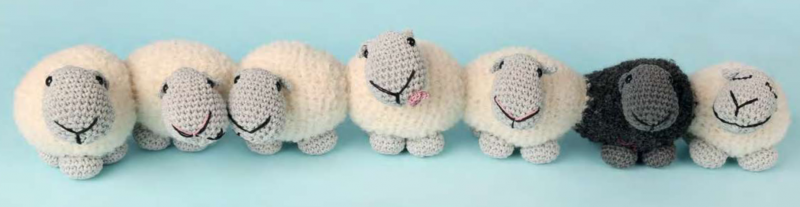
Be creative! You can make your lamb black or add a tiny flower.
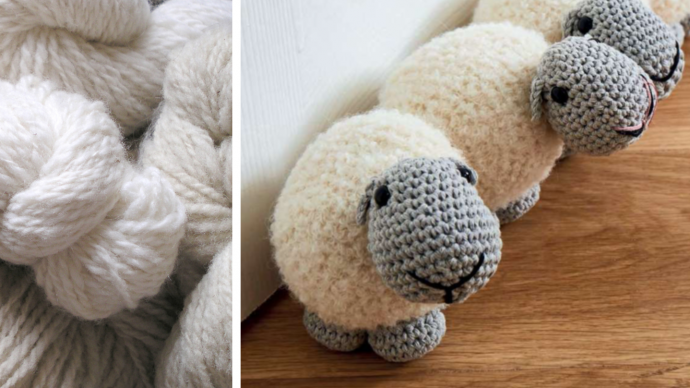
Materials needed include: medium weight soft yarn (if you have Alpaca Boucle – awesome! I didn’t have it last time) and cotton light in gray or beige (up to you), 2 mm, 3,5 mm and 4.5 mm crochet hooks, toy stuffing, 9mm black toy eyes, fabric glue, tapestry needle, black embroidery thread.
Tension is not critical for this project, but stitches should be tight enough to stop stuffing showing through.
Start crocheting
Body
Rnd 1: With soft white yarn (yarn A) and 4.5mm hook, working into a magic ring, 6 dc. 6 sts
Rnd 2: 2 dc into each st across. 12 sts Rnd 3: [1 dc, 2 dc in the next st] around.
18 sts
Rnd 4: [2 dc, 2 dc in the next st] around. 24 sts
Rnd 5: [3 dc, 2 dc in the next st] around. 30 sts
Rnd 6: [9 dc, 2 dc in the next st] around. 33 sts
Rnd 7: [10 dc, 2 dc in the next st] around. 36 sts
Rnd 8: [11 dc, 2 dc in the next st] around. 39 sts
Place marker to mark Rnd 8.
Rnd 9: [12 dc, 2 dc in the next st] around.
42 sts
Rnd 10: [13 dc, 2 dc in the next st] around. 45 sts
Rnd 11: [14 dc, 2 dc in the next st] around. 48 sts
Rnds 12 & 13: Dc around.
Rnd 14: [Dc2tog, 5 dc] around. 36 sts Rnd 15: [Dc2tog, 4 dc] around. 30 sts Rnd 16: [Dc2tog, 3 dc] around. 24 sts Stuff body.
Rnd 17: [Dc2tog, 2 dc] around. 18 sts Rnd 18: [Dc2tog, 1 dc] around. 12 sts
Rep rnds 3-18 six more times changing to beige/brown Yarn B from the second to last body and back to A for final body.
Fasten off. Using a tapestry needle, weave tail through rem st and pull tight to close.
Head
With 3.5mm hook, working into a magic ring, 6 dc. 6 sts
Rnd 1: 2 dc into each st around. 12 sts Rnd 2: Dc around.
Rnd 3: [2 dc, 2 dc in the next st] around. 16 sts
Rnd 4: Dc around.
Rnd 5: [3 dc, 2 dc in the next st] around.
20 sts
Place stitch marker to mark this rnd Rnd 6: Dc around.
Rnd 7: [4 dc, 2 dc in the next st] around.
24 sts
Rnd 8: Dc around.
Rnd 9: [5 dc, 2 dc in the next st] around.
28 sts
Rnds 10-11: Dc around.
Insert the eyes (if using) on the marked rnd 8 sts apart.
Rnd 12: [Dc2tog, dc in the next five sts]
around. 24 sts
Rnd 13: [Dc2tog, dc in the next two sts]
around. 18 sts
(optional) You may continue with couple of rounds using Yarn A, the soft white one, to make the “hair” if you like.
Rnd 14: [Dc2tog, dc in the next st] around. 12 sts
Stuff now.
Rnd 15: [Dc2tog] around. 6 sts
Fasten off and sew closed the hole at the base of the head.
Legs (make 4 in same color as head)
With 3.5mm hook, working into a magic ring, 6 dc. 6 sts
Rnd 1: 2 dc in each st around. 12 sts Rnd 2: [1 dc, 2 dc in the next st] around.
18 sts
Rnd 3: Dc around. 18 sts
Rnd 4: Dc around. 18 sts
Rnd 5: [Dc2tog] around. 9 sts
Fasten off and stuff well. Sew four close together on the base of each body.
Ears (make two in same yarn as head)
With 3.5mm hook, chain 5.
Row 1: Sl st in 2nd ch from hook, 1 dc, 1
htr, 1 tr.
Fasten off and sew onto the head just above and behind the eyes.
Finishing
Use black embroidery thread and long stitches to create a V in the center for the nose and a line down for the mouth. Back-stitch a semicircle if you want to make the sleepy eyes.
Crochet Technique: Invisible Decrease
Ok, as I promised you, the second thing for today is invisible decrease in crochet - a very useful technique to learn! I’d like to show you how to crochet single crochet invisible decreases in 4 easy steps!
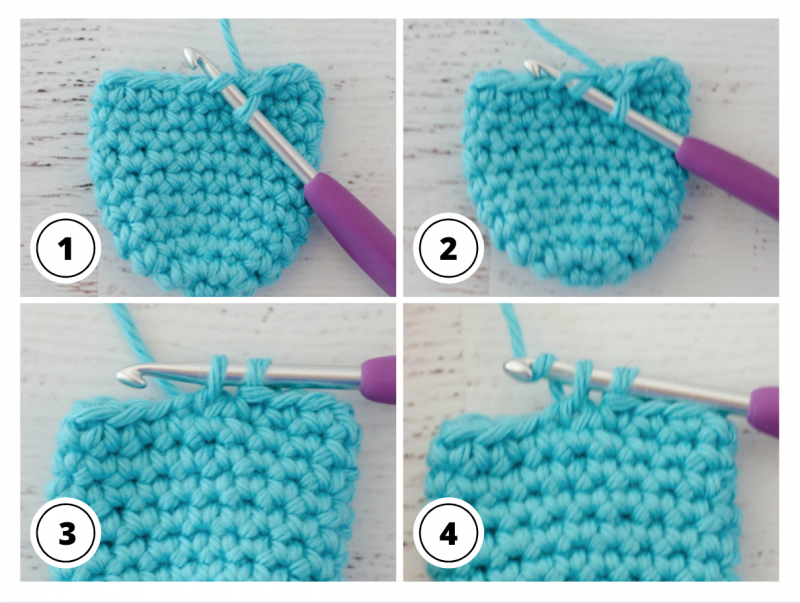
Step 1:
Insert the hook into the front loop only of the next stitch.
Step 2:
Then stick the hook into the front loop of the next stitch. This feels a little awkward because the original loop and the yarn is on the hook first, then the front loops only of the next 2 stitches.
Step 3:
Yarn over and pull through the first 2 loops on the hook. This is actually the two front loops you picked up in steps one and two. There are now 2 stitches on the hook.
Step 4:
Now you basically finish making a single crochet. Just yarn over again and pull the yarn through the 2 loops on the hook. This makes a single crochet.
And that is how easy it is to single crochet invisible decrease! Easy, right?
Please let me know if you like this pattern and if you want to see more like that – I’ll be happy to share more! Happy crocheting!
Little lamb is so cute. Thanks for sharing. Also, the blind decrease was so easy, once you explained it. It is something I will incorporate into my stitching. Make it a great day, and thank you again. L Lindsey.
Dear Leoma, thank you so very much for your comment! And thank you for reading! Please don't hesitate to ask me any questions if you face any difficulties, I will try to explain and help! Have a lovely day! Anna
Great ideas n suggestions. I love going down the lists of things to Crochet. I am a beginner but hopefully I will grasp it.
Thank you team xx
Thank you for being here with us! I'm 100% sure you will grasp it! Check out my beginner guides and tutorials (tags: #crochet lessons #crochet for beginners), I hope you'll find them helpful! 😊Have a pleasant day!
Anna