Knitting Basics: Slip Knot Cast On + Printable Guide

I think we’ve all been there. You’ve knit a beautiful pair of socks, a hat or sweater only to find out that the cast on ended up too tight. Even though you had swatched and everything seemed to match the needed gauge (if you have missed my post about gauge, please check it here: https://lifehack.craftorator.com/121-guide-to-crochet-knitting-gauge.html)
Some projects need a cast on with more stretch to it than your usual cast on might offer. So today I’m going to show you how to make one of the awesome stretchy cast-ons (and there will be a series of them for you to learn). It’s super easy and the result is pretty, sturdy and definitely stretchy.
This cast on, also known as Buttonhole or Jeny’s Stretchy Slip Knot, is simply a string of slip knots lined up on your needle. It creates a very elastic edge that is great for the tops of socks, the ribbing on sleeve cuffs and mittens, and other places where you want a lot of stretch. When followed by ribbing, the cast-on edge looks great — it makes neat little accordion folds that follow the stitches. On stockinette, however, the edge looks unfinished, and I would reserve its use for edges that will be seamed. Additionally, it is great for adding on stitches at the end of rows. Slip Knot cast on is perfect for adding stitches at end of row, buttonholes and any very stretchy ribbed edges.
Warning: This cast-on is a bit finicky about the kind of yarn you use. You should use yarn that is a smooth texture and uniform in width.
Working the Cast On
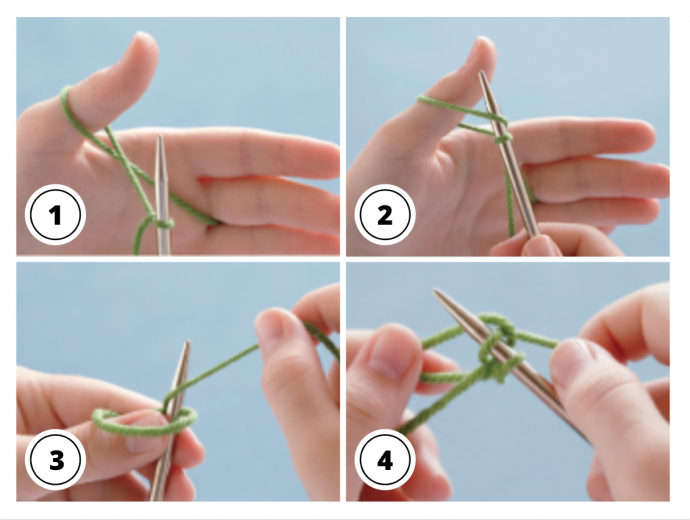
Make a slip knot, leaving a short tail, and place it on your needle. (If you are casting on at the end of the row, skip this and start with step 2.)
Step 2
With the working end of the yarn, make a loop around your left thumb. The yarn goes from the needle, between the thumb and forefinger, and wraps around the outside of the thumb, with the working end of the yarn then going underneath and to the right of the needle.
Step 3
Insert the tip of the needle into the thumb loop.
Step 4
With your right hand, wrap the working yarn around the needle tip as if to knit.
Final steps
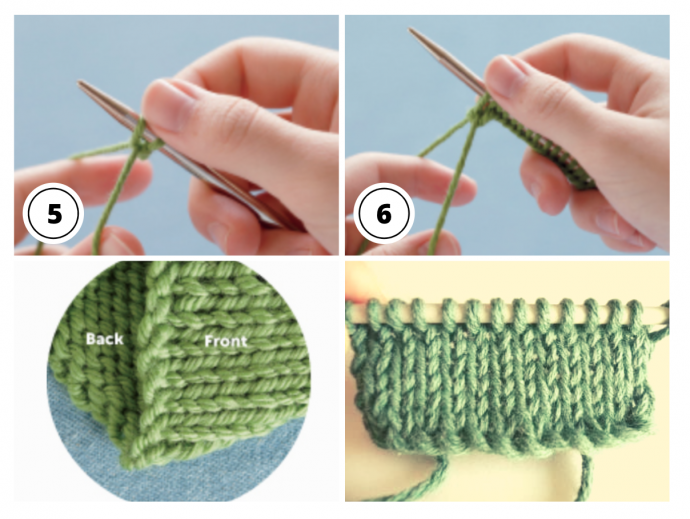
Pass the thumb loop over the tip of the needle.
Step 6
Tighten the stitch on needle. It is important to get the stitches snugged up tight against each other. Use your right thumb and forefinger to hold the loop in place on the needle while pulling with your left hand to tighten the stitch. You want to avoid slack yarn between the cast-on stitches. Even though it may seem tight with the stitches snugged against each other, the finished edge will actually be quite stretchy. Repeat steps 2–6 for the desired number of stitches
Thanks for all your tips you have been giving for casting on in knitting. It's a BIG help🥰
Debbie