Crochet Basics: Puff Stitch

Give your crochet some extra texture with some pretty puff stitches! It is similar to the shell stitch, that we learned last time, but you wait to pull the last yarn over until you have all the stitches worked. You can use these stitches to create smaller motifs, work a row of puff stitches among other stitches, or crochet rows of the stitch to make a puff stitch fabric. The possibilities are endless! In this step-by-step tutorial I will show you how to work a basic crochet puff stitch. Let's give it some practice.
What I love about the puff: it looks the same on both sides of your project. And it looks just like it sounds... puffy, and depending on how many loops you choose to add to this stitch the puffier it will get. This stitch forms double-sided bobbles that are both thick and fluffy. Although getting the tension correct can take a little practice, puff stitch is a variation on half double crochet, that we have already covered before. The puff stitch is different from other crochet stitches because it is made up of several loops that connect at the top and bottom of the stitch. The connecting loops are what gives the puff stitch its raised and defined look.
The puff stitch is abbreviated (puff st) or (ps).
If you've never tried one of this stitch before, here is a tip for puffy success: crochet loosely, perhaps by going up half a hook size if you are naturally a tight crocheter.
Directions
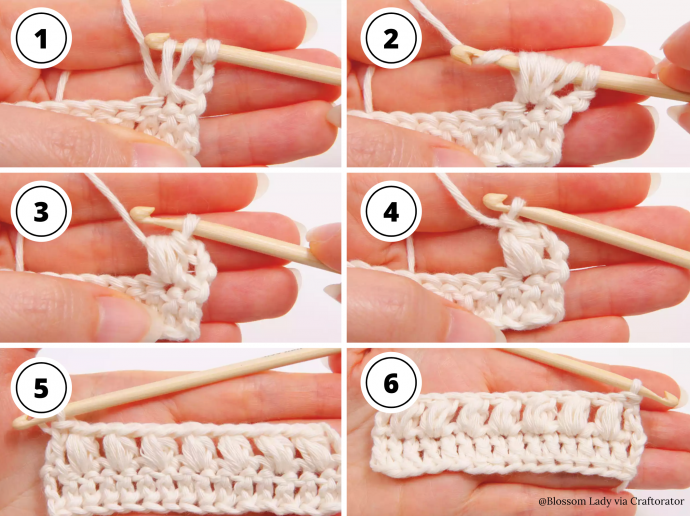
Step 1
To practice puff stitches, work with a yarn that isn't prone to splitting and a crochet hook in the size recommended on the label. Make a starting chain in a multiple of two stitches plus four. Wrap the yarn over the hook and insert the hook into the fourth chain from the hook. Yarn over again and draw up a loop. You should have three loops on your hook. This is the beginning of a half double crochet stitch. Instead of drawing the yarn through these loops, continue to the next step. Step 2 Yarn over, insert your hook through the same chain stitch, yarn over, and then draw up another loop. You should have seven loops on the hook.
Step 3
Repeat the previous step until you have the number of loops on your hook as needed for the puff stitch you're making. Some puff stitches have as few as five loops on the hook, while others may have 11 loops.
Step 4
When you have as many loops as you want on the hook, yarn over and draw it through all the loops.
Step 5
Secure the puff stitch with a chain. With the loop pulled through the puff stitch, make a single chain. This secures the puff stitch, keeps the stitch more upright, and creates the space to work into on the next row.
Step 6
When working across a row, skip one chain and work another puff stitch into the next chain. Follow this across the row. Make a puff stitch and skip a chain. You should end with a puff stitch. You’ll see how the stitches look like little puffs of yarn – if you lie your fabric flat, the puffs should stand out a little from the treble stitches in the fabric. At the end of your row, flip your work and make a turning chain of three chain stitches.
Hope you likes this tutorial and will practice this pretty stitch at home!