Crocodile Stitch for Thick Yarns

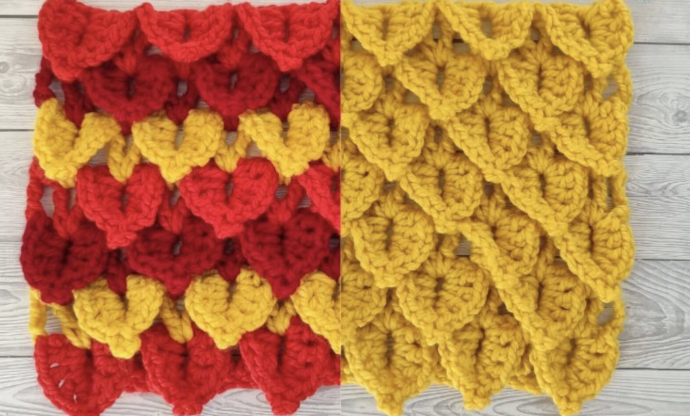
The Crocodile Stitch is a popular crochet technique known for its unique and textured appearance, resembling the scales of a crocodile. While traditionally worked with thinner yarns, this tutorial will guide you on how to adapt the Crocodile Stitch for use with thicker yarns. Whether you're looking to create a cozy blanket, a chunky scarf, or other projects with thicker yarns, mastering the Crocodile Stitch for thick yarns can add a stunning and eye-catching element to your crochet creations. Get ready to explore this fascinating stitch and elevate your crochet projects to a whole new level with this tutorial.
Special Stitches
The Leaf – I will show you here in detail how to crochet one leaf for you to see how it is made. Follow the directions below if you get stuck in the main pattern, this tutorial will show you in detail how each leaf is crocheted.
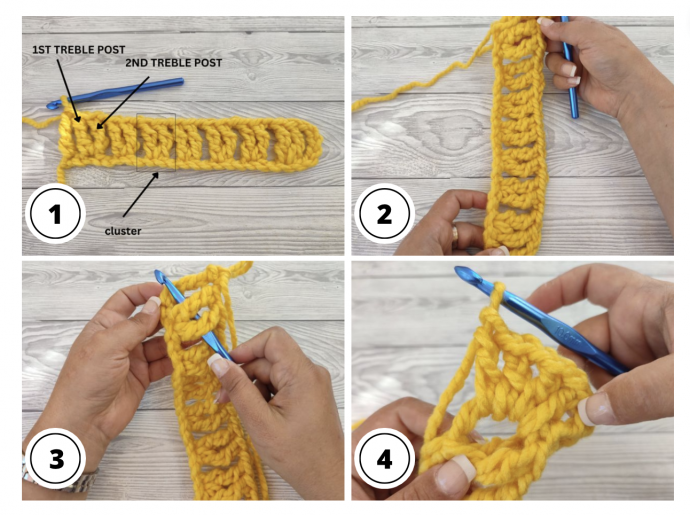
NOTE: The Double Crochet Cluster
The leaf is crocheted around the 2 treble crochet posts in the cluster. You will always crochet the leaf in the cluster, never around 2 random treble posts.
Step 1: First Half Of The Leaf
Place your work with the right side up, vertically with the end towards you and the hook away from you.
(Dc, ch, dc, ch, dc, ch, dc) around the first tr post of the cluster.
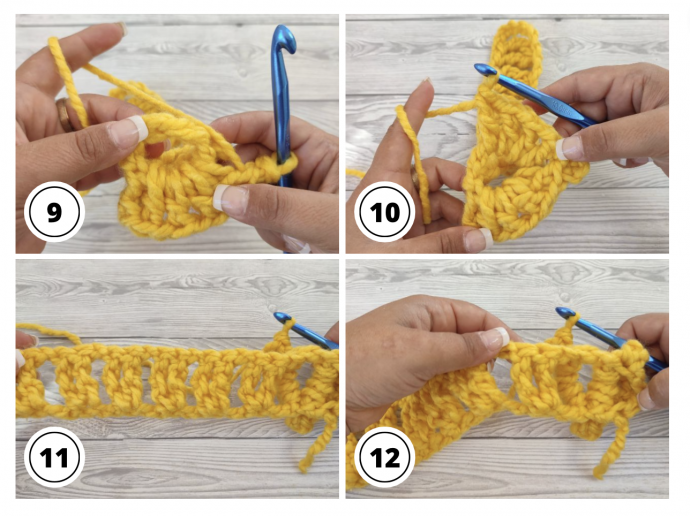
Step 2: The Pointy Tip (Picot Stitch)
Once the first half of the leaf is crocheted, rotate your work 90 degrees to the right until it is horizontally placed in front of you with the top of the work facing you.
Ch3
Sl st in the base stitch (NOT the base chain) by inserting the hook through both loops at the base.
Step 3: The Second Half Of The Leaf
After you make the pointy tip, rotate again 90 degrees to the right until the work is vertically placed in front of you, with the end of the row away from you.
(Dc, ch, dc, ch, dc, ch, dc) around the second tr post in the cluster
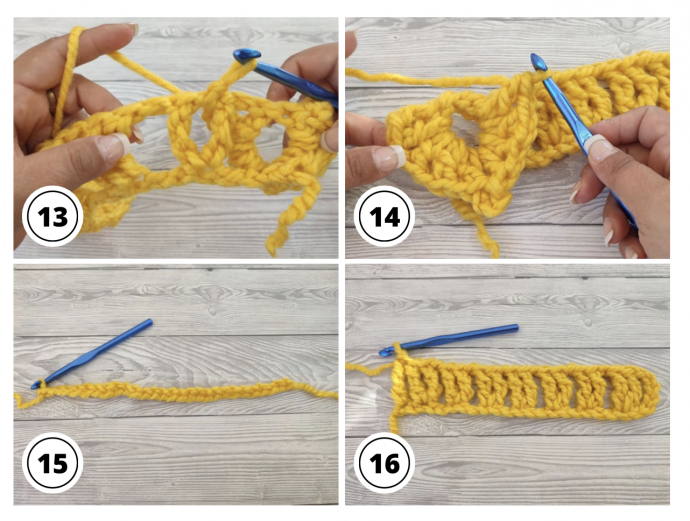
Step 4: Attaching The Leaf To The Lattice
We will go one extra step and attach the end of the leaf to the latticework behind it.
Turn your work around again, this time with the wrong side facing you and the top of the work pointing up.
Sl st in between the 2 double crochet stitches of the next cluster.
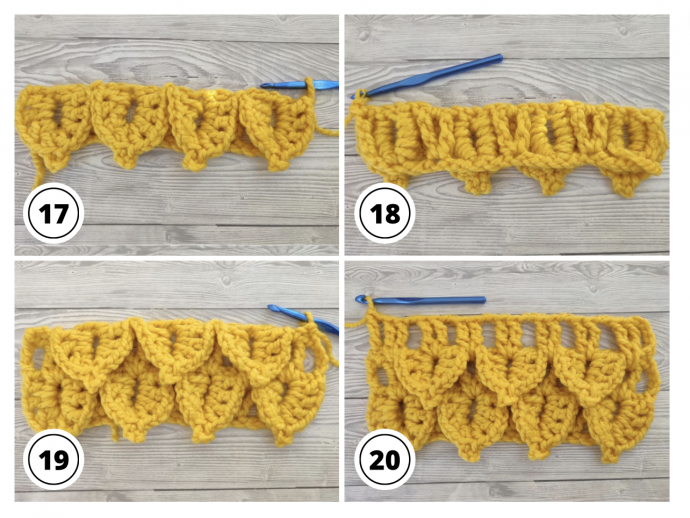
Your leaf is complete.
Pattern Instructions
Ch1 at the beginning of each row does not count as a stitch
Stitches contained within ** are the repeat section for that row
ch5 at the beginning of the row counts as 1tr plus 1ch
TIP 1: This pattern is crocheted on the right side only, meaning that we crochet the lattice rows from right to left, then we go back, from left to right, and crochet the leaves around every other treble cluster
TIP 2: The leaves are offset from one row to another
Starting Chain: This pattern requires you to chain multiples of 6ch plus 3. My starting chain is 27ch.
Row 1: Lattice Row
Make 2tr in 7th ch from hook, *ch1, sk2, 2tr in the following ch*, repeat from * until you have 2ch left, sk1, tr in the last ch.
Row 2: Leaf Row
Ch1 (does not count as a st), turn and sc in first st.
Turn back to the right side *in the next cluster, make a leaf (as explained in the tutorial above, including the sl st in the next cluster)*, repeat until you have one cluster and 1tr left (the tr is the ch7 you skipped on row 1)
In the last cluster make a leaf, but this time don’t sl st at the end, instead, sc in the 6th ch of ch7 that counts as a tr (count from the bottom up).
Row 3: Lattice Row
Ch5 (counts as 1tr + 1ch).
Make 2tr in-between the 2tr of the following cluster.
*Ch2, 2tr in-between the following cluster*, repeat from * until you have crocheted in the last cluster in the row.
Ch1, tr in the sc stitch below you made at the beginning of row 2.
Row 4: Leaf Row
Ch1 (does not count as a st), turn and sc in first st, ch1, sl st in-between the 2tr of the first cluster.
Turn back to the right side, *in the next cluster, make a leaf (as explained in the tutorial above, including the sl st in the next cluster)*, repeat until you have sl st in the very last cluster.
Ch1, sc in the 4th ch of ch5 that counts as a dc (count from the bottom up)
Row 5: Lattice Row
Ch5 (counts as 1tr + 1ch).
Make 2tr in-between the 2tr of the following cluster.
*Ch2, 2tr in-between the following cluster*, repeat from * until you have crocheted in the last cluster in the row.
Ch1, tr in the sc stitch below you made at the beginning of row 4.
Row 6: Leaf Row
Ch1 (does not count as a st), turn and sc in first st.
Turn back to the right side *in the next cluster, make a leaf (as explained in the tutorial above, including the sl st in the next cluster)*, repeat until you have one cluster and 1tr left (the treble is the chains you made at the beginning of row 5)
In the last cluster make a leaf, but this time don’t sl st at the end, instead, sc in the 4th ch of ch5 that counts as a tr (count from the bottom up)
Repeat rows 3 – 6 until you have the required length